{
    "id": "3d3e6d7b-8a58-4776-b791-099de877aa51",
    "name": "Provision Virtual Networks",
    "slug": "provision-virtual-networks",
    "status": "published",
    "lab_type": "pta",
    "is_sample": false,
    "duration_in_seconds": 1800,
    "metadata": {
        "courses": [
            "26f9ad91-c452-41bd-87ea-284a1e3de3f3",
            "9d8d4179-9915-4895-95e6-178f7ca69436"
        ],
        "pta_sdn": "142",
        "pta_namespace": "my.ine",
        "learning_paths": [],
        "has_published_parent": true
    },
    "session": null,
    "company": "a491bc32-c056-4946-9169-cc053387bada",
    "created": "2022-08-18T21:25:09.453432Z",
    "modified": "2023-10-03T18:58:36.522475Z",
    "is_beta": false,
    "lab_objectives": [],
    "main_learning_area": "d3f82c70-f4e7-428e-afd7-4b1d28988e18",
    "learning_areas": [
        {
            "id": "d3f82c70-f4e7-428e-afd7-4b1d28988e18",
            "name": "Cloud",
            "slug": "cloud"
        }
    ],
    "categories": [],
    "tags": [],
    "difficulty": null,
    "is_web_access": true,
    "is_lab_experience": false,
    "is_featured": false,
    "cve": null,
    "severity": null,
    "year": null,
    "classification": null,
    "is_trackable": false,
    "cpe_credits": null,
    "is_skill_check": false,
    "external_url": "",
    "solution_video": null,
    "explanation_video": null,
    "description": "The goal of this task is to provision three virtual networks using the Azure portal, Azure PowerShell, and the Azure CLI.",
    "description_html": "<p>The goal of this task is to provision three virtual networks using the Azure portal, Azure PowerShell, and the Azure CLI.</p>",
    "tasks": "",
    "tasks_html": "",
    "published_date": "2020-04-07T18:00:00Z",
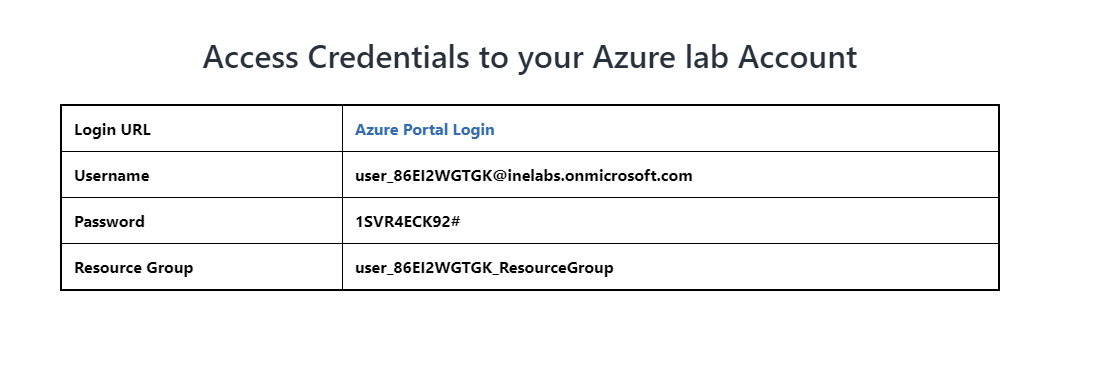
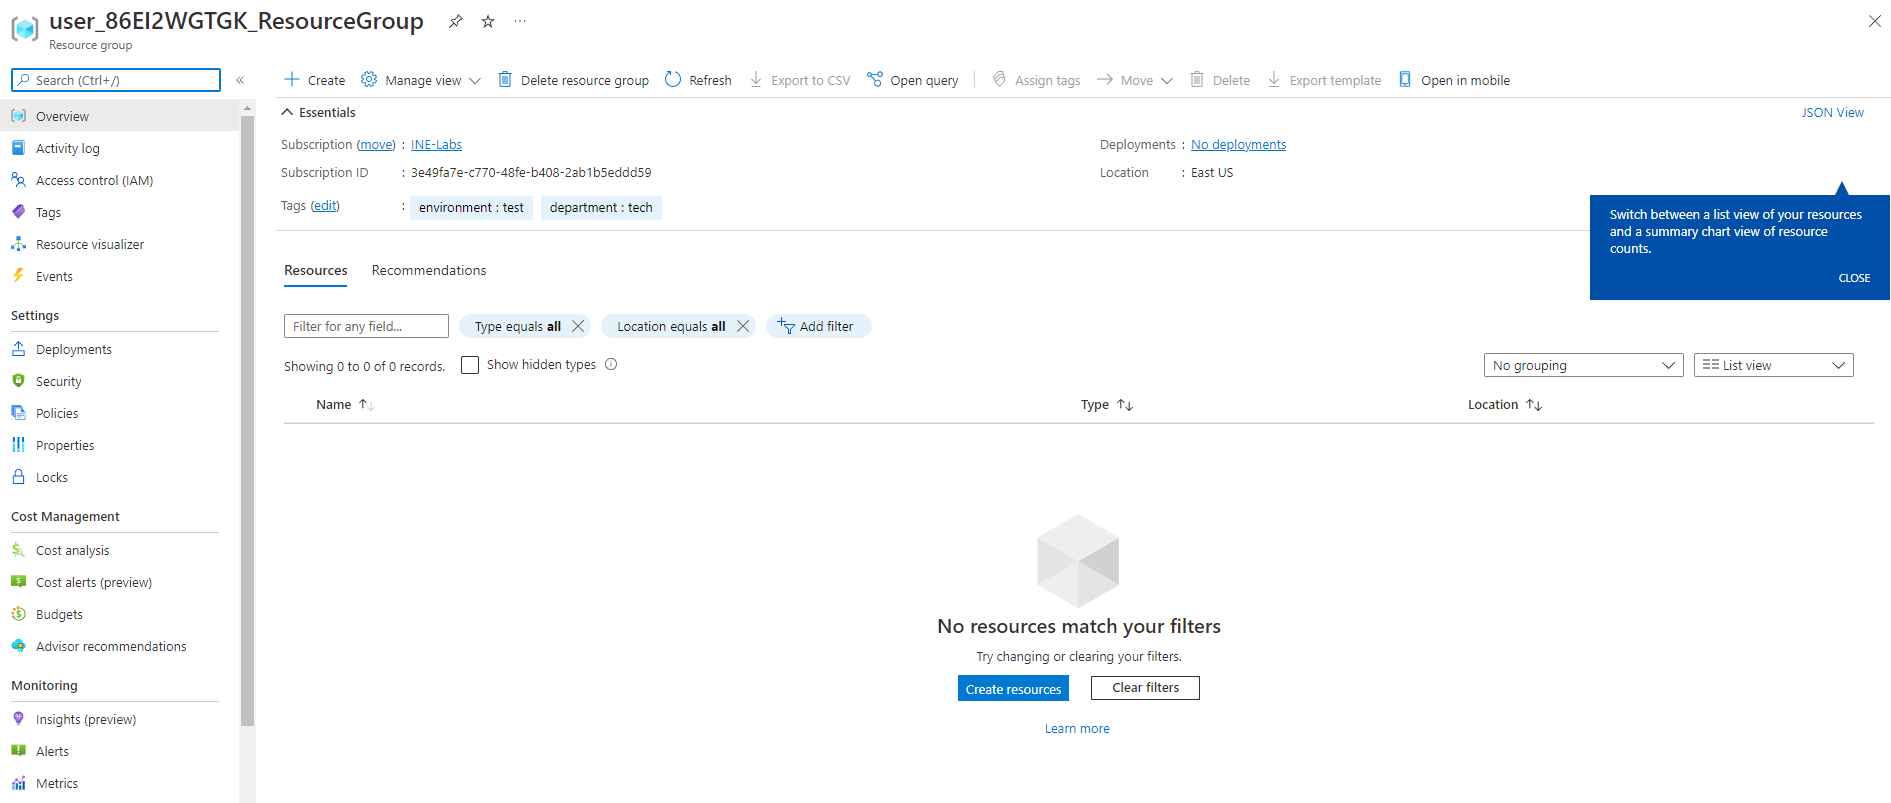
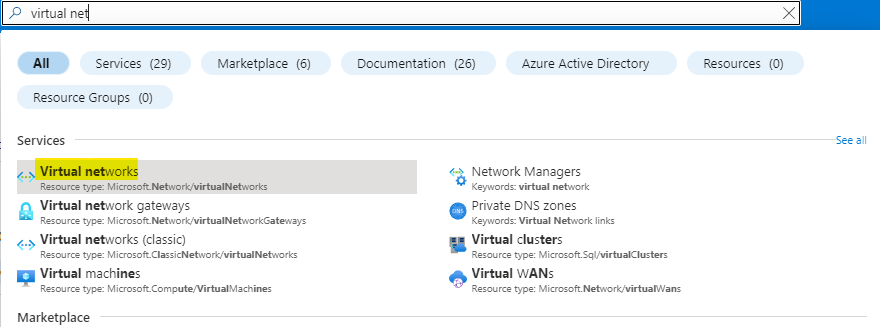
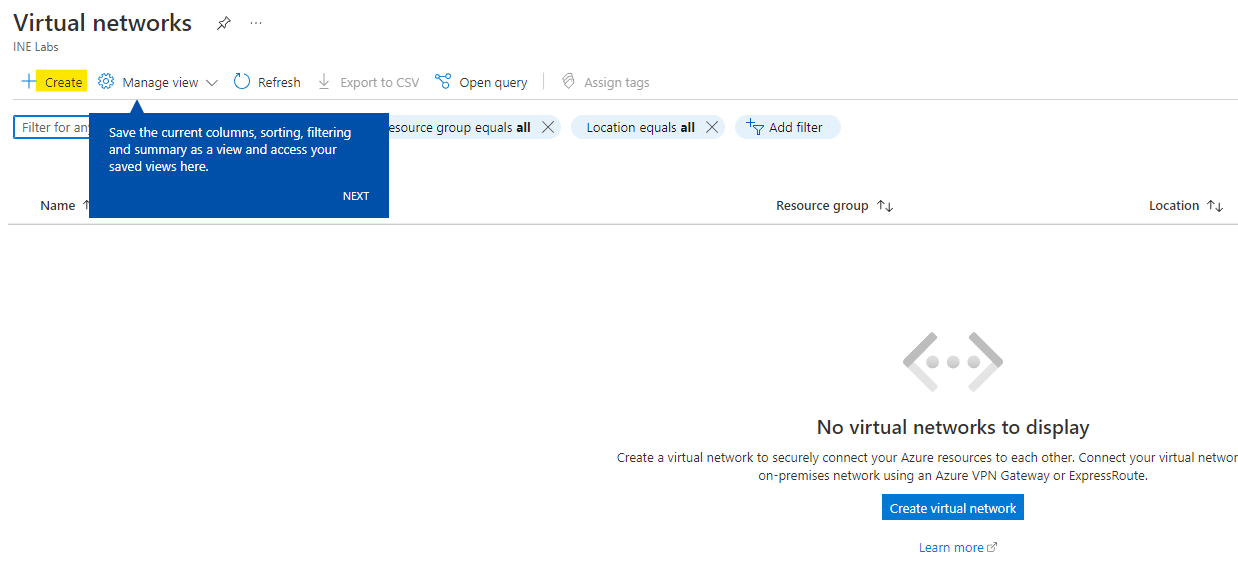
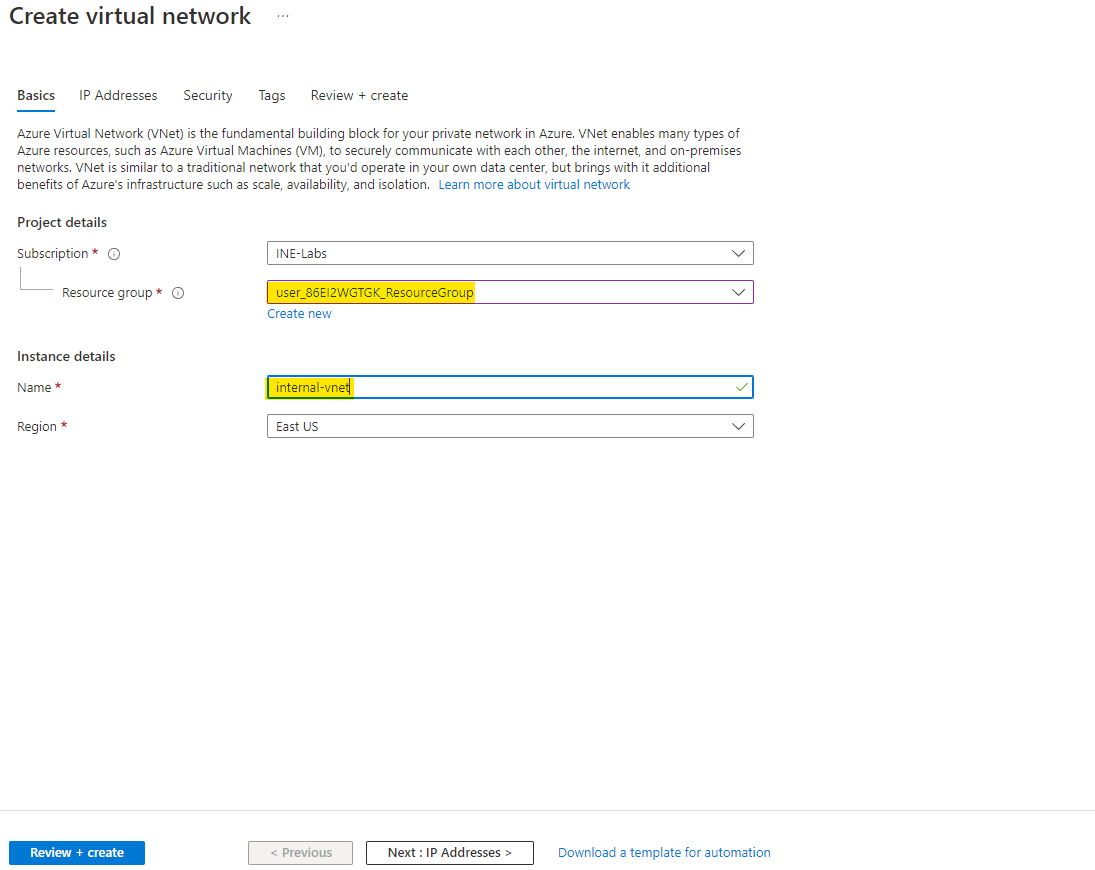
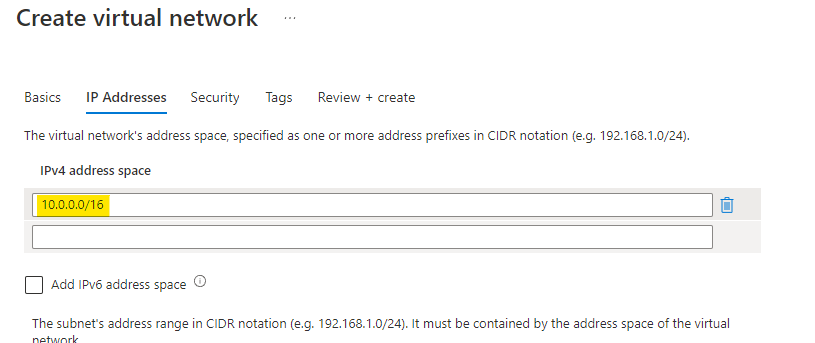
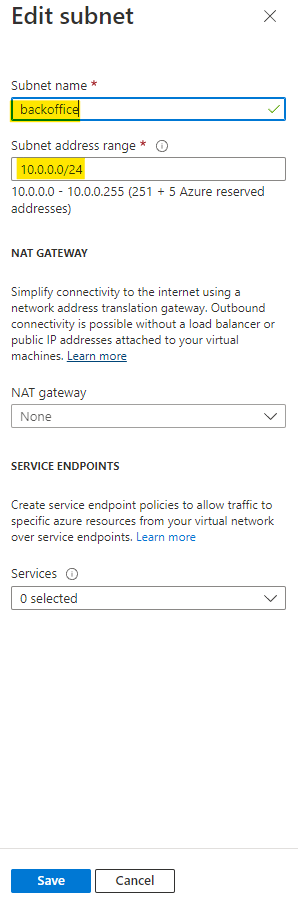
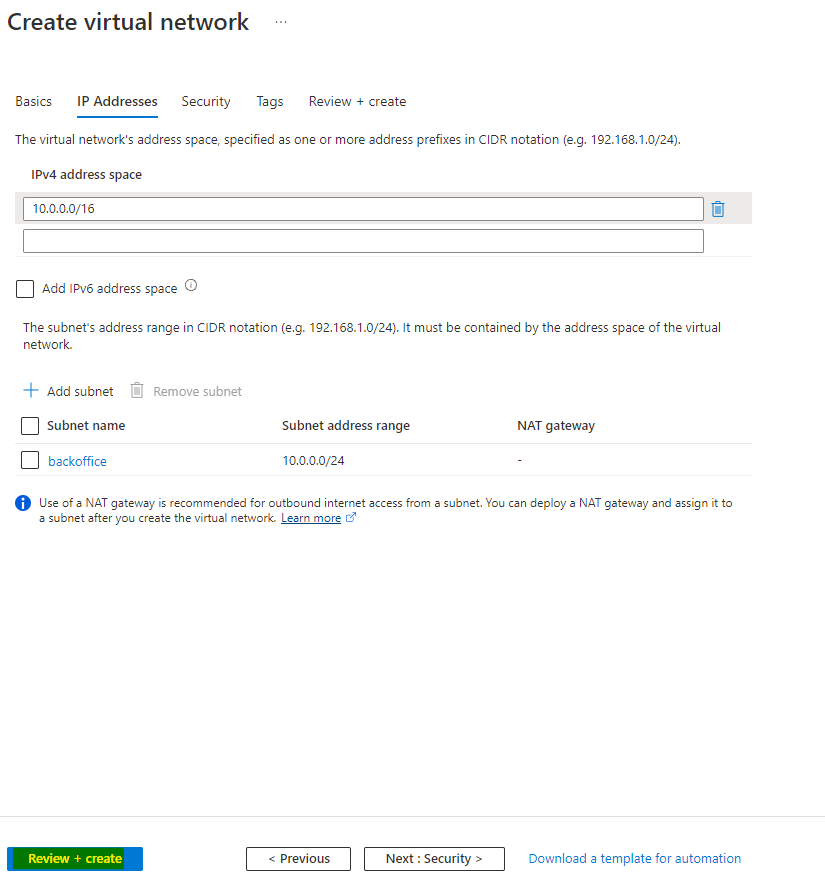
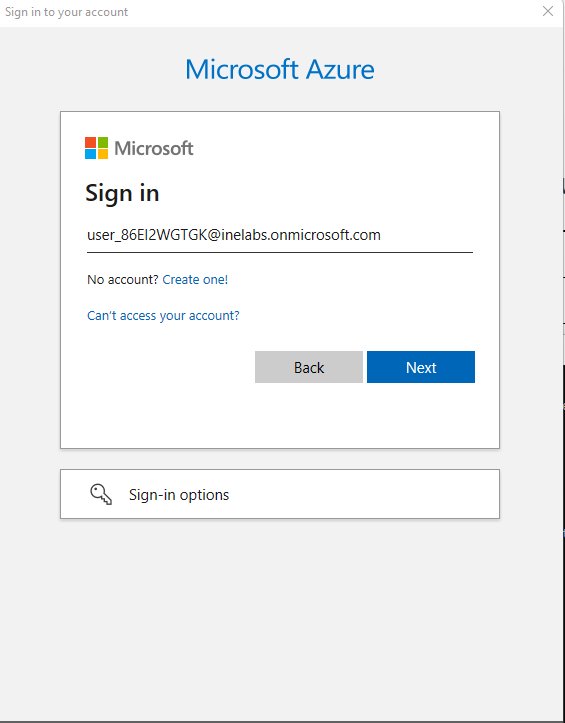
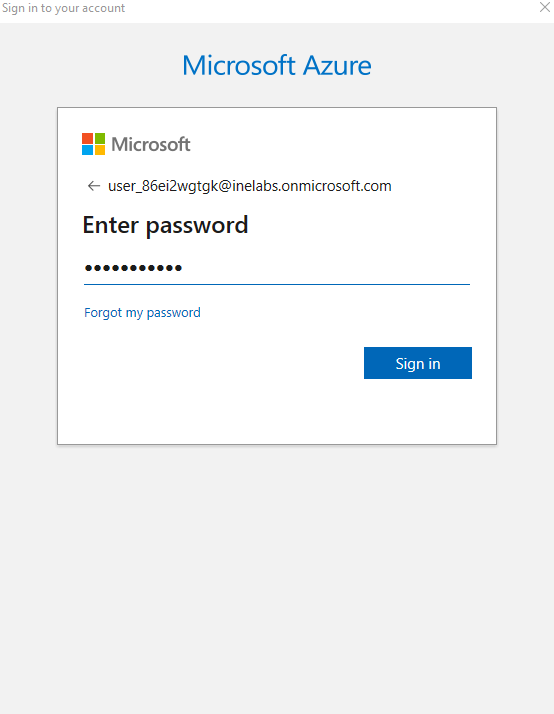
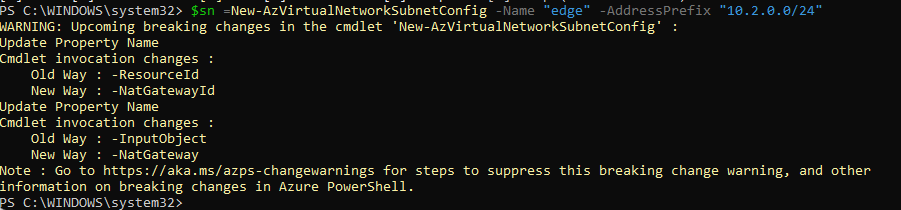
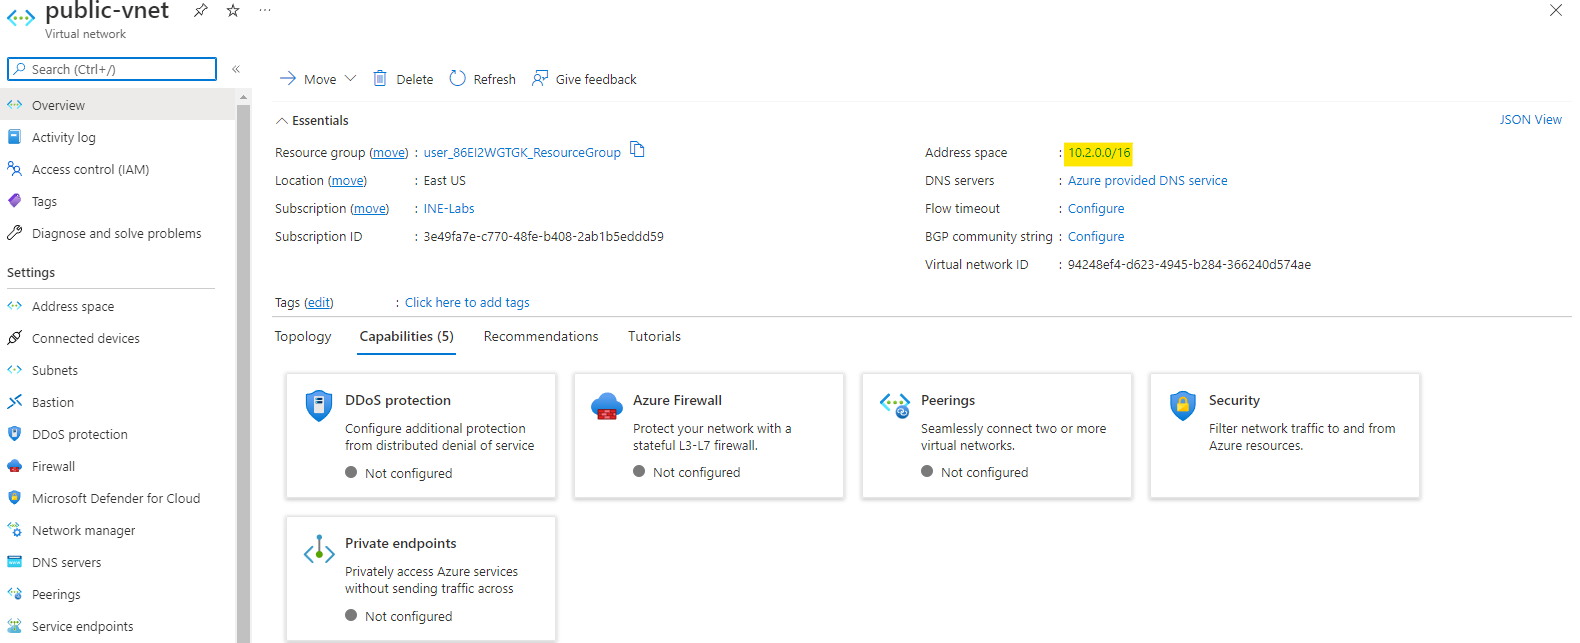
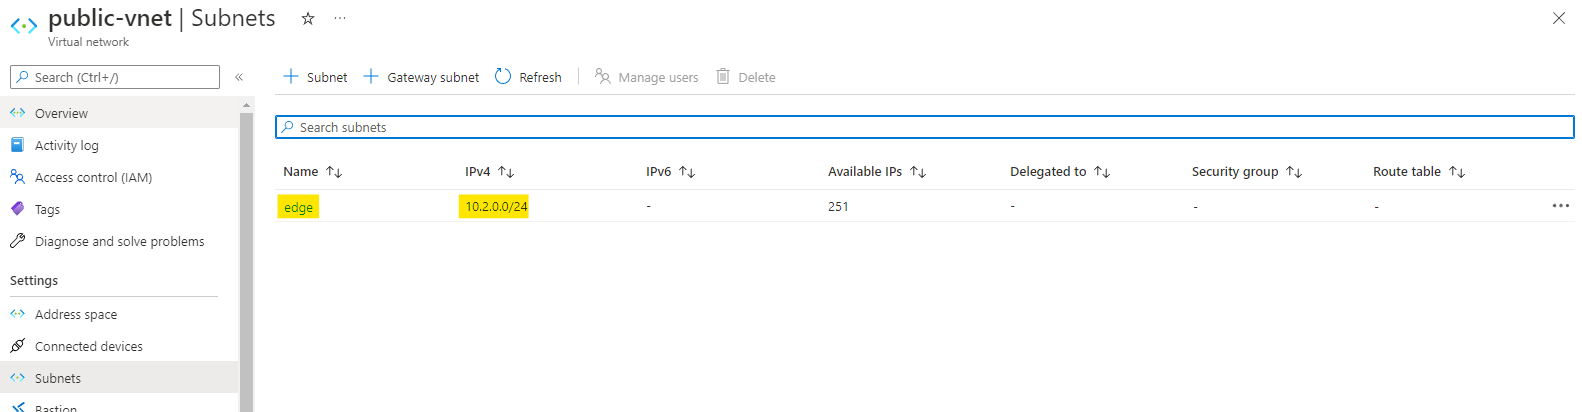
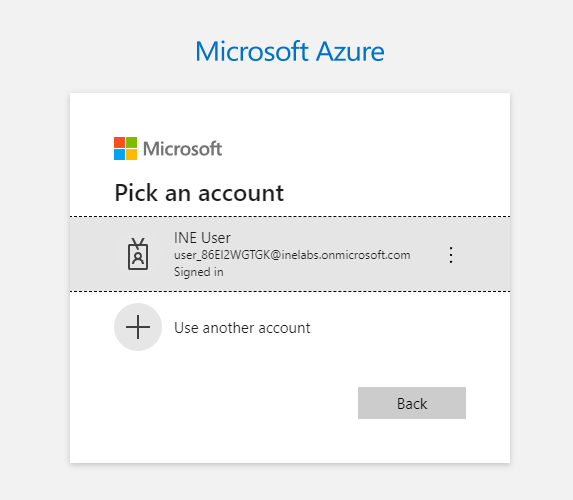
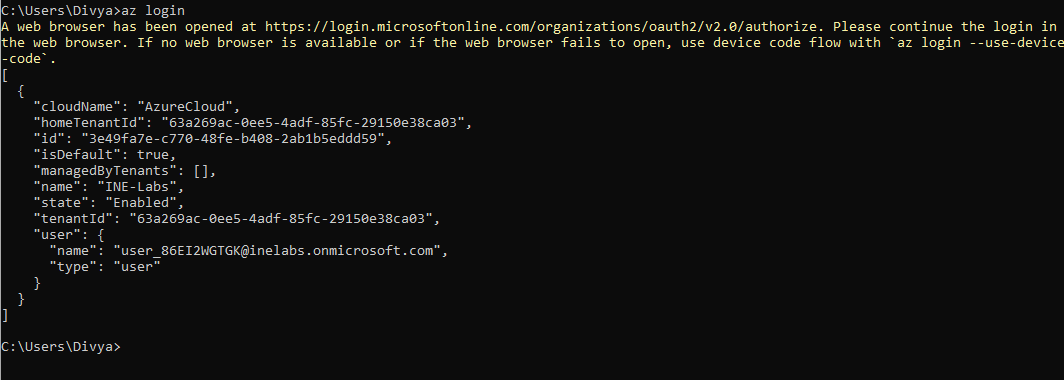
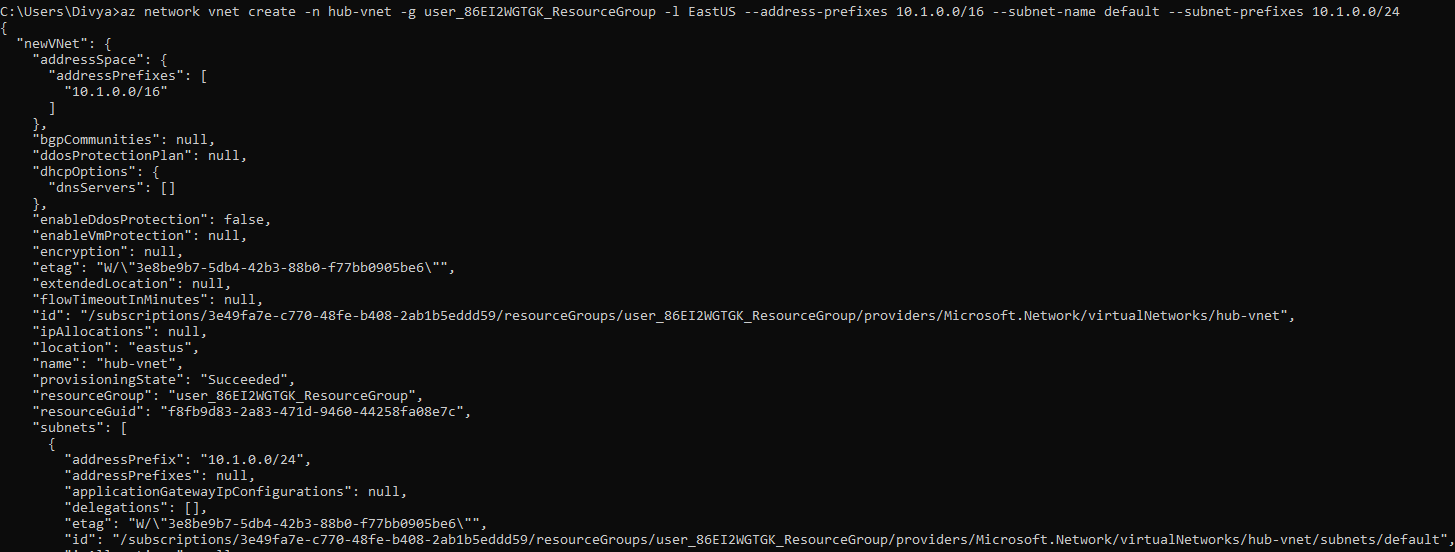
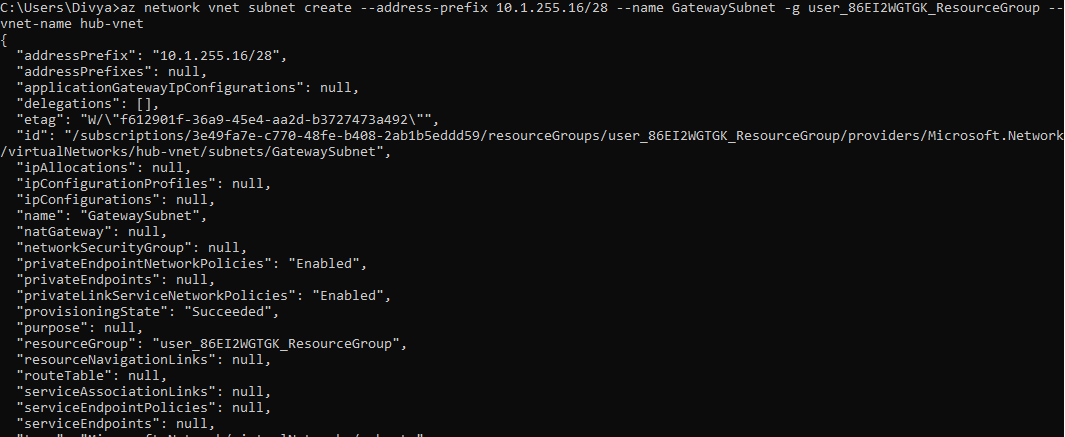
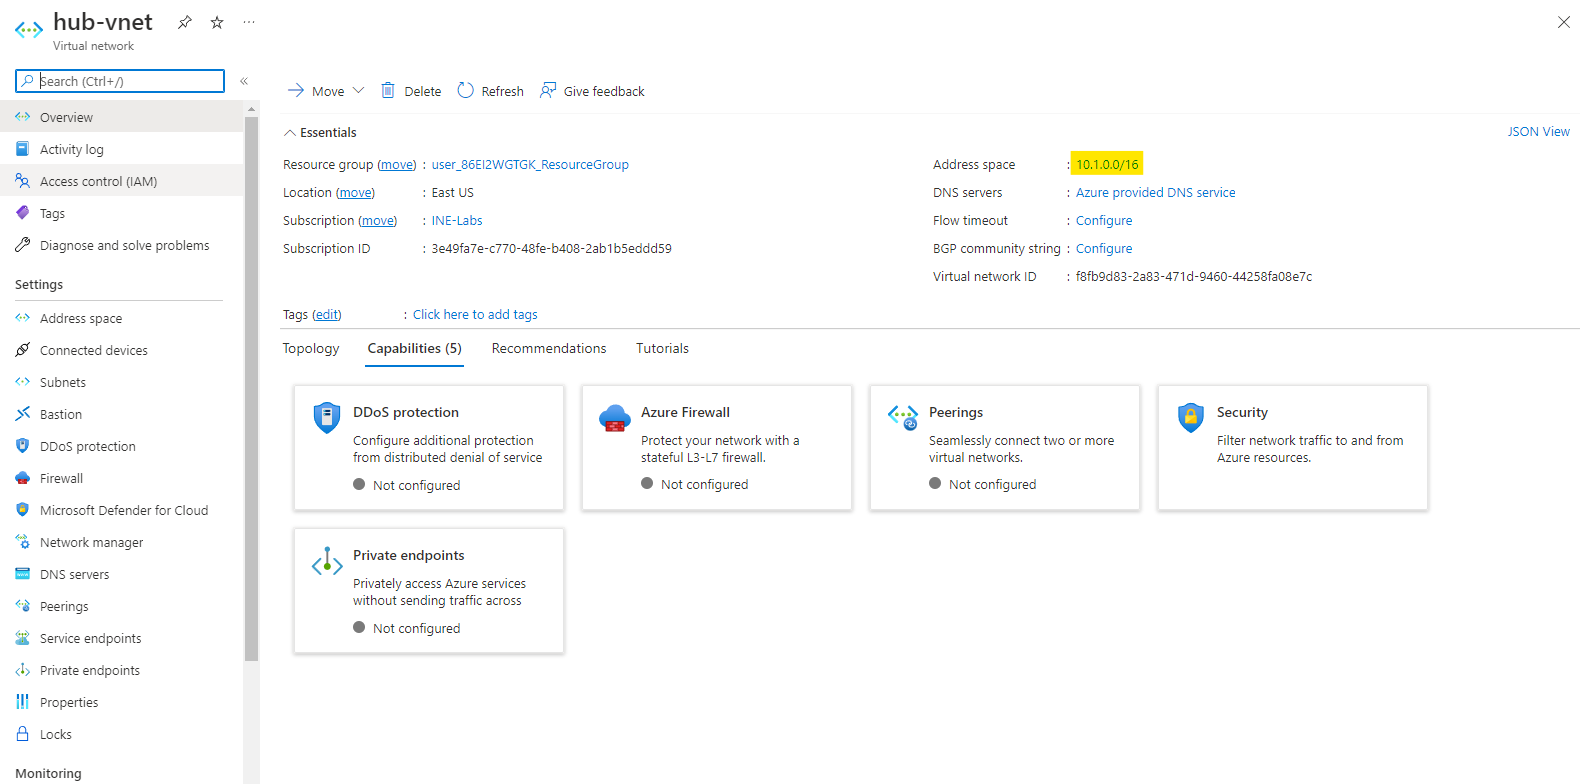
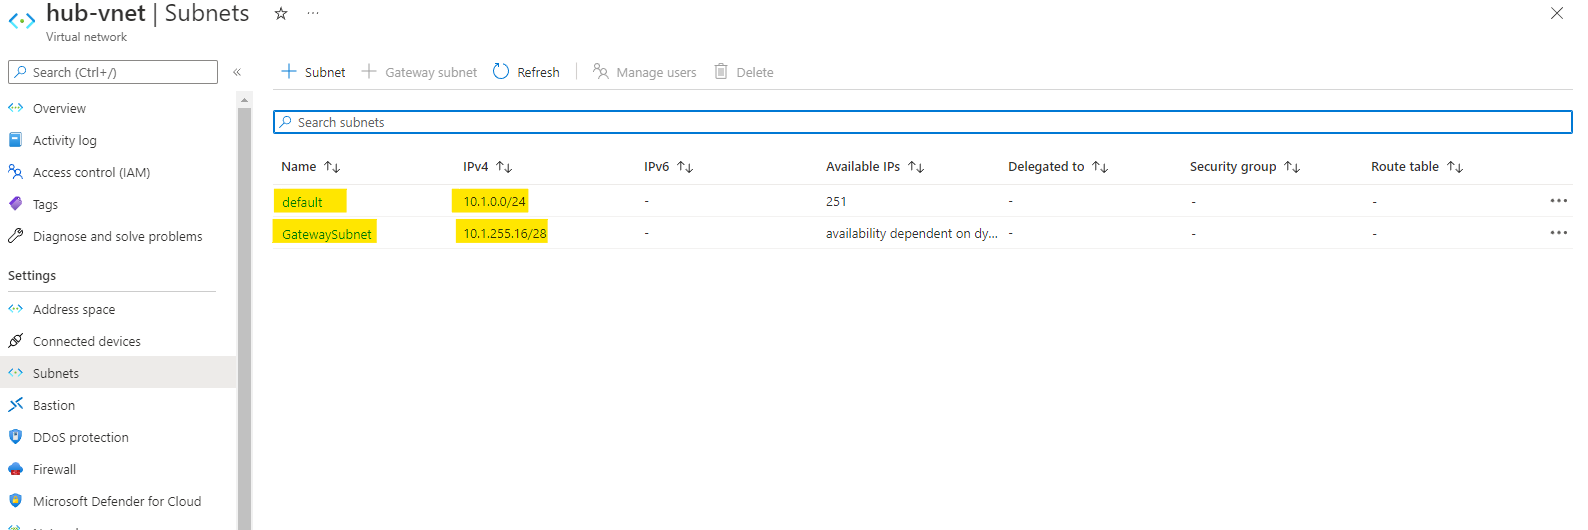
    "solutions": "# Provision a virtual network from the Azure portal\n\nFirst of all login to your azure portal with the generated credentials. You have to accept the terms and click continue to generate the credentials.\n\n![](https://assets.ine.com/content/labs/azure-course-labs/provision-virtual-networks/1.png)\n\n**Note:** Your credentials will be different from the one shown in the figure.\n\nAfter logging in to portal using the credentials. You will see a empty resource group where you can create some resources.\n\n![](https://assets.ine.com/content/labs/azure-course-labs/provision-virtual-networks/2.png)\n\nSearch for Virtual networks and click on **Virtual networks** as highlighted below.\n\n![](https://assets.ine.com/content/labs/azure-course-labs/provision-virtual-networks/3.png)\n\nHere you see there are no virtual networks. Click on **Create**\n\n![](https://assets.ine.com/content/labs/azure-course-labs/provision-virtual-networks/4.png)\n\nUse the resource group which is assigned to you and give it name as **internal-vnet** \n\nAfter that click on *Next*\n\n![](https://assets.ine.com/content/labs/azure-course-labs/provision-virtual-networks/5.png)\n\nHere use the address space as highlighted below which is **10.0.0.0/16**\n\n![](https://assets.ine.com/content/labs/azure-course-labs/provision-virtual-networks/6.png)\n\nClick on the default subnet and you can edit the subnet.\n\n* Give it name as **backoffice**\n* Specify the address range as **10.0.0.0/24**\n\n![](https://assets.ine.com/content/labs/azure-course-labs/provision-virtual-networks/7.png)\n\nNow you can see the Address space and Subnet configured.\n\nClick on **Review+create**\n\n![](https://assets.ine.com/content/labs/azure-course-labs/provision-virtual-networks/8.png)\n\nAzure will now validate the configuration done by you.\n\nAfter few seconds you can see that Validation passed and now you can click on create to provision the subnet.\n\n![](https://assets.ine.com/content/labs/azure-course-labs/provision-virtual-networks/9.png)\n\nAfter some time the deployment will be done and You will see something like the below image.\n\nYou can click on **Go to resource**\n\n![](https://assets.ine.com/content/labs/azure-course-labs/provision-virtual-networks/10.png)\n\nHere you can see the address space for our vnet. You can click on subnets to check the subnets also.\n\n![](https://assets.ine.com/content/labs/azure-course-labs/provision-virtual-networks/11.png)\n\nYou will see the subnet is also configured correctly.\n\n![](https://assets.ine.com/content/labs/azure-course-labs/provision-virtual-networks/11a.png)\n\n# Provision a virtual network using Azure PowerShell\n\nFor this start your powershell with admin permissions.\n\nRun a command \n```\nConnect-AzAccount\n```\n\nA login window will now open to you.\n\n![](https://assets.ine.com/content/labs/azure-course-labs/provision-virtual-networks/12.png)\n\nUse the given email id and password to login.\n\n![](https://assets.ine.com/content/labs/azure-course-labs/provision-virtual-networks/13.png)\n\nAfter logging in you will something like the below image.\n\n![](https://assets.ine.com/content/labs/azure-course-labs/provision-virtual-networks/14.png)\n\nNow execute the below command in your powershell.\n\n```\n$sn =New-AzVirtualNetworkSubnetConfig -Name \"edge\" -AddressPrefix \"10.2.0.0/24\"\n```\n\nThis will create a subnet config which you can use while creating the vnet.\n\n* Name for subnet is **edge**\n* Address prefix this subnet going to use is **10.2.0.0/24**\n\n![](https://assets.ine.com/content/labs/azure-course-labs/provision-virtual-networks/15.png)\n\nAfter creating a subnet, create a vnet with the below command.\n\n```\n$vnet = New-AzVirtualNetwork -name \"public-vnet\" -ResourceGroupName user_86EI2WGTGK_ResourceGroup -Location EastUS -AddressPrefix \"10.2.0.0/16\" -Subnet $sn\n```\n\n* Here we are creating a vnet named as **public-vnet**\n* We are using the given resource group(You should use the rg which is assigned to you)\n* Setting up the location for our vnet as **EastUS**\n* We are using the address space for our vnet as **10.2.0.0/16**\n* At last we are using the subnet config we created just now\n\n![](https://assets.ine.com/content/labs/azure-course-labs/provision-virtual-networks/16.png)\n\nAfter the command is done executing you can go to azure portal and check for the vnet just created now.\n\nYou will see that the **public-vnet** is created. It is having the address space we specified earlier.\n\n![](https://assets.ine.com/content/labs/azure-course-labs/provision-virtual-networks/17.png)\n\nYou can also verify the subnet configured to it is the right one.\n\n![](https://assets.ine.com/content/labs/azure-course-labs/provision-virtual-networks/18.png)\n\n\n# Provision a virtual network using the Azure CLI\n\nFor this go to cmd or terminal and execute the below command to login to your azure account.\n\n```\naz login\n```\n\nA new tab will open up in your browser to login to your azure account.\n\n![](https://assets.ine.com/content/labs/azure-course-labs/provision-virtual-networks/19.png)\n\nAfter logging in you can see the output as the image below.\n\n![](https://assets.ine.com/content/labs/azure-course-labs/provision-virtual-networks/20.png)\n\nNow use the below command to create a vnet.\n\n```\naz network vnet create -n hub-vnet -g user_86EI2WGTGK_ResourceGroup -l EastUS --address-prefixes 10.1.0.0/16 --subnet-name default --subnet-prefixes 10.1.0.0/24\n```\n* Here we have specified the name for vnet as **hub-vnet** \n* We have used the assigned resource group(You will use the rg which is assigned to you)\n* Location for vnet is specified as **EastUS**\n* Address space for vnet is specified as **10.1.0.0/16**\n* We are creating a subnet named as **default**\n* Address prefix for the subnet is **10.1.0.0/24**\n\nYou will see the output for the command as the image below\n\n![](https://assets.ine.com/content/labs/azure-course-labs/provision-virtual-networks/21.png)\n\nWe have to assign one more subnet to this vnet.\n\nFor that execute the below command\n\n```\naz network vnet subnet create --address-prefix 10.1.255.16/28 --name GatewaySubnet -g user_86EI2WGTGK_ResourceGroup --vnet-name hub-vnet\n```\n\nWe are creating a subnet with below config\n\n* Name for subnet is **GatewaySubnet**\n* Address prefix for the subnet is **10.1.255.16/28**\n* We have specified the resource group assigned to us, you should use the one assigned to you.\n* Now we specify the name of vnet where this subnet has to be assigned.\n\nYou will see the output ofthe command as below image\n\n![](https://assets.ine.com/content/labs/azure-course-labs/provision-virtual-networks/22.png)\n\nNow go to azure portal and you can see the vnet is created.\n\nYou can check that it has the address space specified by us.\n\n![](https://assets.ine.com/content/labs/azure-course-labs/provision-virtual-networks/23.png)\n\nWe can also verify that it has two subnets, just like we specified.\n\n![](https://assets.ine.com/content/labs/azure-course-labs/provision-virtual-networks/24.png)\n\nNow all the 3 vnets are created.\n\nYou can see all the 3 virtual networks.\n\n![](https://assets.ine.com/content/labs/azure-course-labs/provision-virtual-networks/25.png)\n\nOur lab is now complete.",
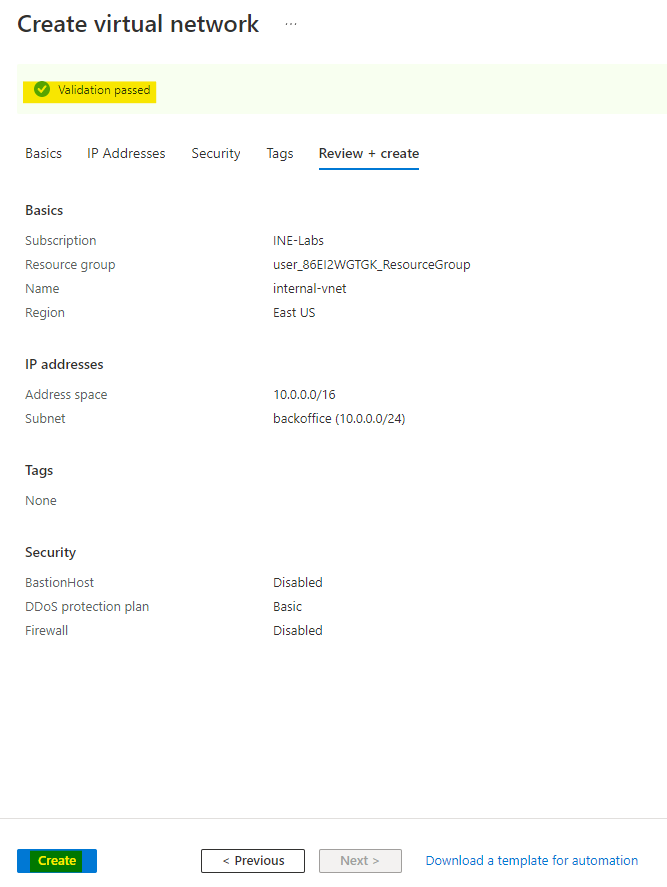
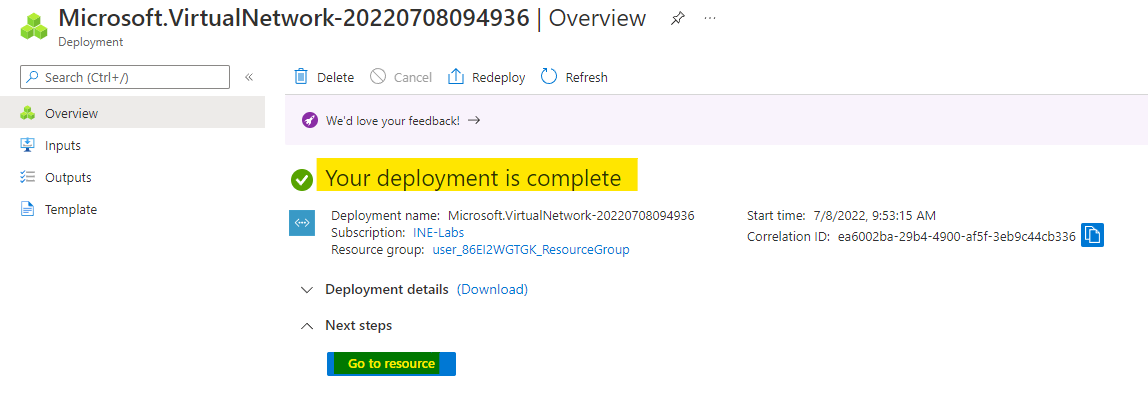
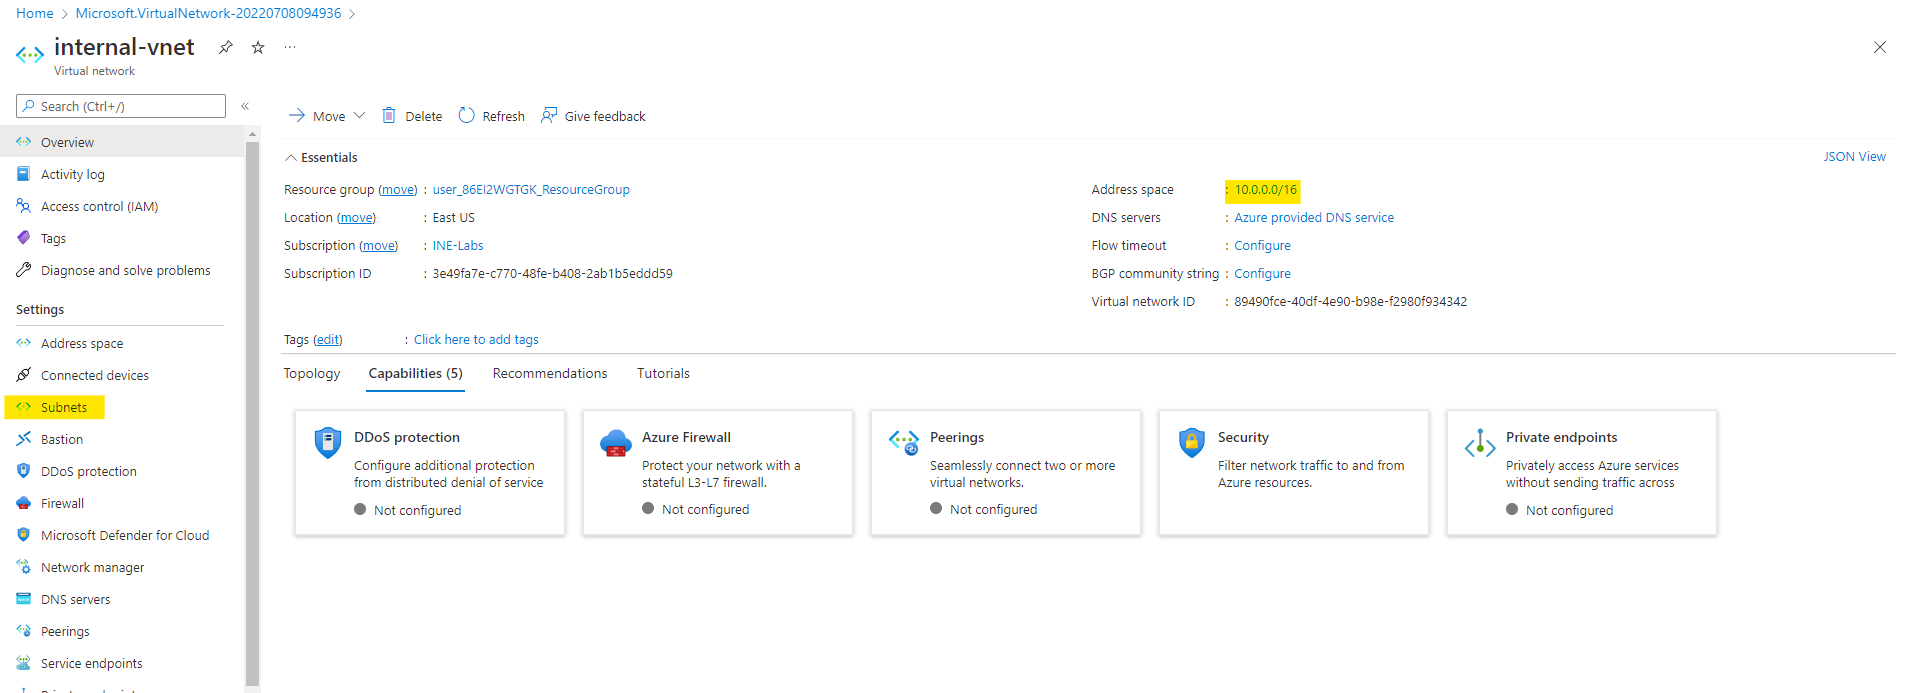
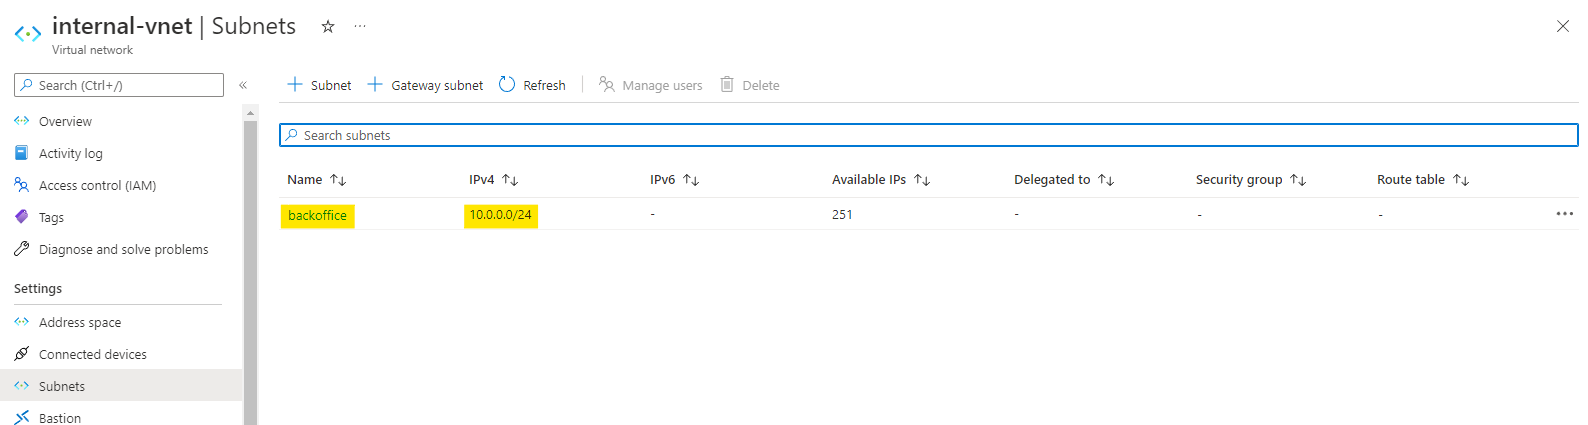



    "solutions_html": "<h1>Provision a virtual network from the Azure portal</h1>\n<p>First of all login to your azure portal with the generated credentials. You have to accept the terms and click continue to generate the credentials.</p>\n<p><img alt=\"\" src=\"https://assets.ine.com/content/labs/azure-course-labs/provision-virtual-networks/1.png\" /></p>\n<p><strong>Note:</strong> Your credentials will be different from the one shown in the figure.</p>\n<p>After logging in to portal using the credentials. You will see a empty resource group where you can create some resources.</p>\n<p><img alt=\"\" src=\"https://assets.ine.com/content/labs/azure-course-labs/provision-virtual-networks/2.png\" /></p>\n<p>Search for Virtual networks and click on <strong>Virtual networks</strong> as highlighted below.</p>\n<p><img alt=\"\" src=\"https://assets.ine.com/content/labs/azure-course-labs/provision-virtual-networks/3.png\" /></p>\n<p>Here you see there are no virtual networks. Click on <strong>Create</strong></p>\n<p><img alt=\"\" src=\"https://assets.ine.com/content/labs/azure-course-labs/provision-virtual-networks/4.png\" /></p>\n<p>Use the resource group which is assigned to you and give it name as <strong>internal-vnet</strong> </p>\n<p>After that click on <em>Next</em></p>\n<p><img alt=\"\" src=\"https://assets.ine.com/content/labs/azure-course-labs/provision-virtual-networks/5.png\" /></p>\n<p>Here use the address space as highlighted below which is <strong>10.0.0.0/16</strong></p>\n<p><img alt=\"\" src=\"https://assets.ine.com/content/labs/azure-course-labs/provision-virtual-networks/6.png\" /></p>\n<p>Click on the default subnet and you can edit the subnet.</p>\n<ul>\n<li>Give it name as <strong>backoffice</strong></li>\n<li>Specify the address range as <strong>10.0.0.0/24</strong></li>\n</ul>\n<p><img alt=\"\" src=\"https://assets.ine.com/content/labs/azure-course-labs/provision-virtual-networks/7.png\" /></p>\n<p>Now you can see the Address space and Subnet configured.</p>\n<p>Click on <strong>Review+create</strong></p>\n<p><img alt=\"\" src=\"https://assets.ine.com/content/labs/azure-course-labs/provision-virtual-networks/8.png\" /></p>\n<p>Azure will now validate the configuration done by you.</p>\n<p>After few seconds you can see that Validation passed and now you can click on create to provision the subnet.</p>\n<p><img alt=\"\" src=\"https://assets.ine.com/content/labs/azure-course-labs/provision-virtual-networks/9.png\" /></p>\n<p>After some time the deployment will be done and You will see something like the below image.</p>\n<p>You can click on <strong>Go to resource</strong></p>\n<p><img alt=\"\" src=\"https://assets.ine.com/content/labs/azure-course-labs/provision-virtual-networks/10.png\" /></p>\n<p>Here you can see the address space for our vnet. You can click on subnets to check the subnets also.</p>\n<p><img alt=\"\" src=\"https://assets.ine.com/content/labs/azure-course-labs/provision-virtual-networks/11.png\" /></p>\n<p>You will see the subnet is also configured correctly.</p>\n<p><img alt=\"\" src=\"https://assets.ine.com/content/labs/azure-course-labs/provision-virtual-networks/11a.png\" /></p>\n<h1>Provision a virtual network using Azure PowerShell</h1>\n<p>For this start your powershell with admin permissions.</p>\n<p>Run a command \n<pre class=\"codehilite\"><code>Connect-AzAccount</code></pre></p>\n<p>A login window will now open to you.</p>\n<p><img alt=\"\" src=\"https://assets.ine.com/content/labs/azure-course-labs/provision-virtual-networks/12.png\" /></p>\n<p>Use the given email id and password to login.</p>\n<p><img alt=\"\" src=\"https://assets.ine.com/content/labs/azure-course-labs/provision-virtual-networks/13.png\" /></p>\n<p>After logging in you will something like the below image.</p>\n<p><img alt=\"\" src=\"https://assets.ine.com/content/labs/azure-course-labs/provision-virtual-networks/14.png\" /></p>\n<p>Now execute the below command in your powershell.</p>\n<pre class=\"codehilite\"><code>$sn =New-AzVirtualNetworkSubnetConfig -Name \"edge\" -AddressPrefix \"10.2.0.0/24\"</code></pre>\n\n<p>This will create a subnet config which you can use while creating the vnet.</p>\n<ul>\n<li>Name for subnet is <strong>edge</strong></li>\n<li>Address prefix this subnet going to use is <strong>10.2.0.0/24</strong></li>\n</ul>\n<p><img alt=\"\" src=\"https://assets.ine.com/content/labs/azure-course-labs/provision-virtual-networks/15.png\" /></p>\n<p>After creating a subnet, create a vnet with the below command.</p>\n<pre class=\"codehilite\"><code>$vnet = New-AzVirtualNetwork -name \"public-vnet\" -ResourceGroupName user_86EI2WGTGK_ResourceGroup -Location EastUS -AddressPrefix \"10.2.0.0/16\" -Subnet $sn</code></pre>\n\n<ul>\n<li>Here we are creating a vnet named as <strong>public-vnet</strong></li>\n<li>We are using the given resource group(You should use the rg which is assigned to you)</li>\n<li>Setting up the location for our vnet as <strong>EastUS</strong></li>\n<li>We are using the address space for our vnet as <strong>10.2.0.0/16</strong></li>\n<li>At last we are using the subnet config we created just now</li>\n</ul>\n<p><img alt=\"\" src=\"https://assets.ine.com/content/labs/azure-course-labs/provision-virtual-networks/16.png\" /></p>\n<p>After the command is done executing you can go to azure portal and check for the vnet just created now.</p>\n<p>You will see that the <strong>public-vnet</strong> is created. It is having the address space we specified earlier.</p>\n<p><img alt=\"\" src=\"https://assets.ine.com/content/labs/azure-course-labs/provision-virtual-networks/17.png\" /></p>\n<p>You can also verify the subnet configured to it is the right one.</p>\n<p><img alt=\"\" src=\"https://assets.ine.com/content/labs/azure-course-labs/provision-virtual-networks/18.png\" /></p>\n<h1>Provision a virtual network using the Azure CLI</h1>\n<p>For this go to cmd or terminal and execute the below command to login to your azure account.</p>\n<pre class=\"codehilite\"><code>az login</code></pre>\n\n<p>A new tab will open up in your browser to login to your azure account.</p>\n<p><img alt=\"\" src=\"https://assets.ine.com/content/labs/azure-course-labs/provision-virtual-networks/19.png\" /></p>\n<p>After logging in you can see the output as the image below.</p>\n<p><img alt=\"\" src=\"https://assets.ine.com/content/labs/azure-course-labs/provision-virtual-networks/20.png\" /></p>\n<p>Now use the below command to create a vnet.</p>\n<p><pre class=\"codehilite\"><code>az network vnet create -n hub-vnet -g user_86EI2WGTGK_ResourceGroup -l EastUS --address-prefixes 10.1.0.0/16 --subnet-name default --subnet-prefixes 10.1.0.0/24</code></pre>\n* Here we have specified the name for vnet as <strong>hub-vnet</strong> \n* We have used the assigned resource group(You will use the rg which is assigned to you)\n* Location for vnet is specified as <strong>EastUS</strong>\n* Address space for vnet is specified as <strong>10.1.0.0/16</strong>\n* We are creating a subnet named as <strong>default</strong>\n* Address prefix for the subnet is <strong>10.1.0.0/24</strong></p>\n<p>You will see the output for the command as the image below</p>\n<p><img alt=\"\" src=\"https://assets.ine.com/content/labs/azure-course-labs/provision-virtual-networks/21.png\" /></p>\n<p>We have to assign one more subnet to this vnet.</p>\n<p>For that execute the below command</p>\n<pre class=\"codehilite\"><code>az network vnet subnet create --address-prefix 10.1.255.16/28 --name GatewaySubnet -g user_86EI2WGTGK_ResourceGroup --vnet-name hub-vnet</code></pre>\n\n<p>We are creating a subnet with below config</p>\n<ul>\n<li>Name for subnet is <strong>GatewaySubnet</strong></li>\n<li>Address prefix for the subnet is <strong>10.1.255.16/28</strong></li>\n<li>We have specified the resource group assigned to us, you should use the one assigned to you.</li>\n<li>Now we specify the name of vnet where this subnet has to be assigned.</li>\n</ul>\n<p>You will see the output ofthe command as below image</p>\n<p><img alt=\"\" src=\"https://assets.ine.com/content/labs/azure-course-labs/provision-virtual-networks/22.png\" /></p>\n<p>Now go to azure portal and you can see the vnet is created.</p>\n<p>You can check that it has the address space specified by us.</p>\n<p><img alt=\"\" src=\"https://assets.ine.com/content/labs/azure-course-labs/provision-virtual-networks/23.png\" /></p>\n<p>We can also verify that it has two subnets, just like we specified.</p>\n<p><img alt=\"\" src=\"https://assets.ine.com/content/labs/azure-course-labs/provision-virtual-networks/24.png\" /></p>\n<p>Now all the 3 vnets are created.</p>\n<p>You can see all the 3 virtual networks.</p>\n<p><img alt=\"\" src=\"https://assets.ine.com/content/labs/azure-course-labs/provision-virtual-networks/25.png\" /></p>\n<p>Our lab is now complete.</p>",
    "flags": [],
    "min_points_to_pass": null,
    "access_type": "web",
    "user_status": "unstarted",
    "user_lab_status": null,
    "user_status_modified": null,
    "user_flags": [],
    "global_running_session": null
}