The goal of this task is to deploy a virtual machine scale set with a sample workload, configure autoscale for the scale set, and verify that autoscale is working as expected. This will include deploying a Linux-based scale set with a simple Web app, setting the scale set to scale based on the length of a queue storage instance, and triggering a scale event.
Task 1: Provision a virtual machine scale set
For this requirement you will deploy a Linux-based virtual machine scaleset. You will start with an Azure quickstart template and modify it to load a custom script. Follow the steps to complete this requirement:
- Use your credentials and login to the Azure portal

- You will see the precreated stroage resource in your resource group. Click to open it.

- Let's check the a Queue named process exists inside the queue or not.

- Now, come back and click on + Create.

- Search for Template Deployment in search box.


- Now, choose Quickstart Template. And then click on the quickstart template dropbox.


- Choose the vmss-linux-nat and click on Select Template button.


- Remove the vmSku default value Standard_A1.

- Write Standard_D2S_V3 in the default value

- Now in the instance count remove the minimum value 5.

- Write 1 in the minimum value.

- Now, go down to line no.211 there you will see network profile element.

-
Under the newtwork profile element. Add the extension profile element in the line no.241. And then click on the Save button.
"extensionProfile": {
      "extensions": [
          {
          "name": "vmssscript",
          "properties": {
              "publisher": "Microsoft.OSTCExtensions",
              "type": "CustomScriptForLinux",
              "typeHandlerVersion": "1.4",
              "autoUpgradeMinorVersion": true,
              "settings": {
              "fileUris": [
                  "https://inedemoassets.blob.core.windows.net/taskfiles/azure/webserverinstall.sh"
              ],
              "commandToExecute": "sh webserverinstall.sh"
              }
          }
          }
      ]
  }
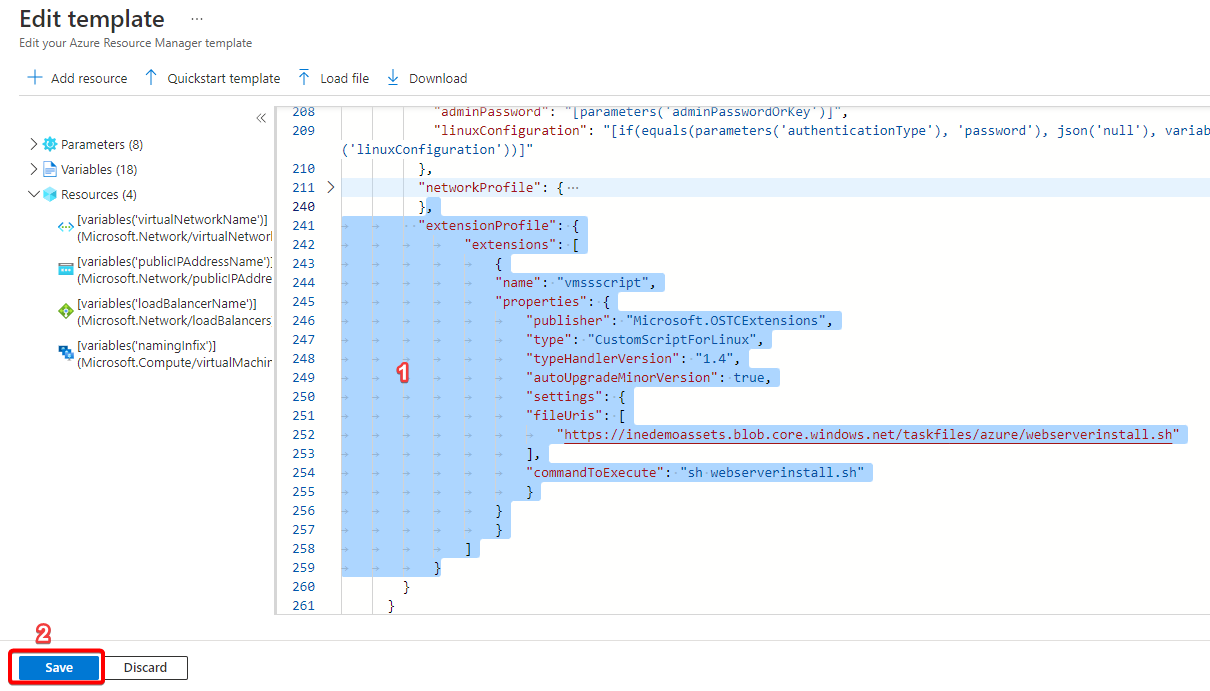
-
Check the VmSku, Vmss Name: task-vmss, Instance Count: 1, Admin Username: student and choose a strong password. Click on Review+Create.

- After successful validation click on Create.

- Click on Go to Resource group if the depolyment is completed.

- Open the Load balance: task-vmsslb.

- Navigate to the Health probes and click on Add.

- Add the following:
- Name: http
- Protocol: TCP
- Port: 80
- Interval: 5
- Click on Add by adding the health probe we can check the status of the backend pool instance. Wait untill it is added.

- Now, navigate to Loading balancing rules and click on Add.

- Add the following:
- Frontend Ip address: LoadBalancerFrontEnd
- Backend pool: task-vmssbepool
- Protocol: TCP
- Port: 80
- Backend port: 80
- Health probe: http
- Remaining leave as default and click on Add button.

- Now we need to test whether the vmss is connected through the Load Balancer or not. Copy the public IP address.

- Open a new browser window and navigate to the public IP address of the load balancer. You should receive the name of the instance that handled the request. As shown in the below image.

Successfully we finsihed our Task 1.
Task 2: Implement autoscale
In this requirement you will configure an autoscale rule to scale out when the process queue in the storage account created during the pre-requisite setup exceeds 2 items. You will scale back in when the queue length drops below 2. Add an autoscale condition with two rules:

- Navigate to the Scaling and click on Custom auto-scale.

- Scroll down, in the Scale mode choose Scale based on a metric. And click on Add rule.

- We need to create the Scale out rule:
- Metric Source: Storage Queue
- Resource: use the precreated storage
- Storage queue: Process

- Scroll down and fill the following:
- Operator: Greater than
- Threshold: 2
- Operation: Increase count by
- instance count: 1
- Click on Add. With the help of this rule our instance count will increase by 1 if the queue has more than 2 items.

- Now you can see the Scale out has been added. Click on Add rule.

- Now, we will create the Scale in rule:
- Metric Source: Storage Queue
- Resource: use the precreated storage
- Storage queue: Process

- Scroll down and fill the following:
- Operator: Less than
- Threshold: 2
- Operation: Decrease count by
- instance count: 1
- Click on Add With the help of this rule our instance count will decrease by 1 if the queue has less than 2 items.

- In the Instance limits maximum insatnce are 2. And click on save to apply the changes.

Successfully we finsihed our Task 2.
Task3: Verify autoscale
- Navigate to the Azure portal view for the process queue in the storage account that you provisioned in the pre-requisite setup.

- Click on + Add message to add an item.

- Add some message text and click on OK.

- Similarly add atleast 3 items. I have added 4 items, you may add more than that.

- Return to the task-vmss blade and you can see it is scaling up from 1 to 2 instances. Note: It may take time of 2-3 minutes.

- Navigate to Scaling and you can see the instance count is 2. Note: It may take time of 2-3 minutes.

- If you navigate back again to Overview then you see 2 instaces. Note: It may take time of 2-3 minutes.

- Open the public Ip address of Load Balancer. You may see the differnt instance name or the 1st instance name.

- Refresh page until you see the different instance.

- If you keep on refreshing the page it moves back and forth between the instances.
Optional:
- After the virtual machine scale set has scaled out, return to the process queue in your storage account and delete all of the messages.

- After clearing it should be empty as shown in the image.

- You can see it is scaling down form 2 to 1 instances.

- Navigate to Scaling and you can see the instance count is 1. Note: It may take time of 2-3 minutes.

- If you navigate back again to Overview then you see 1 instace. Note: It may take time of 2-3 minutes.

- Even if you refresh the page for multiple times you should see only one same instance.

Cleanup
- Delete all the created resources.