Our suspect seems very careful with leaving traces behind, especially when it comes to tracking him down and identifying locations visited. In this lab, we will use the evidence found on his USB, which we found recently in one of the motels he was staying in. We will focus this time on extracting and analyzing EXIF data instead of file headers like we did in previous labs. We will also see how useful EXIF data is when analyzing files and especially photos. Analyzing EXIF data is extremely important especially in our case since we want to track down our suspect. EXIF data analysis is not useful just for tracking, but if you have a child abuse/pornography case or any other case that involves digital photos.
\nIn this task, you are required to do a preliminary analysis of the files we found on the suspect's USB drive [you can find the suspect's files at C:\\DFP\\Labs\\Module3\\Lab4]. We want to discover the file type for each of the files you found. Use exiftool (regardless of platform) to accomplish the task.
\nOur next step in analyzing the evidence will be to extract EXIF data out of the files found and identify mainly each of the properties below:
\nAdd anything else you believe is necessary.
\nOur next step is to try and track down the locations the suspect has visited and try to discover if there is a connection between each of them (CSI stuff). So, in this task, you are required to analyze EXIF data found in evidence photos [located at C:\\DFP\\Labs\\Module3\\Lab4\\pics] and answer the following questions:
\nAdd anything else you believe is necessary for the investigation.
\nWhen the extraction of the EXIF data and their analysis are done, it is now time to add all this information into a single data sheet that will accompany your final investigation report.
",
"published_date": "2020-10-20T15:32:26Z",
"solutions": "# SOLUTIONS\n\n## Task 1: Discover File Types using Exiftool\n\nIn this part of the lab we are only required to extract the file type from the files we have on the suspect's USB [you can find the suspect's files at C:\\\\DFP\\\\Labs\\\\Module3\\\\Lab4]. I will be using Windows but you can use Linux to solve it easily too.\n\nLet's now leverage exiftool's -filetype flag to extract the file type from the suspect's files. Simply open a cmd.exe terminal and execute the below, against each file in the Lab4 folder.\n\n```\n# cd C:\\DFP\\Tools\\Metadata\n# \"exiftool(-k).exe\" -filetype C:\\DFP\\Labs\\Module3\\Lab4\\2D3Fa2a\n```\n\n**Note:** the output has been modified to fit this report without affecting the final understanding required.\n\n2D3Fa2a File Type : PDF\n\nAW3DXW File Type : JPEG\n\nMx\\#234 File Type : PPT\n\nXFaWxVa File Type : PDF\n\nZC2f2d2 File Type : XLSX\n\nAlternatively, on Linux, you could do the following, to speed things up:\n\n```\n# find -type f -print -exec exiftool -filetype {} \\;\n```\n\nThe command above searches for all files within the current working directory and prints the name of the file that was filtered based on the results of the exiftool utility (those results contain the file type). If you noticed, we asked exiftool to specifically print the File Type and not all of the EXIF information. So, as you can see, by now we have two basic ways of identifying a file; one using the Linux \"file\" command and the other using the \"exiftool\" utility.\n\n## Task 2: Analyzing File's EXIF Data\n\nIn this part, we were asked to extract the Tool Version, File Size, File Creation Date, File Type, Producer, Creator and Author, and finally the Product information out of the files we found. For understanding purposes, we will focus on the five different files below:\n\n1. 2D3Fa2a\n2. AW3DXW\n3. Mx\\#234\n4. XFaWxVa\n5. and ZC2f2d2\n\nThe basic way of using the exiftool utility on Windows, is similar to the command used below:\n\n```\n# \"exiftool(-k).exe\" C:\\DFP\\Labs\\Module3\\Lab4\\2D3Fa2a\n```\n\nAs we saw in the previous part of the lab, this was a PDF file, and we found the following interesting information:\n\n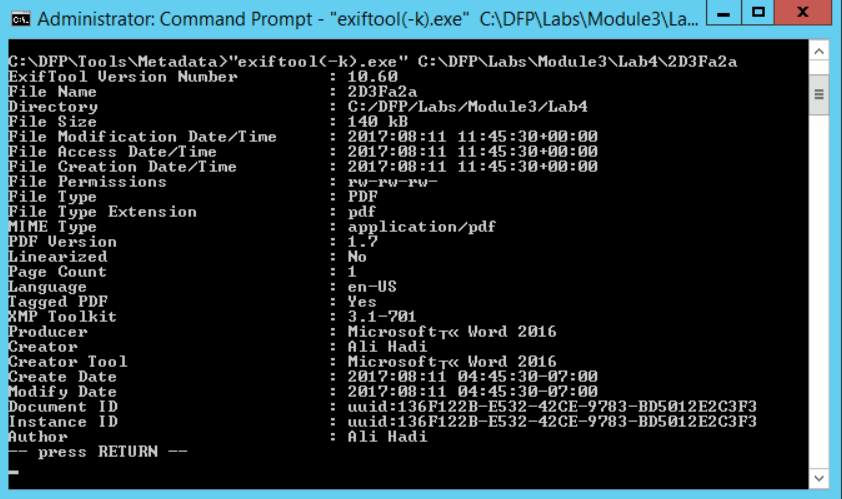\n\nFrom the snapshot, we can gather the following useful information:\n\n1. File Size: \t\t\t\t\t\t\t 140 KB\n2. File Creation Date: 2017:08:11 04:45:30-07:00\n3. File Type: PDF\n4. Producer: Microsoft\u00ae Word 2016\n5. Creator and Author: Ali Hadi\n6. Product: Microsoft\u00ae Word 2016\n\nNow, let us move on to checking the rest of the files and see what we found in each:\n\n```\n# \"exiftool(-k).exe\" C:\\DFP\\Labs\\Module3\\Lab4\\AW3DXW\n```\n\nIt was found that this is a JPEG image file with lots of useful information. Let us write down the basics:\n\n1. File Size: \t\t\t\t\t\t\t\t\t\t**859 KB**\n2. File Creation Date: **2008:03:14 13:59:26.54**\n3. File Type: **JPEG**\n4. Creator: **Corbis**\n\nThose were only the basics, but we found other useful information such as the following:\n\n1. Since we are dealing with an image, we found an \"**Artist**\" tag, not an author, and in this file, it also leads to \"**Corbis**.\"\n2. The \"Thumbnail Offset\" tag is extremely useful. The thumbnail could be used to check whether the original image was modified or not. So, we can extract it and compare it with the original image.\n3. The \"**XMP Toolkit**\" tag describes the toolkit used, which we found here was \"**Adobe XMP Core 4.2-c020 1.124078, Tue Sep 11 2007 23:21:40**\".\n4. We also found the \"**Date/Time Digitized**\" which was \"**2008:03:14 11:31:48.98-07:00**\". This gives us an idea when this image was stored in its digital format.\n5. Maybe the \"**Copyright Notice**\" is useful too in cases related to photos. Anyway, we found the \"**\u00a9 Corbis. All Rights Reserved.\"** in this image.\n6. We also found a \"**URL**\" within this image, which was \"**http://pro.corbis.com/search/searchresults.asp?txt=42-17167222&openImage=42-17167222**\".\n7. Finally, we can see the image width and height, which are **1024** and **768** respectively.\n\nLet us move on to our third file.\n\n```\n# \"exiftool(-k).exe\" C:\\DFP\\Labs\\Module3\\Lab4\\Mx#234\n```\n\nThe results could be seen in the snapshot below.\n\n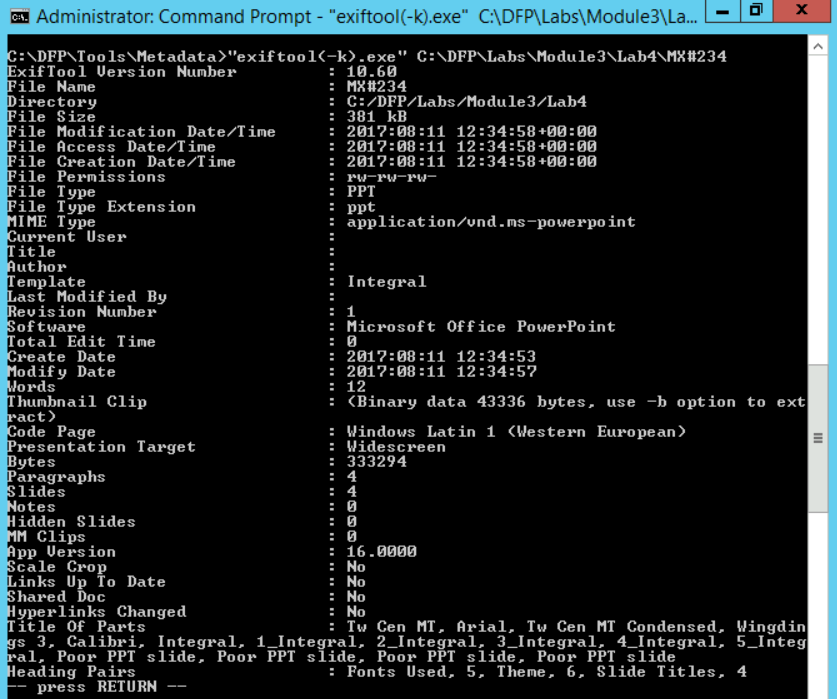\n\nHere we have the following useful information:\n\n1. File Size: \t\t\t\t\t\t\t\t\t\t\t\t**381 KB**\n2. File Creation Date: **2017:08:11 12:34:53**\n3. Modification Date: **2017:08:11 12:34:57**\n4. File Type: **PPT**\n5. Author:\n\nFirst, the \"**Title**\" tag shows \"**PowerPoint Presentation,**\" maybe not very useful, but it is good to check too. The \"**Software**\" used to create it was \"**Microsoft Office PowerPoint,**\" has no hidden slides and the \"**Presentation Target**\" is a \"**Widescreen.**\" Another important detail here is that we could also see the file was last modified by the author himself. So, the \"**Last Modified By**\" tag could come handy in other investigations, keep that in mind.\n\nLet us check the fourth file:\n\n```\n# \"exiftool(-k).exe\" C:\\DFP\\Labs\\Module3\\Lab4\\XFaWxVa\n```\n\nHere we have the following useful information:\n\n1. File Size: \t\t\t\t\t **140 KB**\n2. File Creation Date: **2017:08:11 05:32:41-07:00**\n3. Modification Date: **2017:08:11 05:32:41-07:00**\n4. File Type: **PDF**\n5. Software: **Microsoft Office Word**\n6. Pages: **1**\n\nNow, a 1-page document might not always be malicious, but for example if the pdf document was supposed to be a proposal, then a one-page document is truly \"**suspicious**\".\n\nOur final file is:\n\n```\n# \"exiftool(-k).exe\" C:\\DFP\\Labs\\Module3\\Lab4\\ZC2f2d2\n```\n\nHere we have the following useful information:\n\n1. File Size: \t\t\t\t\t\t\t\t\t\t\t\t\t**9.7 KB**\n2. File Creation Date: **2006:09:16 00:00:00Z**\n3. Modification Date: **2017:08:11 12:36:15Z**\n4. File Type: **XLSX**\n5. Application: **Microsoft Excel**\n6. Sheets: **2 (Sheet1 and Sheet2)**\n\n## Task 3: Extracting Photos EXIF Data and Discovering GPS Coordinates\n\nFor this task, I won't be using the \"**exiftool**\" utility to solve the task, but another tool named \"**ExifReader**\" [located at **C:\\\\DFP\\\\Tools\\\\Metadata\\\\exifr300_e**]. I'm going to do that for two reasons; the first is that there always will be different ways and tools to solve a problem, and second, is to introduce you to **ExifReader**.\n\nIn this task, we have a couple of photos [located at **C:\\\\DFP\\\\Labs\\\\Module3\\\\Lab4\\\\pics**] and we want to get an idea of the following:\n\n1. What manufacturer does the camera belong to?\n2. What is the camera model?\n3. Was the flash used to take the photo or not?\n4. If the camera was from a cellular phone, was it the rear or the front camera that was used?\n5. What are the GPS coordinates of the camera at the time the photo was taken if any was found?\n6. When was the photo taken?\n7. What are the photo resolutions and was a thumbnail generated or not?\n\nSo, let us get started. We discovered six photos, let us check each one of them and see. Using ExifReader is very simple, all you need to do is either use the \"open\" button and navigate to the location where the photo of interest is found and select it, or just drag-and-drop the photo on top of the application and it will open it for you.\n\n**[IMPORTANT NOTE:]**\n\nThe photos used in this task are only used to help understand the importance of EXIF information found in photos. The photos and people names used do not derive from a real crime or investigation. No harm is meant, this is for educational purposes only.\n\nOpening the first photo \"DSCN0025.jpg\":\n\n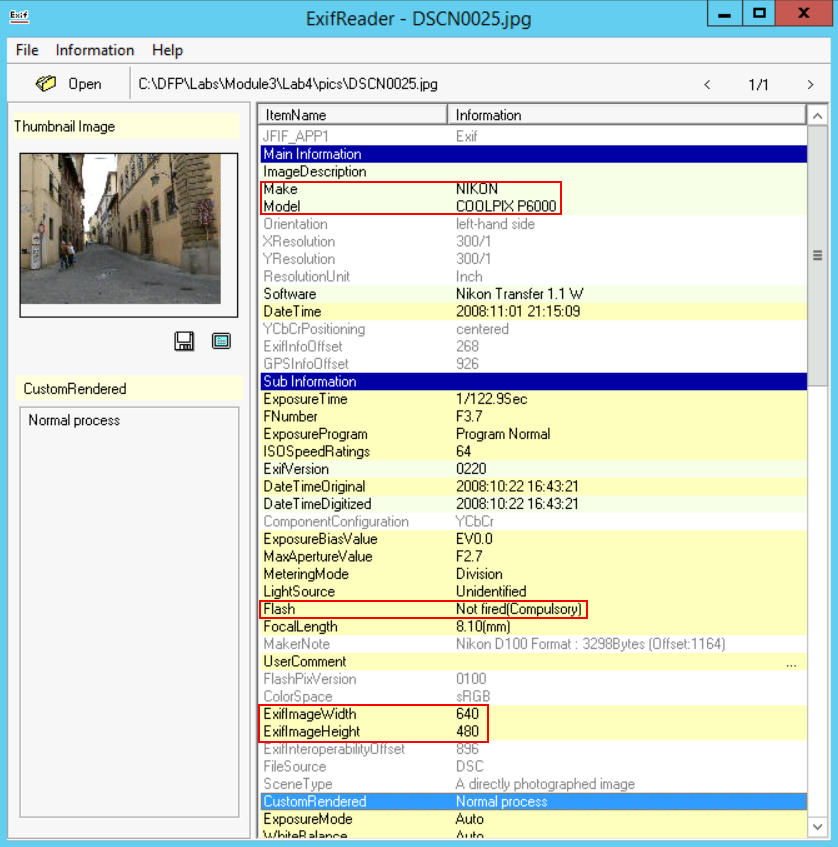\n\nFrom the snapshots above, we can clearly answer the questions required:\n\n1. From the \"**Make**\" tag, we can identify the camera manufacturer: **Nikon**\n\n2. From the \"**Model**\" tag, we can identify the camera model: **COOLPIX P6000**\n\n3. The \"**Flash**\" tag gives us an idea whether the flash was used or not, here it wasn't\n\n4. It doesn't seem that this is a camera of a cellular phone\n\nNow regarding GPS information, let us check that part:\n\n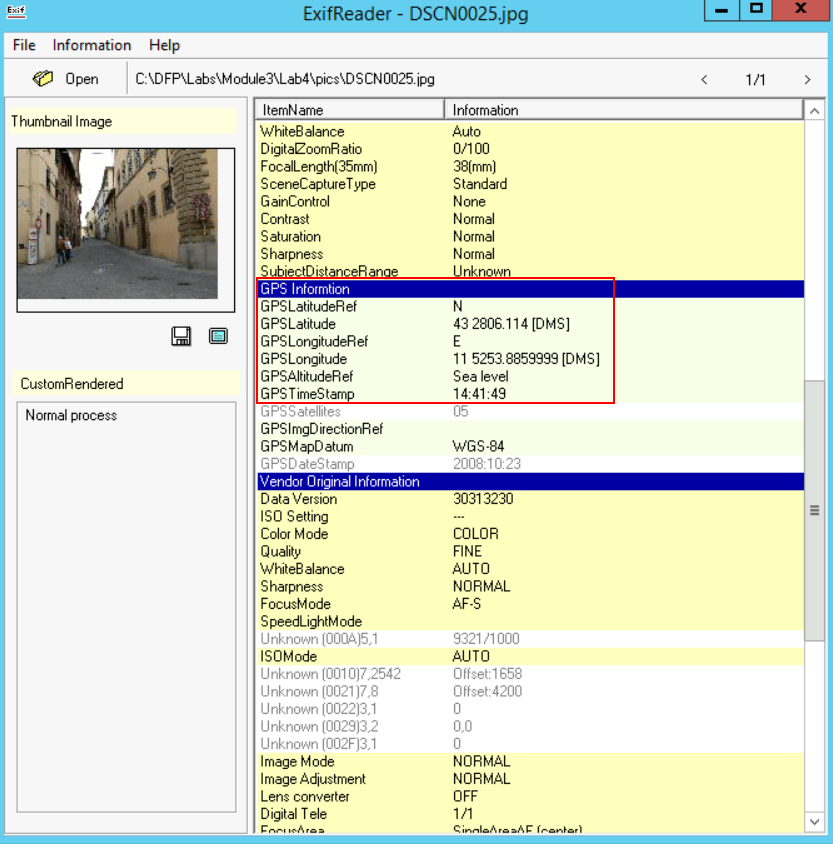\n\n5. Based on the \"GPS Latitude\" tag, we found: **\"43 deg 2806.114'\" North**\n\n6. Based on the \"GPS Longitude\" tag, we found **\"11 deg 5253.8859999'\" East**\n\n7. The photo was taken at \"**2008:10:23 14:41:49**\" and yes there was a thumbnail embedded within this photo.\n\n8. The width and height of the photo are \"**640x480**\"\n\nIf you take these GPS coordinates and use Google Maps, you could identify the location where the photo was taken. This is extremely helpful in crime scenes or in cases where photos could be used to locate the suspect.\n\nNow, if you noticed when checking the results, there are tags or item names that are unknown. This I believe is due to the fact that the tool has not been updated for a very long time. Now if we go back to exiftool and run it against our photo, we shall get more clear details and results.\n\nYou can save all the information you extracted to a Text or CSV file as seen in the snapshot below:\n\n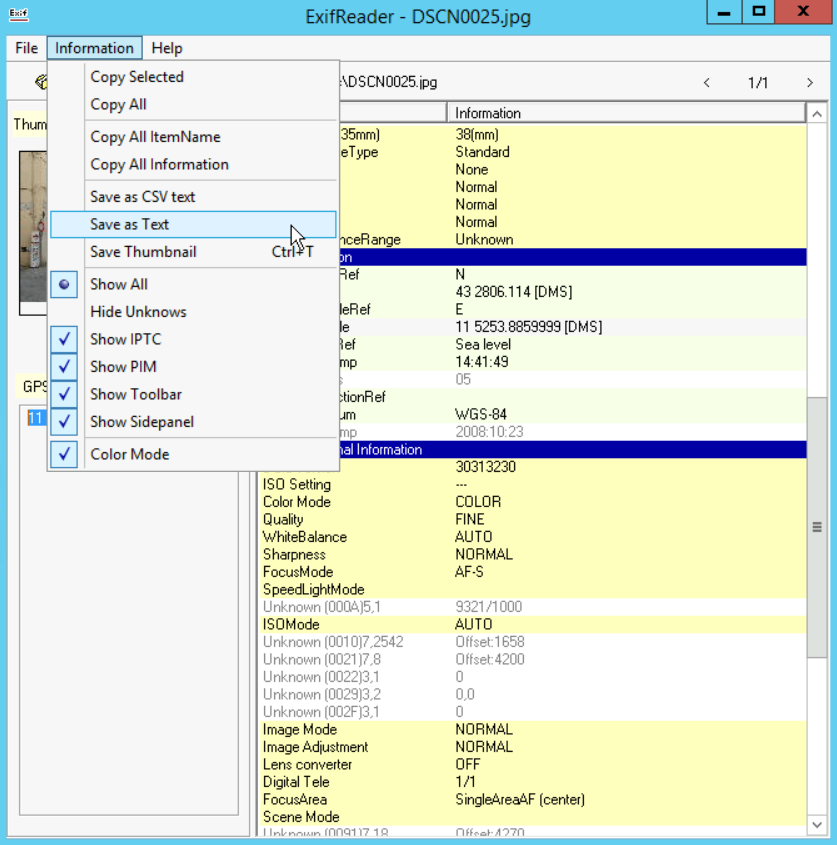\n\nLet us move on to another sample.\n\nLet us open another sample and check it out. This time I am going to open the photo \"**iphone_hdr_NO.jpg**\":\n\n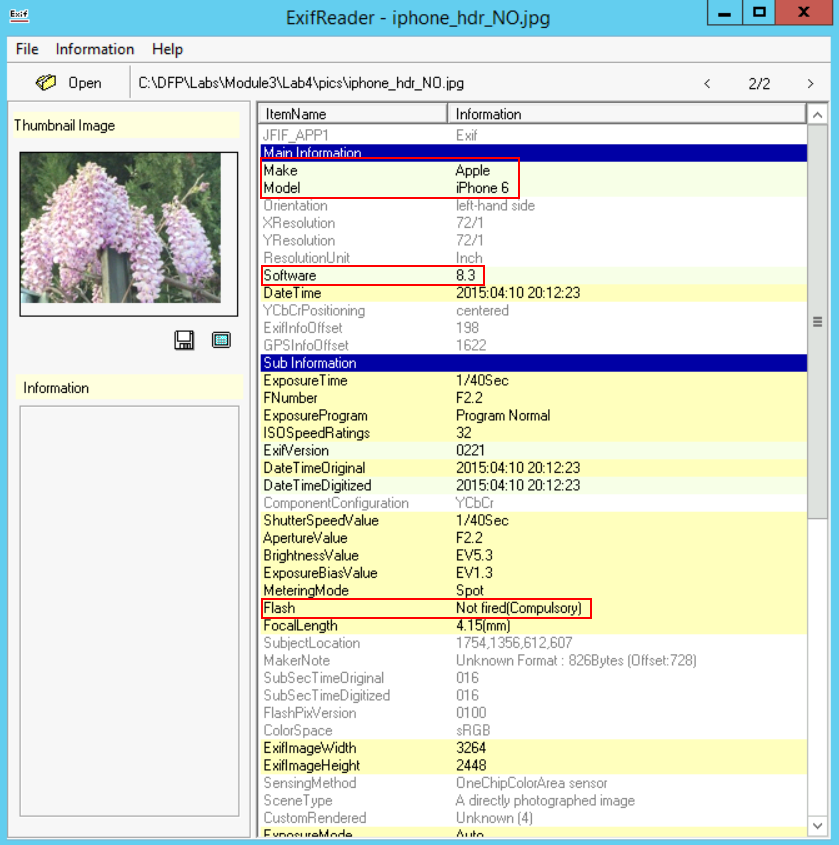\n\nFrom the photos, we can see the following:\n\n1. Image **ImageWidth** and **ImageHeight** are **3264** and **2448** respectively.\n\n2. The camera manufacturer is **Apple**, and its Model is **iPhone 6**.\n\n3. The **Software** used is **8.3**.\n\n4. The photo was created on **2015:04:10 20:12:23**, based on the **DateTimeOriginal** tag.\n\n5. The flash was not used here too.\n\nNow let us check the GPS and additional information from the second snapshot:\n\n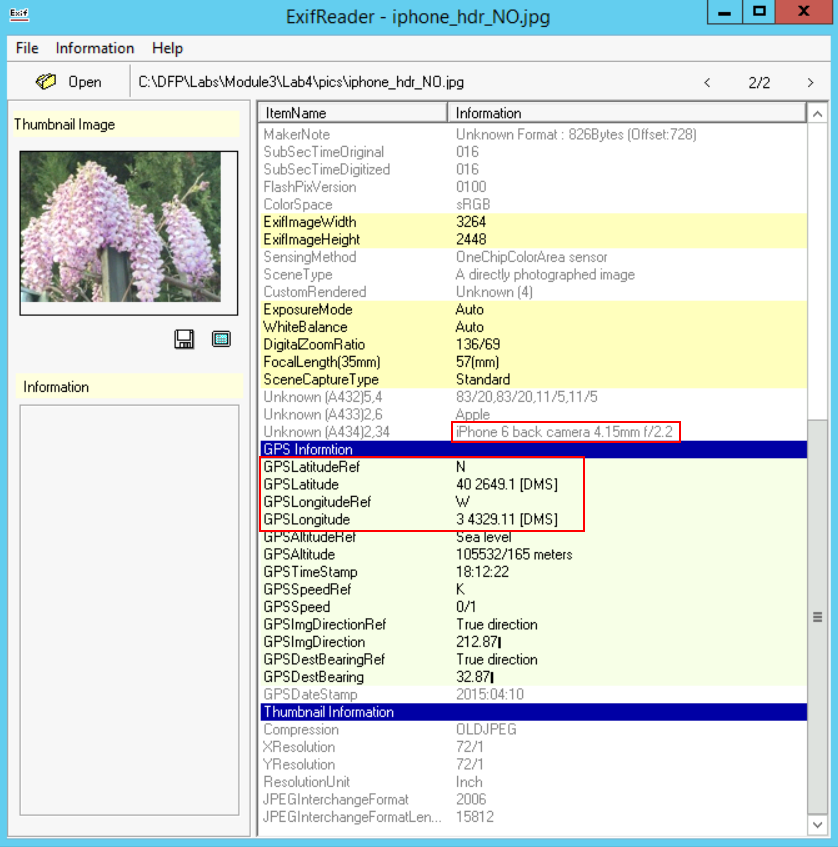\n\n6. The GPS coordinates seem to be Latitude **\"40 deg 2649.1'\" North**, and Longitude **\"3 deg 4329.11'\" West**.\n\n7. We can see that this photo was taken from a **back camera**.\n\nBefore I move to solving Task \\#4, I want to show you what I found when opening the **image02206.jpg** using ExifReader:\n\n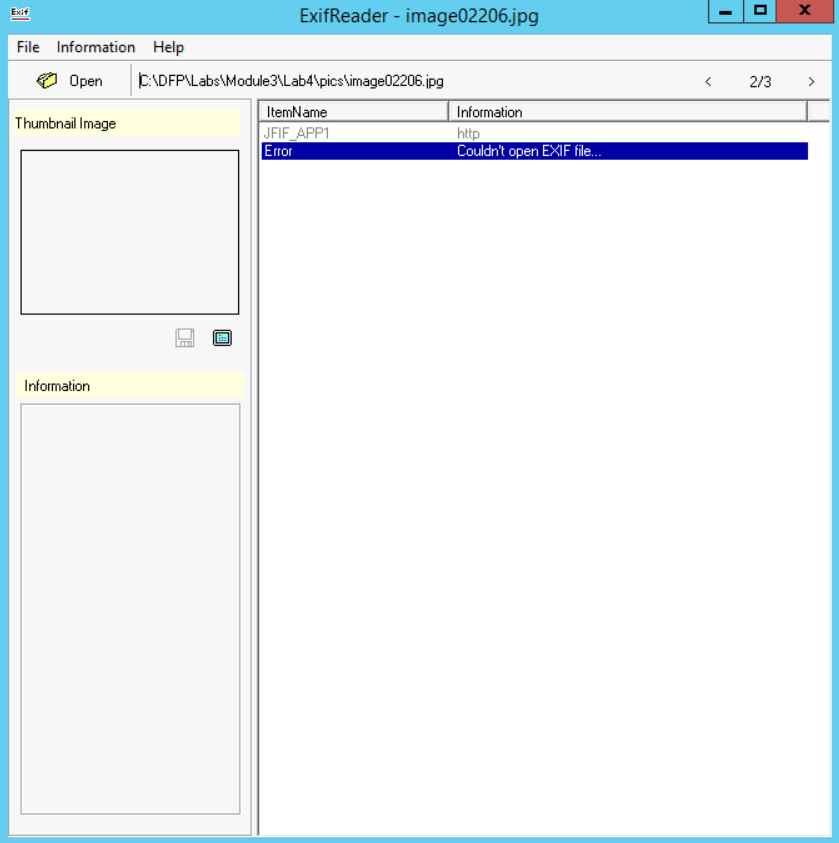\n\nYes, as you noticed, I was not able to extract anything useful from the photo and if I didn't check another tool, I would have been fooled that this photo does not contain any EXIF data, while in reality it does. This is another example of why you should not rely on a single tool and it is far better to verify your work using another approach or tool.\n\nRun exiftool against **image02206.jpg** and see for yourself...\n\n## Task 4: Generating a Data Sheet Report of Extracted Data\n\nWe have finished analyzing the evidence and let's say we want to generate a report with all the EXIF data we found within each file. We can do this using a lots of ways, and I already mentioned one in task \\#3 while using the ExifReader application. This time we will be generating reports using the exiftool utility.\n\nThe first approach is to generate a single report for each photo we have. This could be done using the following command (from within the photo's directory):\n\n```\n# \"C:\\DFP\\Tools\\Metadata\\exiftool(-k).exe\" -a -u -g1 -w %f.txt *.jpg\n```\n\nThis will produce the following output:\n\n```\n6 image files read\n6 output files created\n```\n\nAnd if you check the files, you will find that a .txt file has been created having the same file name as the one of each photo.\n\nFinally, let us generate a single report with all the information within it, specifically let us make it a Comma-Separated Value (CSV) file. We could easily do that with the exiftool utility like this:\n\n```\n# \"C:\\DFP\\Tools\\Metadata\\exiftool(-k).exe\" *.jpg -csv > report.csv\n```\n\nThis will produce a single file called \"report.csv\" that holds all the EXIF data found in each photo. You can use your favorite reader (ex: Microsoft Excel) to open and analyze the contents.\n\n## References:\n\nCode Page, ",
"solutions_html": "SOLUTIONS
\nTask 1: Discover File Types using Exiftool
\nIn this part of the lab we are only required to extract the file type from the files we have on the suspect's USB [you can find the suspect's files at C:\\DFP\\Labs\\Module3\\Lab4]. I will be using Windows but you can use Linux to solve it easily too.
\nLet's now leverage exiftool's -filetype flag to extract the file type from the suspect's files. Simply open a cmd.exe terminal and execute the below, against each file in the Lab4 folder.
\n# cd C:\\DFP\\Tools\\Metadata\n# \"exiftool(-k).exe\" -filetype C:\\DFP\\Labs\\Module3\\Lab4\\2D3Fa2a
\n\nNote: the output has been modified to fit this report without affecting the final understanding required.
\n2D3Fa2a File Type : PDF
\nAW3DXW File Type : JPEG
\nMx#234 File Type : PPT
\nXFaWxVa File Type : PDF
\nZC2f2d2 File Type : XLSX
\nAlternatively, on Linux, you could do the following, to speed things up:
\n# find -type f -print -exec exiftool -filetype {} \\;
\n\nThe command above searches for all files within the current working directory and prints the name of the file that was filtered based on the results of the exiftool utility (those results contain the file type). If you noticed, we asked exiftool to specifically print the File Type and not all of the EXIF information. So, as you can see, by now we have two basic ways of identifying a file; one using the Linux \"file\" command and the other using the \"exiftool\" utility.
\nTask 2: Analyzing File's EXIF Data
\nIn this part, we were asked to extract the Tool Version, File Size, File Creation Date, File Type, Producer, Creator and Author, and finally the Product information out of the files we found. For understanding purposes, we will focus on the five different files below:
\n\n- 2D3Fa2a
\n- AW3DXW
\n- Mx#234
\n- XFaWxVa
\n- and ZC2f2d2
\n
\nThe basic way of using the exiftool utility on Windows, is similar to the command used below:
\n# \"exiftool(-k).exe\" C:\\DFP\\Labs\\Module3\\Lab4\\2D3Fa2a
\n\nAs we saw in the previous part of the lab, this was a PDF file, and we found the following interesting information:
\n
\nFrom the snapshot, we can gather the following useful information:
\n\n- File Size: 140 KB
\n- File Creation Date: 2017:08:11 04:45:30-07:00
\n- File Type: PDF
\n- Producer: Microsoft\u00ae Word 2016
\n- Creator and Author: Ali Hadi
\n- Product: Microsoft\u00ae Word 2016
\n
\nNow, let us move on to checking the rest of the files and see what we found in each:
\n# \"exiftool(-k).exe\" C:\\DFP\\Labs\\Module3\\Lab4\\AW3DXW
\n\nIt was found that this is a JPEG image file with lots of useful information. Let us write down the basics:
\n\n- File Size: 859 KB
\n- File Creation Date: 2008:03:14 13:59:26.54
\n- File Type: JPEG
\n- Creator: Corbis
\n
\nThose were only the basics, but we found other useful information such as the following:
\n\n- Since we are dealing with an image, we found an \"Artist\" tag, not an author, and in this file, it also leads to \"Corbis.\"
\n- The \"Thumbnail Offset\" tag is extremely useful. The thumbnail could be used to check whether the original image was modified or not. So, we can extract it and compare it with the original image.
\n- The \"XMP Toolkit\" tag describes the toolkit used, which we found here was \"Adobe XMP Core 4.2-c020 1.124078, Tue Sep 11 2007 23:21:40\".
\n- We also found the \"Date/Time Digitized\" which was \"2008:03:14 11:31:48.98-07:00\". This gives us an idea when this image was stored in its digital format.
\n- Maybe the \"Copyright Notice\" is useful too in cases related to photos. Anyway, we found the \"\u00a9 Corbis. All Rights Reserved.\" in this image.
\n- We also found a \"URL\" within this image, which was \"http://pro.corbis.com/search/searchresults.asp?txt=42-17167222&openImage=42-17167222\".
\n- Finally, we can see the image width and height, which are 1024 and 768 respectively.
\n
\nLet us move on to our third file.
\n# \"exiftool(-k).exe\" C:\\DFP\\Labs\\Module3\\Lab4\\Mx#234
\n\nThe results could be seen in the snapshot below.
\n
\nHere we have the following useful information:
\n\n- File Size: 381 KB
\n- File Creation Date: 2017:08:11 12:34:53
\n- Modification Date: 2017:08:11 12:34:57
\n- File Type: PPT
\n- Author:
\n
\nFirst, the \"Title\" tag shows \"PowerPoint Presentation,\" maybe not very useful, but it is good to check too. The \"Software\" used to create it was \"Microsoft Office PowerPoint,\" has no hidden slides and the \"Presentation Target\" is a \"Widescreen.\" Another important detail here is that we could also see the file was last modified by the author himself. So, the \"Last Modified By\" tag could come handy in other investigations, keep that in mind.
\nLet us check the fourth file:
\n# \"exiftool(-k).exe\" C:\\DFP\\Labs\\Module3\\Lab4\\XFaWxVa
\n\nHere we have the following useful information:
\n\n- File Size: 140 KB
\n- File Creation Date: 2017:08:11 05:32:41-07:00
\n- Modification Date: 2017:08:11 05:32:41-07:00
\n- File Type: PDF
\n- Software: Microsoft Office Word
\n- Pages: 1
\n
\nNow, a 1-page document might not always be malicious, but for example if the pdf document was supposed to be a proposal, then a one-page document is truly \"suspicious\".
\nOur final file is:
\n# \"exiftool(-k).exe\" C:\\DFP\\Labs\\Module3\\Lab4\\ZC2f2d2
\n\nHere we have the following useful information:
\n\n- File Size: 9.7 KB
\n- File Creation Date: 2006:09:16 00:00:00Z
\n- Modification Date: 2017:08:11 12:36:15Z
\n- File Type: XLSX
\n- Application: Microsoft Excel
\n- Sheets: 2 (Sheet1 and Sheet2)
\n
\nTask 3: Extracting Photos EXIF Data and Discovering GPS Coordinates
\nFor this task, I won't be using the \"exiftool\" utility to solve the task, but another tool named \"ExifReader\" [located at C:\\DFP\\Tools\\Metadata\\exifr300_e]. I'm going to do that for two reasons; the first is that there always will be different ways and tools to solve a problem, and second, is to introduce you to ExifReader.
\nIn this task, we have a couple of photos [located at C:\\DFP\\Labs\\Module3\\Lab4\\pics] and we want to get an idea of the following:
\n\n- What manufacturer does the camera belong to?
\n- What is the camera model?
\n- Was the flash used to take the photo or not?
\n- If the camera was from a cellular phone, was it the rear or the front camera that was used?
\n- What are the GPS coordinates of the camera at the time the photo was taken if any was found?
\n- When was the photo taken?
\n- What are the photo resolutions and was a thumbnail generated or not?
\n
\nSo, let us get started. We discovered six photos, let us check each one of them and see. Using ExifReader is very simple, all you need to do is either use the \"open\" button and navigate to the location where the photo of interest is found and select it, or just drag-and-drop the photo on top of the application and it will open it for you.
\n[IMPORTANT NOTE:]
\nThe photos used in this task are only used to help understand the importance of EXIF information found in photos. The photos and people names used do not derive from a real crime or investigation. No harm is meant, this is for educational purposes only.
\nOpening the first photo \"DSCN0025.jpg\":
\n
\nFrom the snapshots above, we can clearly answer the questions required:
\n\n- \n
From the \"Make\" tag, we can identify the camera manufacturer: Nikon
\n \n- \n
From the \"Model\" tag, we can identify the camera model: COOLPIX P6000
\n \n- \n
The \"Flash\" tag gives us an idea whether the flash was used or not, here it wasn't
\n \n- \n
It doesn't seem that this is a camera of a cellular phone
\n \n
\nNow regarding GPS information, let us check that part:
\n
\n\n- \n
Based on the \"GPS Latitude\" tag, we found: \"43 deg 2806.114'\" North
\n \n- \n
Based on the \"GPS Longitude\" tag, we found \"11 deg 5253.8859999'\" East
\n \n- \n
The photo was taken at \"2008:10:23 14:41:49\" and yes there was a thumbnail embedded within this photo.
\n \n- \n
The width and height of the photo are \"640x480\"
\n \n
\nIf you take these GPS coordinates and use Google Maps, you could identify the location where the photo was taken. This is extremely helpful in crime scenes or in cases where photos could be used to locate the suspect.
\nNow, if you noticed when checking the results, there are tags or item names that are unknown. This I believe is due to the fact that the tool has not been updated for a very long time. Now if we go back to exiftool and run it against our photo, we shall get more clear details and results.
\nYou can save all the information you extracted to a Text or CSV file as seen in the snapshot below:
\n
\nLet us move on to another sample.
\nLet us open another sample and check it out. This time I am going to open the photo \"iphone_hdr_NO.jpg\":
\n
\nFrom the photos, we can see the following:
\n\n- \n
Image ImageWidth and ImageHeight are 3264 and 2448 respectively.
\n \n- \n
The camera manufacturer is Apple, and its Model is iPhone 6.
\n \n- \n
The Software used is 8.3.
\n \n- \n
The photo was created on 2015:04:10 20:12:23, based on the DateTimeOriginal tag.
\n \n- \n
The flash was not used here too.
\n \n
\nNow let us check the GPS and additional information from the second snapshot:
\n
\n\n- \n
The GPS coordinates seem to be Latitude \"40 deg 2649.1'\" North, and Longitude \"3 deg 4329.11'\" West.
\n \n- \n
We can see that this photo was taken from a back camera.
\n \n
\nBefore I move to solving Task #4, I want to show you what I found when opening the image02206.jpg using ExifReader:
\n
\nYes, as you noticed, I was not able to extract anything useful from the photo and if I didn't check another tool, I would have been fooled that this photo does not contain any EXIF data, while in reality it does. This is another example of why you should not rely on a single tool and it is far better to verify your work using another approach or tool.
\nRun exiftool against image02206.jpg and see for yourself...
\nTask 4: Generating a Data Sheet Report of Extracted Data
\nWe have finished analyzing the evidence and let's say we want to generate a report with all the EXIF data we found within each file. We can do this using a lots of ways, and I already mentioned one in task #3 while using the ExifReader application. This time we will be generating reports using the exiftool utility.
\nThe first approach is to generate a single report for each photo we have. This could be done using the following command (from within the photo's directory):
\n# \"C:\\DFP\\Tools\\Metadata\\exiftool(-k).exe\" -a -u -g1 -w %f.txt *.jpg
\n\nThis will produce the following output:
\n6 image files read\n6 output files created
\n\nAnd if you check the files, you will find that a .txt file has been created having the same file name as the one of each photo.
\nFinally, let us generate a single report with all the information within it, specifically let us make it a Comma-Separated Value (CSV) file. We could easily do that with the exiftool utility like this:
\n# \"C:\\DFP\\Tools\\Metadata\\exiftool(-k).exe\" *.jpg -csv > report.csv
\n\nThis will produce a single file called \"report.csv\" that holds all the EXIF data found in each photo. You can use your favorite reader (ex: Microsoft Excel) to open and analyze the contents.
\nReferences:
\nCode Page, https://en.wikipedia.org/wiki/Code_page
",
"flags": [],
"min_points_to_pass": null,
"access_type": "default",
"user_status": "unstarted",
"user_lab_status": null,
"user_status_modified": null,
"user_flags": [],
"global_running_session": null
}