
You were asked to investigate a hard disk drive of an employee named John Doe, that is suspected of hiding some tools and files on his computer somehow. The IT team at the company has already checked his disk but found nothing, but they are sure he is hiding his data somehow on the disk.
\nYou went there and took a forensic image of his hard disks as seen in the figure below:
\n
Your evidence file can be found at C:\\DFP\\Labs\\Module04\\Lab9\\Lab9.001 .
\nUse your disk analysis skills to manually parse the extended partition and identify all logical partitions found on the disk. Report back the starting sector, size and type of each partition found.
\nUse your disk analysis skills to identify if there are any hidden partitions, and explain why you believe they were hidden. Be sure to incorporate skills learned in previous labs.
\nHINT: Think about what would happen if the suspect modified the byte containing information about the type of a partition. Wouldn't he be able to hide a partition from the system this way?
\nUse your disk analysis skills to extract and search partition gaps for hidden data. WinHex's File Recovery by Type functionality and Eric Zimmerman's bstrings [located at C:\\DFP\\Tools\\Utilities] or the Linux strings command will certainly prove handy in solving this task.
", "published_date": "2020-10-20T15:32:26Z", "solutions": "## SOLUTIONS\n\n### Task 1: Parsing The Extended Partition\nExamine the evidence file named \"[Lab9.001]\" [located at C:\\DFP\\Labs\\Module04\\Lab9\\Lab9.001] using the forensic tool of your choice (Autopsy or MMLS.exe is recommended), which would lead us to the following Please note:\n- I have colored each partition entry in the MBR disk structure\n- You will need to locate and extract TheSluethkit from the C:\\DFP\\Tools\\Windows\\sleuthkit-4.12.0-win32.zip\n\n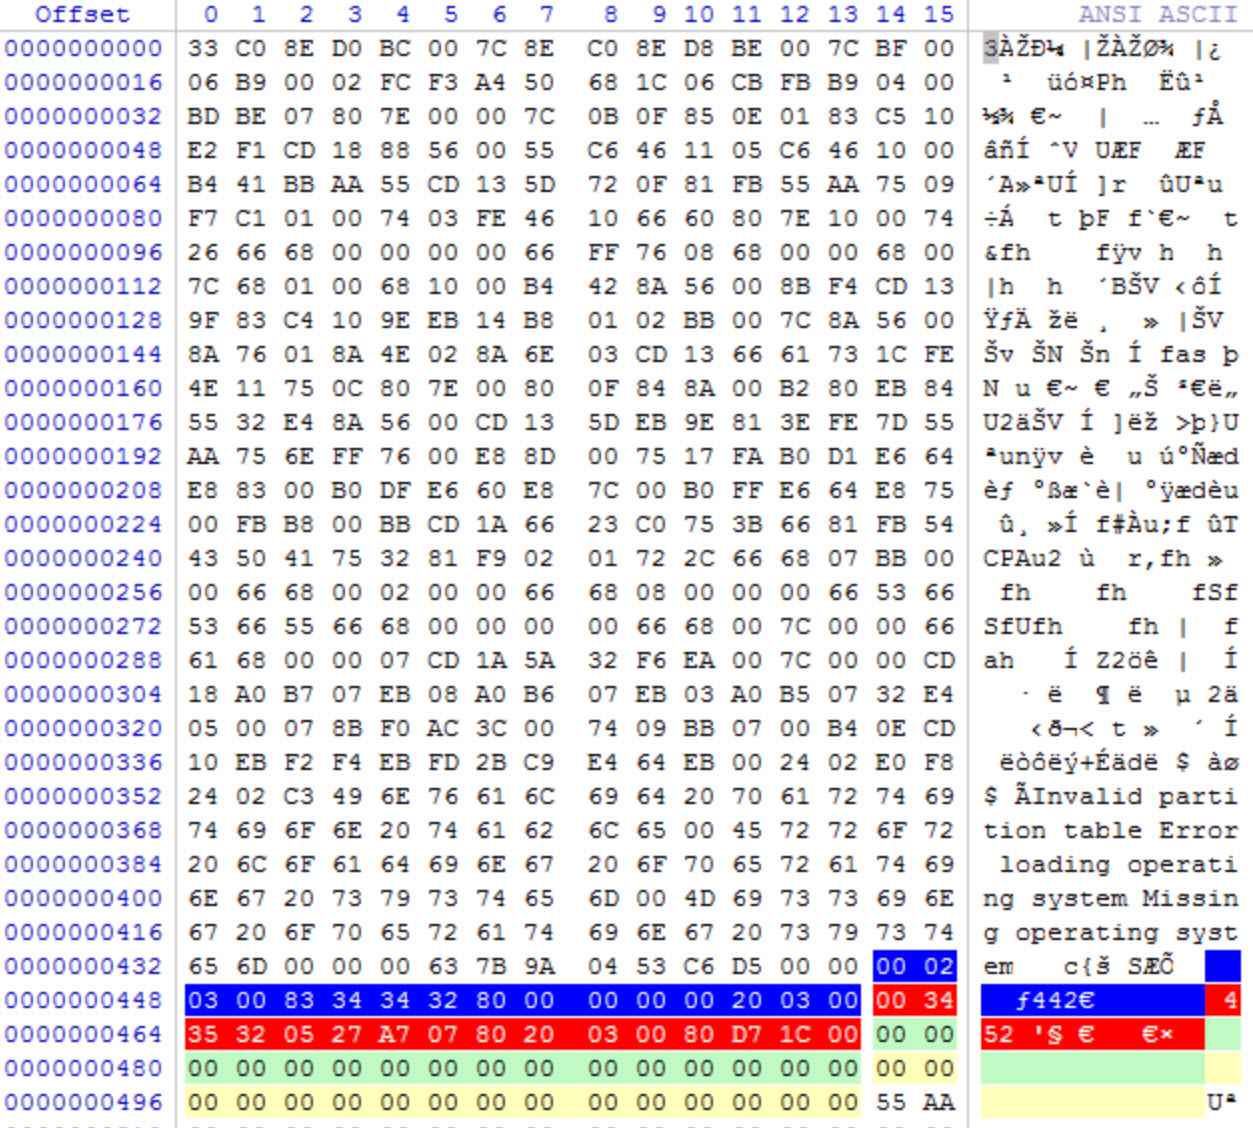\n\nView the partition in the tool of your choice\n\n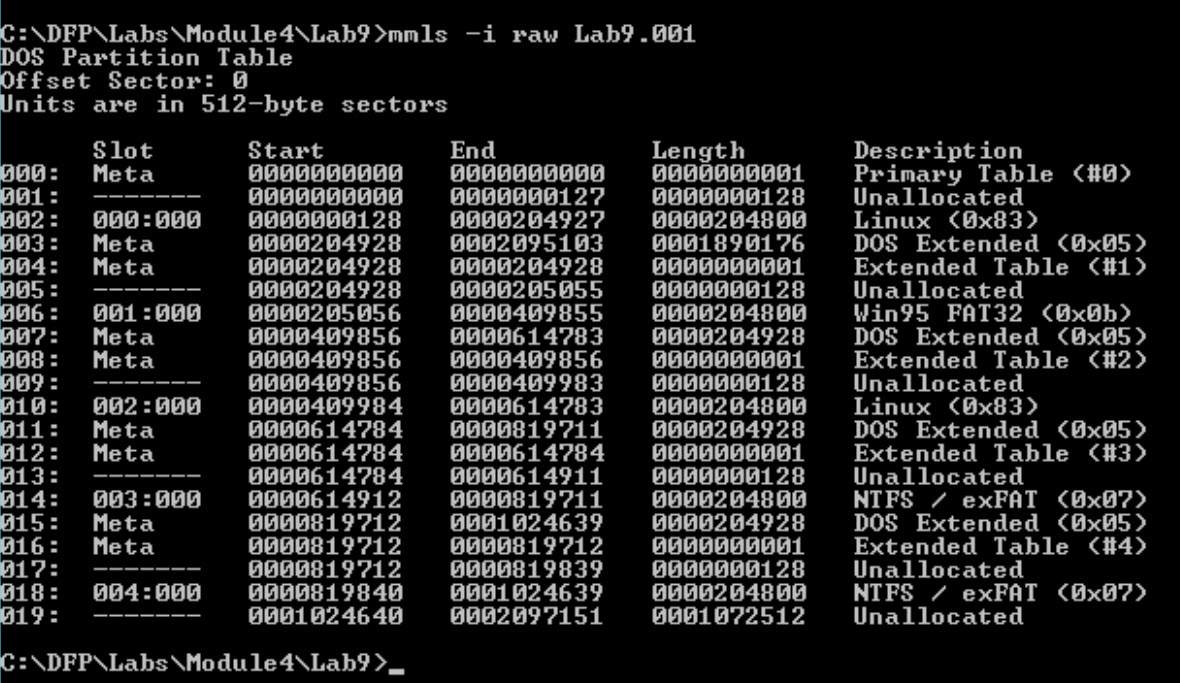\n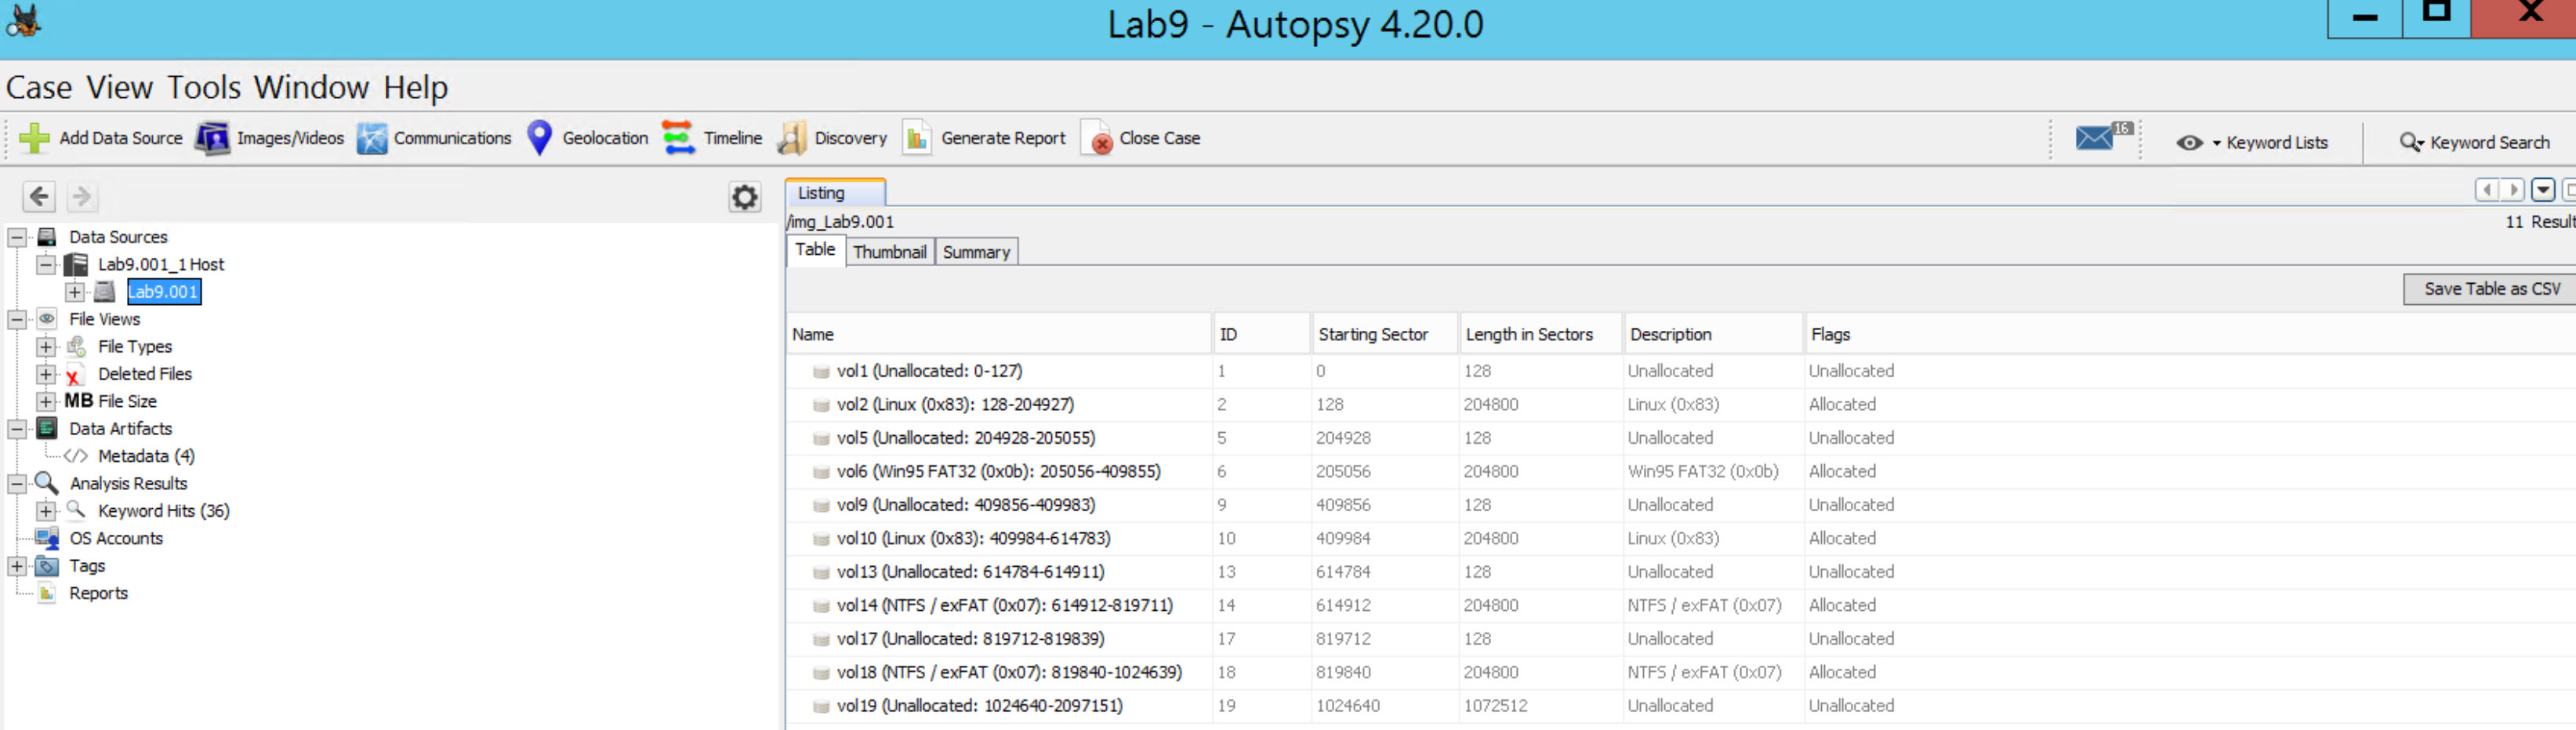\n\nThe output should show you a list of partitions, primary and extended. When examiniing a partition structure they are typicaly continous. The sector stop and the sector start for the next partition should be adjacent to each other, with no missing sectors in between. If you see that sectors are not contimous, then you have what is called a partition gap. This is not normal behavior for partition creation, and is generally intentionally created by a human. Typically the threat actor will use a tool such as fdisk, gparted, or diskpart to manually create and delete partitions--custom picking the sector starts and length.\n\nWe definitely can observe some gaps.We now need to figure out how this disk is structured and understand where each partition starts and ends.\n\nManually document the partitions. I recommend creating a table. Start with you first partition and take note of the start sector, end sector, length, partition type, and whether or not there is a gap between the previous partition. Look for allocated vs unallocated partition tables.\n\n**NOTE:** Before continuing, take the time to study the partition tables generated by your tool and do the analysis yourself.\n\nYou should come up with the following partitions\n\n|Partition Number|Start Sector|End Sector|Length|Partition Type|Gap Detected|\n|:--------------:|:----------:|:--------:|:----:|:------------:|:----------:|\n|1|128|204927|204800|Linux (0x83)|No|\n|2|205056|409855|204800|Win95 FAT32 (0x0b)|**YES**|\n|3|409984|614783|204800|Linux (0x83)|**YES**|\n|4|614912|819711|204800|NTFS/exFAT (0x07)|**YES**|\n|5|819840|1024639|204800|NTFS/exFAT (0x07)|**YES**|\n\nFrom this, we know that the first partition is after 128 sectors from the beginning of the disk, and its capacity is 204800 sectors. From the menu and using the go to offset button, use it to move 128 sectors.\n\nThis will lead us to the first partition holding a FAT32 file system as seen below:\n\nNow we see that this partition has 204800 sectors\n\nThis should lead us to the following:\n\nIf we add the values in the sectors preceding partition #1 (128) with the sectors in the partition (204800), we get 204928, which exactly where the next partition starts.\n\nBefore we proceed, if you look at the Partition Type Indicator of the second partition, we notice that it is 0x05, which refers to an extended partition. And since it is an extended partition, I just want to remind you that they use the following MBR structure:\n\nEntry\tSize in Bytes\tDescription\n1\t446\tZeros\n2\t16\tDescribe the first partition\n3\t16\tThe location of the next partition\n4\t32\tZeros\n5\t2\tThe end of sector marker 55 AA\nTotal\t512\t\n\nAnother important note to remember is the last extended partition table will only have one 16 byte entry, and the rest will be zeros. So, we can understand that this is the last logical partition in the extended structure by checking the second entry of the partition table found. If the entry has values, then this is the location of that partition; if it holds only zeros, then we have reached the last partition as we said.\n\nContinueing on, if we add the size of sectors we found in the previous step, which was 204800 sectors, we will reach the next extended partition, which will also hold an MBR boot structure. This can be seen below:\n\nThe beginning of the sector has all zeros as we expected, and then we see that there are also 128 sectors before we reach the first partition. Please remember that this is a relative offset and not one calculated from the beginning of the disk. Also, note the size of the disk is 204800 sectors. So, let us do this again, add 128 sectors to our current position. This would take us to the first partition, and then from there add the size 204800 sectors to go to the next partition.\n\nNote: since the second partition entry is not zero, it means there are still some partitions on this disk.\n\nAs we see below, we got a partition holding an NTFS file system:\n\nAdding its size would lead us to the next partition, so let us do that.\n\nAs expected, we reached another extended MBR Boot Record.\n\nSo the partition is also after 128 sectors and its size is 204800 sectors, plus we still have other partitions to follow, because the second partition table is not empty (zeros). Let's continue. Now we reach another NTFS file system.\n\nAdding the size of it should lead us to another MBR partition.\n\nNow this time notice the first partition is after 128 sectors as we saw in all partitions we went through since the beginning, and the size of it is the same too. But, take a closer look at the second partition entry, it is empty and filled with zeros, which means we reached the end of the partitions on this disk.\n\nLet us create a summary of findings using the table below to answer the questions that were required from us (Report back the starting sector, size and type of each partition found.):\n\n|Partition #|Starting Sector|Size in Bytes|Type ID / Name|\n|:-----------:|:---------------:|:-------------:|:--------------:|\n|1|128|104857600|83 / Linux|\n|2|205056|104857600|0B / FAT32|\n|3|409984|104857600|83 / Linux|\n|4|614912|104857600|07 / NTFS|\n|5|819840|104857600|07 / NTFS|\n\n[Note:] if you are asking yourself from where or how did we calculate the starting sector of each partition relative to the beginning of the disk, all you need to do is the following:\n\nA) Partition #1 = Preceding Sectors Value (128)\n\n= 128\n\nB) Partition #2 = Value found in (A) + Preceding Sectors Value (128) + Size (204800)\n\n= 128 + 128 + 204800 = 205056\n\nC) Partition #3 = Value found in (B) + Preceding Sectors Value (128) + Size (204800)\n\n= 205056 + 128 + 204800 = 409984\n\nD) Partition #4 = Value found in (C) + Preceding Sectors Value (128) + Size (204800)\n\n= 409984 + 128 + 204800 = 614912\n\nE) Partition #3 = Value found in (D) + Preceding Sectors Value (128) + Size (204800)\n\n= 614912 + 128 + 204800 = 819840\n\nAnd that's it; we managed to parse the whole disk, even though it was using a somehow complicated disk structure.\n\n### Task 2: Locate Hidden Partitions\nNow if you go back to the partition table in Autopsy in task #1, you can see that we found Linux partition types. If you examine the findings you will see that autopsy identifies the partition as \"0x83 Linux\". This is from reading the partition table. However, when you click on the partition, it looks like a Windows volume. This is clearly not a linux file system! If you right click and select File System details, autopsy identifies it as a FAT32 partition. If you right click the partition and select \"View in a New Window\", the hexadecimal data confirms the signature of an FAT32 partition.\n\nIn our table partitions, #1 and #3 are reported as Linux, while in the figure above we see that the first is a FAT32 partition, and the third is an NTFS partition. The type of partition is found in the partition entry of each MBR boot record. So, let us locate the entry for the first partition. We already did this in the previous task, so it would be easy to locate the partition entry now by you.\n\nAs we can see, the entry shows a 0x83 Linux partition, but when we look at the content of the partition we find that is not true.\n\nSo, it seems the employee is modifying this byte, so the Windows system is unable to recognize its existence! If we were to write the byte back to 0x0B which refers to a FAT32 file system, windows would recognize and mount the file system.\n\nLet's check the third partition, which was also identified in its partition table as a Linux partition. Go to the partition itself to check its content. We are supposed to find that it is a linux partition. However, it clearly has the structure of NTFS, which means this is an NTFS partition, and even though the employee changed it from the partition table entry, forensic tools such as Autopsy correctly identify the volume.\n\nLet us verify that by exploring the content as we did previously\n\nAs we can see here again, the contents are fully displayed, which means we were right with our hypothesis about what happened here too.\n\nNow, all we would need to do is to, in a hex editor, change the MBR Boot Record for that partition and change the value from 0x83 to 0x0B. \n\n### Task 3: Searching Partition Gaps for Hidden Data\nIt seems our suspect not only managed to hide some partitions from the IT staff, but he even might have hidden some data on the partition gaps that are created on the disk, usually when the disk was partitioned.\n\nIf you look at the figure below, we can see that we have XX partition gaps and two unpartitioned spaces:\n\nWalk through these gaps by selecting each one and then scrolling through them, just to take a look at what is there and if you could identify anything useful. If you don't want to do this, then move on with the lab, we will be doing it by using the tools we have.\n\nKnowing that there are gaps in the partition table and hopefully you have seen suspicious remnants, but we are not quite there yet. We need to process the image for unallocated files.\n\nUse photorec tool located in c:\\DFP\\Tools to accomplish this. Open the image in photorec:\n```\nc:\\DFP\\Labs\\Module4\\Lab9>photorec_win.exe c:\\DFP\\Labs\\Module4\\Lab9\\Lab9.001\n```\n\nOnce the output is exported review the output for suspicious files.\n\nCongrats; we found a hidden picture.\n\n\n\nLet us move on to investigate the rest of the partition gaps.\n\nNext we need to use Eric Zimmerman's Bstrings.exe tool [located at C:\\DFP\\Tools\\Utilities] to search for hidden stuff. After downloading the tool, extract the partition gap by saving it for simplicity to the same location of the tool.\n\nUse the command below to do the following:\n\n```\nbstrings.exe -f Gap4\n```\n\nbstrings.exe is the tool we're using, and the \"-f\" option is to select a file for searching, and the file we used is named Gap4 (I named it that way). Make sure to adjust your commands in order to get something like this:\n\n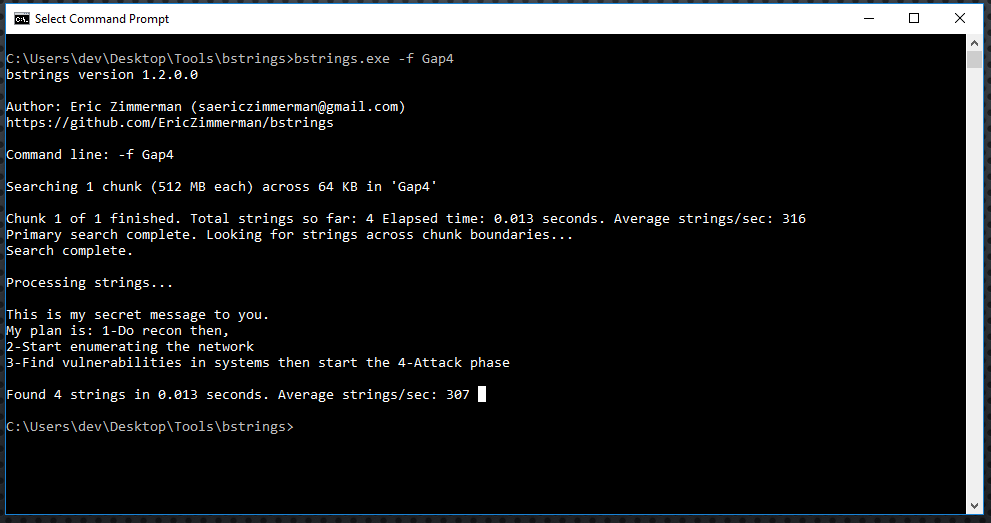\n\nAwesome! We found that he is using these partition gaps to not only hide his maps but even hide his suspicious plans as you can see in the figure above.\n\n## Wrap-Up\n\nCongrats we finished our investigation Successfully!", "solutions_html": "Examine the evidence file named \"[Lab9.001]\" [located at C:\\DFP\\Labs\\Module04\\Lab9\\Lab9.001] using the forensic tool of your choice (Autopsy or MMLS.exe is recommended), which would lead us to the following Please note:\n- I have colored each partition entry in the MBR disk structure\n- You will need to locate and extract TheSluethkit from the C:\\DFP\\Tools\\Windows\\sleuthkit-4.12.0-win32.zip
\n
View the partition in the tool of your choice
\n \n
\n
The output should show you a list of partitions, primary and extended. When examiniing a partition structure they are typicaly continous. The sector stop and the sector start for the next partition should be adjacent to each other, with no missing sectors in between. If you see that sectors are not contimous, then you have what is called a partition gap. This is not normal behavior for partition creation, and is generally intentionally created by a human. Typically the threat actor will use a tool such as fdisk, gparted, or diskpart to manually create and delete partitions--custom picking the sector starts and length.
\nWe definitely can observe some gaps.We now need to figure out how this disk is structured and understand where each partition starts and ends.
\nManually document the partitions. I recommend creating a table. Start with you first partition and take note of the start sector, end sector, length, partition type, and whether or not there is a gap between the previous partition. Look for allocated vs unallocated partition tables.
\nNOTE: Before continuing, take the time to study the partition tables generated by your tool and do the analysis yourself.
\nYou should come up with the following partitions
\n| Partition Number | \nStart Sector | \nEnd Sector | \nLength | \nPartition Type | \nGap Detected | \n
|---|---|---|---|---|---|
| 1 | \n128 | \n204927 | \n204800 | \nLinux (0x83) | \nNo | \n
| 2 | \n205056 | \n409855 | \n204800 | \nWin95 FAT32 (0x0b) | \nYES | \n
| 3 | \n409984 | \n614783 | \n204800 | \nLinux (0x83) | \nYES | \n
| 4 | \n614912 | \n819711 | \n204800 | \nNTFS/exFAT (0x07) | \nYES | \n
| 5 | \n819840 | \n1024639 | \n204800 | \nNTFS/exFAT (0x07) | \nYES | \n
From this, we know that the first partition is after 128 sectors from the beginning of the disk, and its capacity is 204800 sectors. From the menu and using the go to offset button, use it to move 128 sectors.
\nThis will lead us to the first partition holding a FAT32 file system as seen below:
\nNow we see that this partition has 204800 sectors
\nThis should lead us to the following:
\nIf we add the values in the sectors preceding partition #1 (128) with the sectors in the partition (204800), we get 204928, which exactly where the next partition starts.
\nBefore we proceed, if you look at the Partition Type Indicator of the second partition, we notice that it is 0x05, which refers to an extended partition. And since it is an extended partition, I just want to remind you that they use the following MBR structure:
\nEntry Size in Bytes Description\n1 446 Zeros\n2 16 Describe the first partition\n3 16 The location of the next partition\n4 32 Zeros\n5 2 The end of sector marker 55 AA\nTotal 512
\nAnother important note to remember is the last extended partition table will only have one 16 byte entry, and the rest will be zeros. So, we can understand that this is the last logical partition in the extended structure by checking the second entry of the partition table found. If the entry has values, then this is the location of that partition; if it holds only zeros, then we have reached the last partition as we said.
\nContinueing on, if we add the size of sectors we found in the previous step, which was 204800 sectors, we will reach the next extended partition, which will also hold an MBR boot structure. This can be seen below:
\nThe beginning of the sector has all zeros as we expected, and then we see that there are also 128 sectors before we reach the first partition. Please remember that this is a relative offset and not one calculated from the beginning of the disk. Also, note the size of the disk is 204800 sectors. So, let us do this again, add 128 sectors to our current position. This would take us to the first partition, and then from there add the size 204800 sectors to go to the next partition.
\nNote: since the second partition entry is not zero, it means there are still some partitions on this disk.
\nAs we see below, we got a partition holding an NTFS file system:
\nAdding its size would lead us to the next partition, so let us do that.
\nAs expected, we reached another extended MBR Boot Record.
\nSo the partition is also after 128 sectors and its size is 204800 sectors, plus we still have other partitions to follow, because the second partition table is not empty (zeros). Let's continue. Now we reach another NTFS file system.
\nAdding the size of it should lead us to another MBR partition.
\nNow this time notice the first partition is after 128 sectors as we saw in all partitions we went through since the beginning, and the size of it is the same too. But, take a closer look at the second partition entry, it is empty and filled with zeros, which means we reached the end of the partitions on this disk.
\nLet us create a summary of findings using the table below to answer the questions that were required from us (Report back the starting sector, size and type of each partition found.):
\n| Partition # | \nStarting Sector | \nSize in Bytes | \nType ID / Name | \n
|---|---|---|---|
| 1 | \n128 | \n104857600 | \n83 / Linux | \n
| 2 | \n205056 | \n104857600 | \n0B / FAT32 | \n
| 3 | \n409984 | \n104857600 | \n83 / Linux | \n
| 4 | \n614912 | \n104857600 | \n07 / NTFS | \n
| 5 | \n819840 | \n104857600 | \n07 / NTFS | \n
[Note:] if you are asking yourself from where or how did we calculate the starting sector of each partition relative to the beginning of the disk, all you need to do is the following:
\nA) Partition #1 = Preceding Sectors Value (128)
\n= 128
\nB) Partition #2 = Value found in (A) + Preceding Sectors Value (128) + Size (204800)
\n= 128 + 128 + 204800 = 205056
\nC) Partition #3 = Value found in (B) + Preceding Sectors Value (128) + Size (204800)
\n= 205056 + 128 + 204800 = 409984
\nD) Partition #4 = Value found in (C) + Preceding Sectors Value (128) + Size (204800)
\n= 409984 + 128 + 204800 = 614912
\nE) Partition #3 = Value found in (D) + Preceding Sectors Value (128) + Size (204800)
\n= 614912 + 128 + 204800 = 819840
\nAnd that's it; we managed to parse the whole disk, even though it was using a somehow complicated disk structure.
\nNow if you go back to the partition table in Autopsy in task #1, you can see that we found Linux partition types. If you examine the findings you will see that autopsy identifies the partition as \"0x83 Linux\". This is from reading the partition table. However, when you click on the partition, it looks like a Windows volume. This is clearly not a linux file system! If you right click and select File System details, autopsy identifies it as a FAT32 partition. If you right click the partition and select \"View in a New Window\", the hexadecimal data confirms the signature of an FAT32 partition.
\nIn our table partitions, #1 and #3 are reported as Linux, while in the figure above we see that the first is a FAT32 partition, and the third is an NTFS partition. The type of partition is found in the partition entry of each MBR boot record. So, let us locate the entry for the first partition. We already did this in the previous task, so it would be easy to locate the partition entry now by you.
\nAs we can see, the entry shows a 0x83 Linux partition, but when we look at the content of the partition we find that is not true.
\nSo, it seems the employee is modifying this byte, so the Windows system is unable to recognize its existence! If we were to write the byte back to 0x0B which refers to a FAT32 file system, windows would recognize and mount the file system.
\nLet's check the third partition, which was also identified in its partition table as a Linux partition. Go to the partition itself to check its content. We are supposed to find that it is a linux partition. However, it clearly has the structure of NTFS, which means this is an NTFS partition, and even though the employee changed it from the partition table entry, forensic tools such as Autopsy correctly identify the volume.
\nLet us verify that by exploring the content as we did previously
\nAs we can see here again, the contents are fully displayed, which means we were right with our hypothesis about what happened here too.
\nNow, all we would need to do is to, in a hex editor, change the MBR Boot Record for that partition and change the value from 0x83 to 0x0B.
\nIt seems our suspect not only managed to hide some partitions from the IT staff, but he even might have hidden some data on the partition gaps that are created on the disk, usually when the disk was partitioned.
\nIf you look at the figure below, we can see that we have XX partition gaps and two unpartitioned spaces:
\nWalk through these gaps by selecting each one and then scrolling through them, just to take a look at what is there and if you could identify anything useful. If you don't want to do this, then move on with the lab, we will be doing it by using the tools we have.
\nKnowing that there are gaps in the partition table and hopefully you have seen suspicious remnants, but we are not quite there yet. We need to process the image for unallocated files.
\nUse photorec tool located in c:\\DFP\\Tools to accomplish this. Open the image in photorec:\n
c:\\DFP\\Labs\\Module4\\Lab9>photorec_win.exe c:\\DFP\\Labs\\Module4\\Lab9\\Lab9.001Once the output is exported review the output for suspicious files.
\nCongrats; we found a hidden picture.
\n
Let us move on to investigate the rest of the partition gaps.
\nNext we need to use Eric Zimmerman's Bstrings.exe tool [located at C:\\DFP\\Tools\\Utilities] to search for hidden stuff. After downloading the tool, extract the partition gap by saving it for simplicity to the same location of the tool.
\nUse the command below to do the following:
\nbstrings.exe -f Gap4bstrings.exe is the tool we're using, and the \"-f\" option is to select a file for searching, and the file we used is named Gap4 (I named it that way). Make sure to adjust your commands in order to get something like this:
\n
Awesome! We found that he is using these partition gaps to not only hide his maps but even hide his suspicious plans as you can see in the figure above.
\nCongrats we finished our investigation Successfully!
", "flags": [], "min_points_to_pass": null, "access_type": "default", "user_status": "unstarted", "user_lab_status": null, "user_status_modified": null, "user_flags": [], "global_running_session": null }