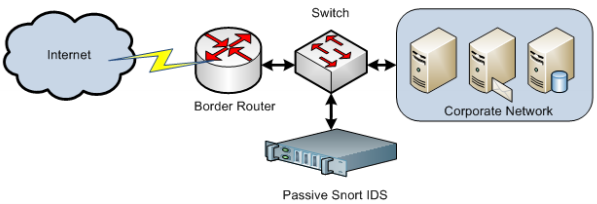
 - Passive IDS
 - NIDS
The organization you work for is considering deploying Snort to enhance its traffic inspection capabilities. Your IT Security manager tasked you with thoroughly analyzing Snort's capabilities. He also provided you with PCAP files containing malicious traffic, so that you can experiment with writing Snort detection rules.
A test instance of Snort has already been set up and waiting for you!
The learning objective of this lab is to not only get familiar with the detection capabilities of Snort but to also learn effective writing of Snort rules.
Specifically, you will learn how to use Snort's capabilities in order to:
Have better visibility over a network
Respond to incidents timely and effectively
Proactively hunt for threats
Snort is an open source IDS and IPS, that can also be used as a packet sniffer or packet logger. Just like Suricata, Snort inspects all traffic on a link for malicious activity and can extensively log all flows seen on the wire, producing high-level situational awareness and detailed application layer transaction records. It needs specific rules (holding instructions) to tell it not only how to inspect the traffic it looks at but also what to look for. It was designed to perform on commodity and purpose-built hardware.
The most important Snort features and capabilities are:
Deep packet inspection
Packet capture logging
Intrusion Detection
Network Security Monitoring
Anomaly Detection
Multitenancy
IPv6 and IPv4 support
Common Snort operation modes:
Snort high-level architecture:
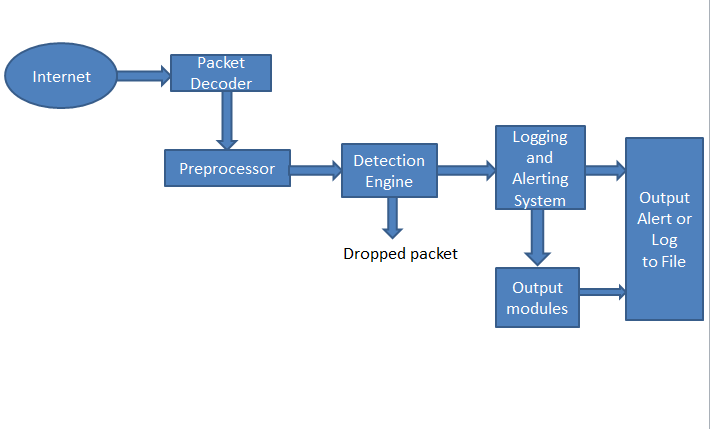
For Snort to evolve from a packet sniffer into a full-fledged IDS, some components had to be added. These components were the Preprocessor, the Detection Engine, the Logging and Alerting System, and the various Output modules.
The packet sniffer (including the Packet Decoder), as its name suggests, "sniffs" network traffic and identifies each packet's structure (layer information). The raw packets that have been "collected" are then sent to the Preprocessors.
The Preprocessors determine the type or the behavior of the forwarded packets. Inside Snort, there are numerous Preprocessor plugins. An example of such a plugin is the HTTP plugin which is responsible for identifying HTTP-related packets. Another example is the *sfPortscan Preprocessor that, armed with defined protocols, types of scans and certain thresholds, can identify a group of packets as a port scan attempt. Once the Preprocessors cease their operations, information is sent to the Detection Engine.
Preprocessors are configured through Snort's configuration file snort.conf. Example:
    preprocessor sensitive_data: alert_threshold 25 \
    mask_output \
    ssn_file ssn_groups_Jan10.csv
The Detection Engine is responsible for comparing each packet with each Snort rule (from a predefined rule set). In case of a match, information is sent to the Logging and Alerting System.
The Logging and Alerting System as well as the various Output modules are responsible for logging or triggering alerts based on each rule action. Logs are stored in different formats (most of the times syslog or unified2) or directly into a DB. Output modules are configured through Snort's configuration file *snort.conf. Example:
    output alert_syslog: host=192.168.2.10:514, <facility> <priority> <options>
    output alert_syslog: host=192.168.2.10:514, log_auth log_alert log_ndelay
In the case of syslog being used, alerts will be visible in /var/log/message.
Snort directory structure:
All Snort-related directories are usually under /opt/snort and are structured similarly to the following.
.
|-- admin
|-- bin
|-- etc
|-- lib
|-- preproc_rules
|-- rules
|-- share
|-- so_rules
`-- src
In the context of this lab, we will use Snort from inside a Security Onion distribution. Security Onion has its own Snort directory structure.
Snort rules:
Snort rules are very much like Suricata rules. They consist of two major parts, the rule header, and the rule options. Examples:
action protocol src_addr src_port direction dst_addr dst_port Options
alert tcp any any -> any 21 (msg: "FTP Traffic";)
The part in bold is the header whereas the remaining part is options.
Even though Snort rules are similar to Suricata rules. Dedicate some time to study Snort rule writing from the following resource: http://manual-snort-org.s3-website-us-east-1.amazonaws.com/node27.html
The latest Snort rules can be downloaded from snort.org or the Emerging Threats website. Remember that the location of the rules can be specified in the snort.conf file. Example:
include $RULE_PATH/backdoor.rules
As a callout, when you download Snort rules, the filenames contain the Snort version, so download files that are relevant to your Snort installation. Also, note that there is also a local.rules file where you can put your own rules in it.
Snort logs:
Snort's default log directory is /var/log/snort, but as previously mentioned we can instruct Snort (via a command line switch of from inside snort.conf) to log in any directory.
Testing Snort:
To quickly test if a Snort installation is working or not, try executing the commands below.
sudo snort -dev -i ens5 //Runs Snort in packet dump mode
or
sudo snort -c /etc/snort/snort.conf -l . -i ens5 //Runs Snort in IDS mode using the specified configuration file (-c) and logging at the specified location (-l)
Snort configuration:
The snort.conf is the main configuration file of Snort. Its typical location is in the /opt/snort/etc directory. snort.conf contains the following sections.
Set the network variables
Configure the decoder
Configure the base detection engine
Configure dynamic loaded libraries
Configure preprocessors
Configure output plugins
Customize your rule set
Customize preprocessor and decoder rule set
Customize shared object rule set
Examples of variable assignment within snort.conf:
ipvar HOME_NET [192.168.0.0/16,10.0.0.0/8,172.16.0.0/12]
ipvar EXTERNAL_NET any
ipvar DNS_SERVERS $HOME_NET
ipvar SMTP_SERVERS $HOME_NET
ipvar HTTP_SERVERS $HOME_NET
portvar HTTP_PORTS [80,81,311,383,591,593,901,1220,1414,1741,1830,2301,2381,2809,3037,3128,3702,4343,4848,5250,6988,7000,7001,7144,7145,7510,7777,7779,8000,8008,8014,8028,8080,8085,8088,8090,8118,8123,8180,8181,8243,8280,8300,8800,8888,8899,9000,9060,9080,9090,9091,9443,9999,11371,34443,34444,41080,50002,55555]
var RULE_PATH /etc/snort/rules
var SO_RULE_PATH /etc/snort/rules
var PREPROC_RULE_PATH /etc/snort/rules
Take some time to read the comments inside the snort.conf file, they are quite enlightening.
Another interesting Snort configuration file is the classification.config file. This file is used to set the priority of alerts, and it is included inside snort.conf.
Format: config classification:shortname,short description,priority
Example: config classification: unknown,Unknown Traffic,3
All provided PCAPs are inside the /root/Desktop/PCAPs directory.
Below, you can find solutions for every task of this lab. Remember though, that you can follow your own strategy, which may be different from the one explained in the following lab.
Snort's default snort.conf contains the 172.31.5.101/20 subnet inside the HOME_NET variable. Change it to 192.168.1.0/24 so we can use HOME_NET variable.
 Updated snort.conf
Once you are connected to the deployed Snort instance, you can introduce a new Snort rule as follows.
vim /etc/snort/rules/local.rulesInside vim enter the following rule that is able to detect an ICMP Echo request (ping) or Echo reply message.
alert icmp any any -> $HOME_NET any (msg: "ICMP test"; sid:1000001; rev:1; classtype:icmp-event;)alert - Rule action. When the specified condition is observed on the wire, Snort will throw an alert.
any - Source IP. Snort will consider all source addresses.
any - Source port. Snort will consider all source ports
-> - Indicates directionality.
$HOME_NET - Destination IP. We are leveraging the HOME_NET variable specified in the snort.conf file.
any - Destination port. Snort will consider all ports of our network.
Rule Options
msg:"ICMP test" - Message that will accompany the alert.
sid:1000001 - Snort rule ID. Remember all IDs smaller than 1,000,000 are reserved.
rev:1 - Revision number.
classtype:icmp-event - Used for rule categorization.
You can the update snort rule as follows

In previous version we needed to use a command rule-update to update the rules but non need here.
We will be using command line, which will output any alerts on the standard output.
cd PCAPs
snort -q -A console --daq pcap -c /etc/snort/snort.conf -r icmp.pcap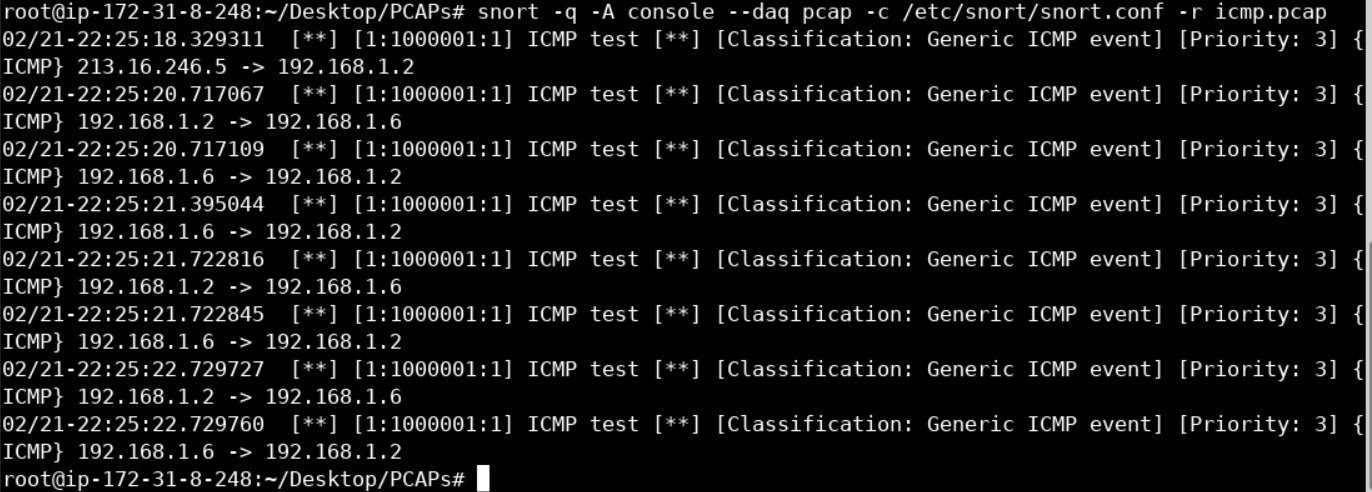
Let's start our analysis by executing tcpdump as follows.
cd PCAPs
tcpdump -nnttttAr eternalblue.pcap
-nn is used so that tcpdump doesn't resolve hostnames or port names
-tttt is used so that we are provided with the maximal human-readable timestamp output
-A is used so that tcpdump prints each packet (minus its link level header) in ASCII
Starting from the bottom up, you should see something similar to the below image.
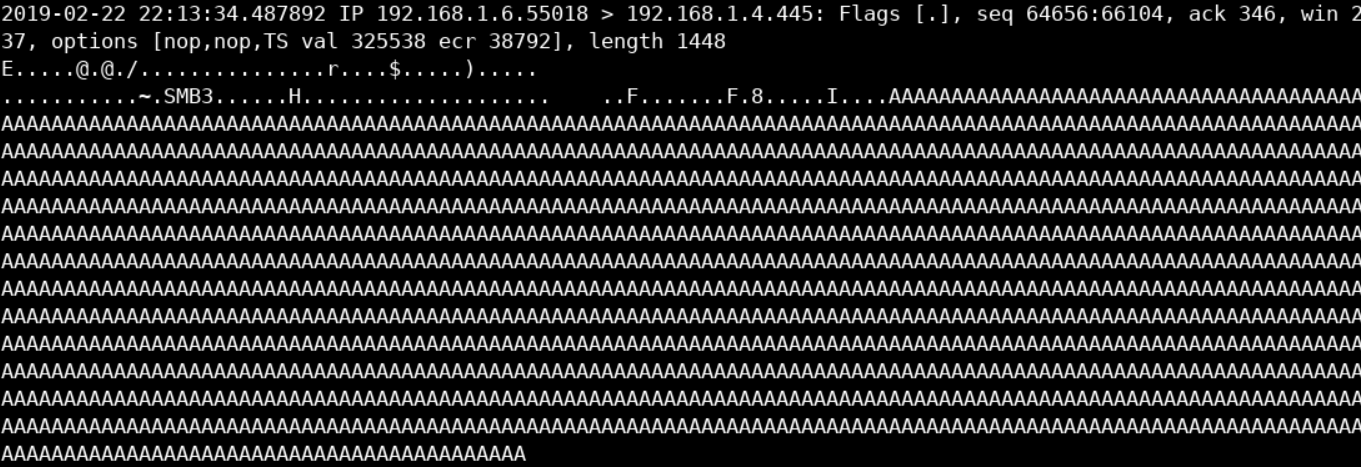
The above looks quite similar to what you saw inside the included cert_trafficwireshark.pdf resource in the 6. FOLLOW TCP STREAM section. In this case, the buffer overflow attempt happens over SMB (notice the 445 port). Let's use this buffer overflow-related portion of the traffic to create our rule.
We can do that as follows.
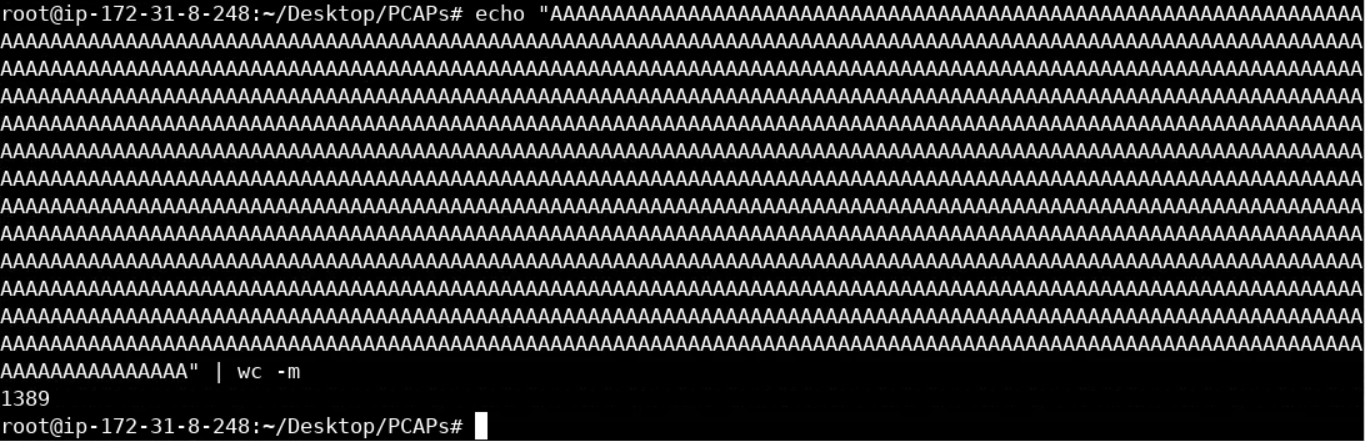
echo "copy-paste all the As here" | wc -mYou should see the below.
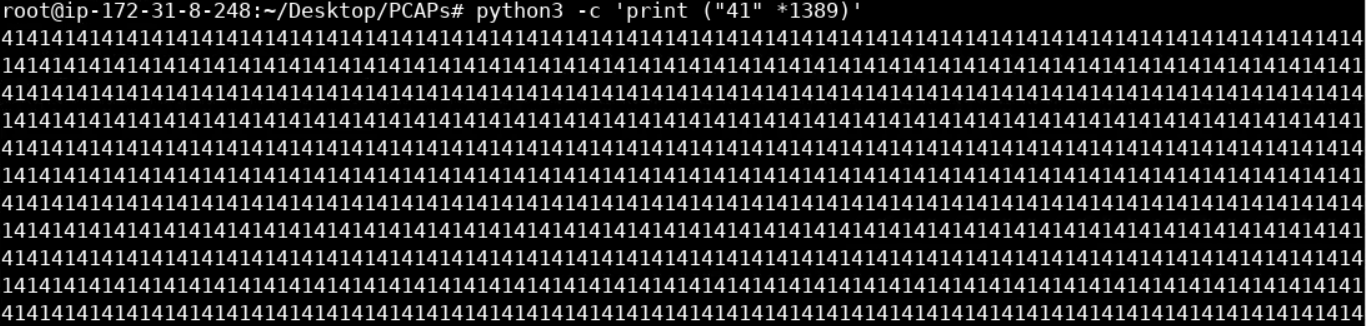
It is more efficient to specify the rule content in hex. Let's turn the above into hex as follows (A is 41 in hex).
python3 -c 'print ("41" * 1389)'You should see the below.
Now, copy all the 41s.
Finally, create a Snort rule that will detect buffer overflow attempts (in this case over SMB), as follows.
vim /etc/snort/rules/local.rulesInside vim enter the below.
alert tcp $EXTERNAL_NET any -> $HOME_NET 445 (msg:"Buffer overflow activity over SMB"; content:"|paste all 41s here|"; sid:1000002; rev:1;)You should see something similar inside the local.rules file.

Let's put the rule above to the test, as follows.
snort -q -A console --daq pcap -c /etc/snort/snort.conf -k none -r eternalblue.pcap-k is used to disable Snort's entire checksum verification subsystem
You should see something similar to the below image.

So far, we wrote a rule that detects buffer overflow attempts on the wire (in this case over SMB).
Let's continue our analysis by executing tcpdump as follows, in order to search for a traffic portion that is related to the attacker obtaining Windows shell access.
cd PCAPs
tcpdump -nnttttAr eternalblue.pcap
Starting from the bottom up, you should see something similar to the below image.

The above is a unique enough traffic portion we can use to write a Snort rule that can detect Windows (7) shell access on the wire; this is actually what we see if the execute cmd.exe inside a Windows 7 machine.
Let's create a Snort rule that will detect Window (7) shell access on the wire, as follows.
vim /etc/snort/rules/local.rulesInside vim enter the below.
alert tcp $EXTERNAL_NET any -> $HOME_NET any (msg:"Microsoft shell access detected."; flow:established; content:"Copyright |28|c|29| 2009 Microsoft Corporation"; sid:1000003; rev:1;)Let's put the rule above to the test as follows.
snort -q -A console --daq pcap -c /etc/snort/snort.conf -k none -r eternalblue.pcapYou should now see something similar to the below image.

By reading the "A technical view of theOpenSSL Heartbleed vulnerability" resource, it is clear that we need to focus our attention on any Heartbeat-related traffic.
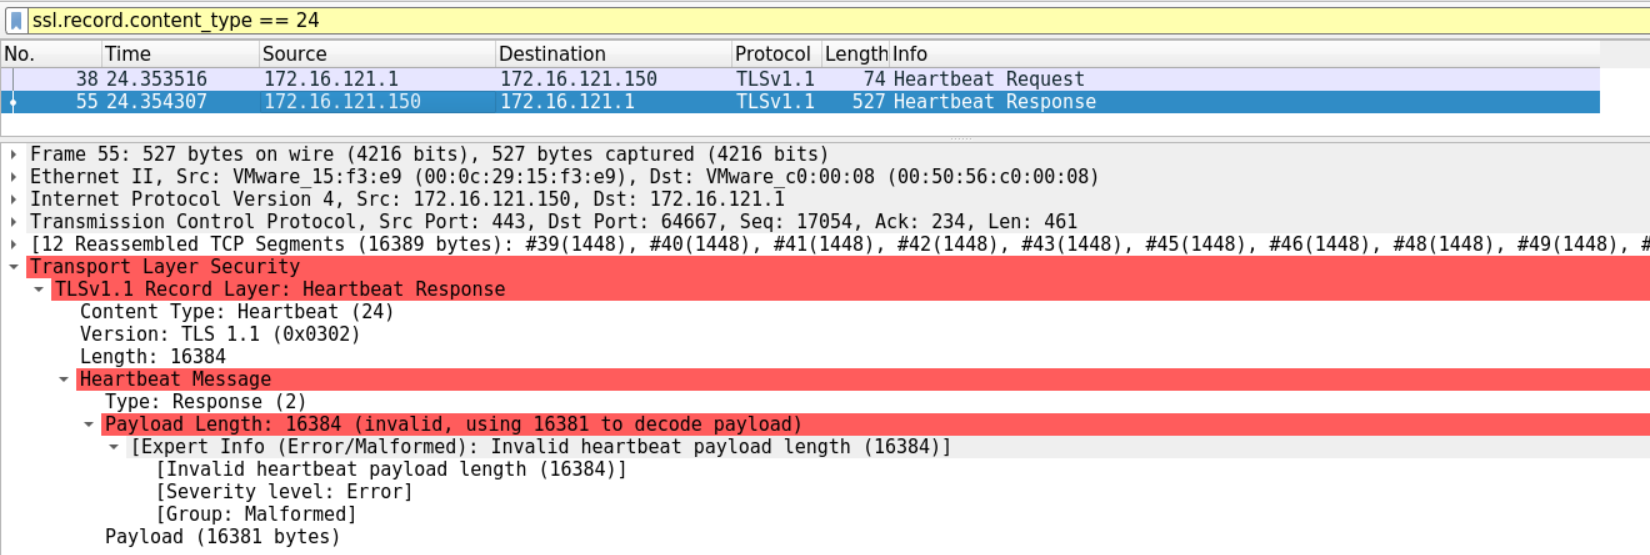
Let's open heart.pcap in Wireshark and filter the traffic in order to see only encrypted Heartbeat messages. We can do that as follows.
ssl.record.content_type == 24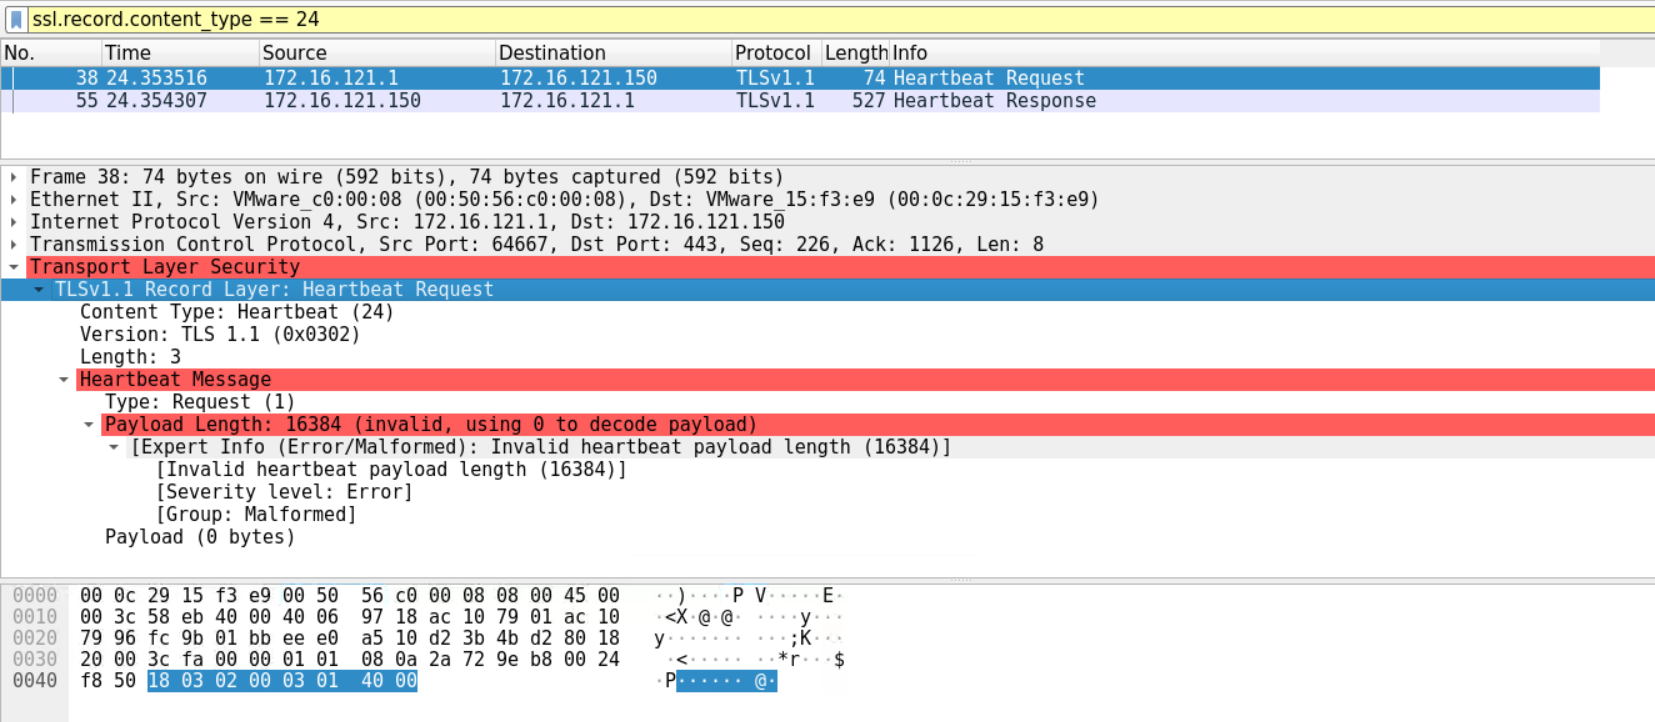
If you look carefully enough, 40 00 is the equivalent of 16384 in decimal. Specifically, the attacker specified that the payload length is 16384 bytes, but no additional data were actually sent. According to the Heartbleed vulnerability, if the server is vulnerable, it should send more data than it typically should.
This is the case because the Heartbeat response is 16384 bytes long.
We can create an unreliable Snort rule based on the Heartbeat request above, as follows.
vim /etc/snort/rules/local.rulesalert tcp $EXTERNAL_NET any -> $EXTERNAL_NET 443 (msg:"Potential Heartbleed attack"; flow:to_server,established; content:"|18 03 02 00 03 01 40 00|"; rawbytes; isdataat:!1,relative; sid:1000004; rev:1;)Let's put the rule above to the test as follows.
snort -q -A console --daq pcap -c /etc/snort/snort.conf -k none -r heart.pcap
The rule above is unreliable because it is constructed to match the exact Heartbeat request in the PCAP. The attacker could specify a payload length different than 16384 bytes and also use another TLS version.
For this reason, we can create a more reliable Snort rule that detects suspiciously large Heartbeat responses, as follows.
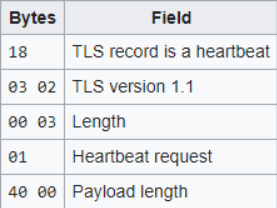
alert tcp $EXTERNAL_NET any -> $EXTERNAL_NET 443 (msg:"Potential Heartbleed attack - Response-based"; flow:to_server,established; content:"|18 03|"; rawbytes; depth:2; byte_test:1, &, 3, 0, relative; byte_test:2, >, 200, 3, relative, big; sid:1000005; rev:1;)byte_test:1, &, 3, 0, relative;
relative: Use an offset relative to the last pattern match
0: Start from the first position within the packet (first byte)
1: The number of bytes to take from the position "0" (first position)
&: Perform a binary "bitwise AND" operation to test the value
3: Value to test the converted value against
big: Process data as big endian (default)
The first byte_test is related to the TLS version used, whereas the second byte_test checks if the length is suspiciously large. Refer to the below image to comprehend which bytes are being checked. The first byte_test checks the "02" of the TLS Version 1.1 field, whereas the second byte_test checks the "00 03" of the Length field.
IF you run the snort command you will be asking why snort is not showing output for any default heart bleed rule. This is because we have don't have the destination ip of this pcap packet on our HOME_NET that's why it's not detecting the vulnerability.
We can now add the IP to our HOME_NET see below

Also updating our rule with HOME_NET variable
alert tcp $EXTERNAL_NET any -> $HOME_NET 443 (msg:"Potential Heartbleed attack - Response-based"; flow:to_server,established; content:"|18 03|"; rawbytes; depth:2; byte_test:1, &, 3, 0, relative; byte_test:2, >, 200, 3, relative, big; sid:1000005; rev:1;)Let's put the rule above to the test as follows.
snort -q -A console --daq pcap -c /etc/snort/snort.conf -k none -r heart.pcap
This PCAP was taken from: https://asecuritysite.com/forensics/snort.
Let's break down the rule below.
alert tcp $EXTERNAL_NET any -> $HOME_NET 445 (msg:"NETBIOS SMB-DS DCERPC LSASS DsRolerUpgradeDownlevelServer exploit attempt"; flow:to_server,established; flowbits:isset,netbios.lsass.bind.attempt; content:"|FF|SMB"; depth:4; offset:4; nocase; content:"|05|"; distance:59; content:"|00|"; within:1; distance:1; content:"|09 00|"; within:2; distance:19; classtype:attempted-admin; sid:2514; rev:7;)alert tcp $EXTERNAL_NET any -> $HOME_NET 445 describes the action that will take place in case of a signature match. Traffic should be TCP-based for the alert to be triggered. The rest should be easy for you to comprehend.
msg:"NETBIOS SMB-DS DCERPC LSASS DsRolerUpgradeDownlevelServer exploit attempt"; is the message that will appear inside the alert, in case the signature was matched.
flow:to_server,established; only packets towards the remote host will be taken into consideration. A connection should, of course, be established beforehand.
flowbits:isset,netbios.lsass.bind.attempt; *flowbits* is Snort's way of identifying conditions that occurred in previous traffic. In this case, a NetBIOS connection and an attempt to connect and bind to the LSASS process should have already occurred.
content:"|FF|SMB"; depth:4; offset:4; nocase; instructs Snort to match the |FF| hex value and the |SMB| value. offset is used so that Snort knows how far into the packet it should look for the content. In this case, Snort will start looking after the first four bytes of the payload. depth is used so that Snorts analyzes the first four bytes only. nocase instructs Snort to search regardless of capitalization.
content:"|05|"; distance:59; Snort will start searching for |05| 59 bytes after the previous content's (|FF|SMB) position.
content:"|00|"; within:1; distance:1;the same as above but 1 byte after the position where |05| (the previous content) was found. within means that there can be 1 byte between the previous content (|05|) and the new content (|00|).
content:"|09 00|"; within:2; distance:19; instructs Snort to start looking for the specified content 19 bytes after the position where the previous content (|00|) was found. There can also be 2 bytes between the last two contents.
classtype:attempted-admin; classtype is Snort's way of categorizing attacks. In this case, the attack is related to an attacker attempting to obtain administrator-level access.
sid:2514; rev:7; sid is this rule's Snort identification number, while rev is the number of the revision this rule has undergone.
Snort Resources: