Helpful Hints about INE’s virtual lab environment:
Lab Notes:
-
On all IOS devices (routers and switches) load the preconfiguration file from flash: memory titled, “Lab-4-Begin”.
-
Once you perform the step above the following will be preconfigured for you:
- All IPv4 addressing on devices other than PCs as shown in the IPv4 addressing chart
- Telnet will be preconfigured on R1 and R2
- VLANs and 802.1q VLAN Trunks
- Router interfaces will be administratively up.
- Devices will have pre-configured Enable passwords of “cisco”
If you get stuck at any point during this lab and wish to view the Lab Solution, load the pre-configuration file (on any IOS device) named, “Lab-4-Solution” from flash memory.
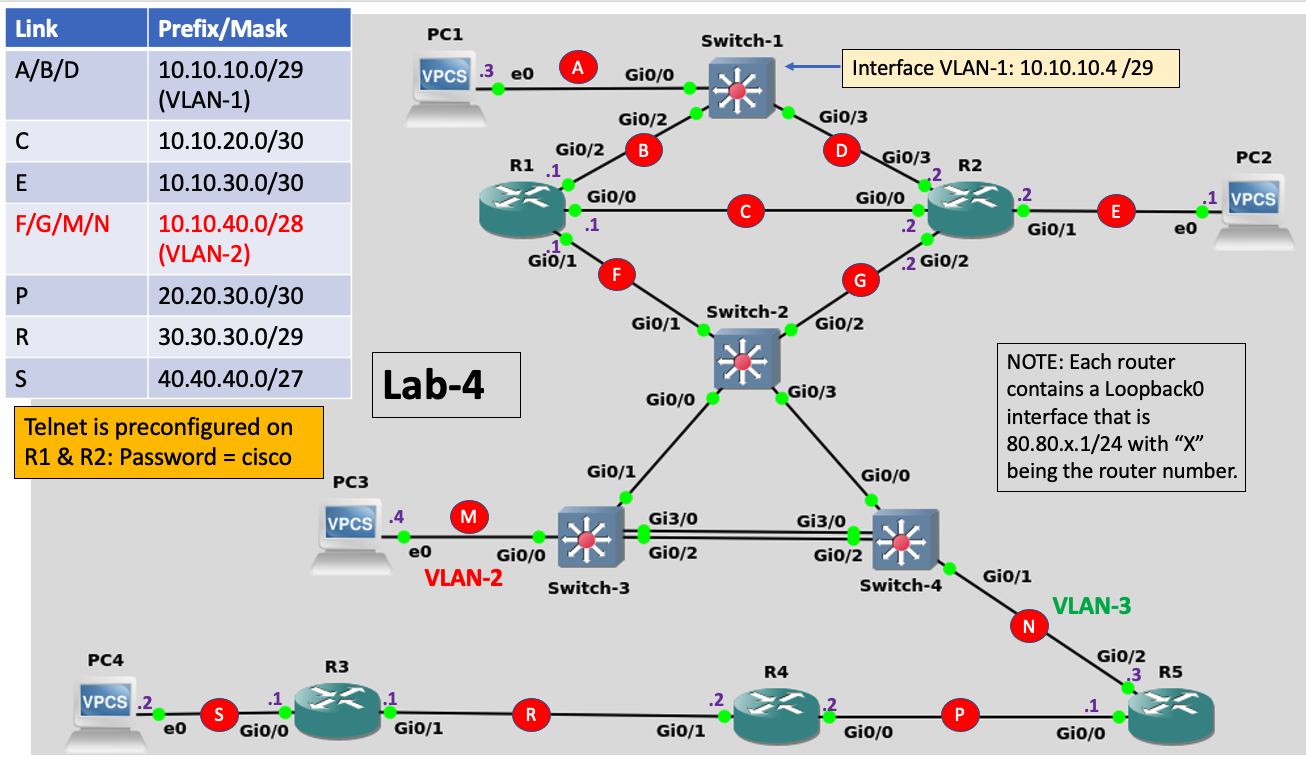
NOTE: Please notice there has been an IPv4 addressing change for links F, G, M and N in this lab. They are now all in the same network.
Hot Standby Router Protocol (HSRP) Tasks
-
In all routers and switches, load from flash memory the saved configuration file titled, “Lab-4-Begin”.
-
onfigure PC3 with the static IPv4 address and mask of 10.10.40.4/28 and a default gateway of 10.10.40.1 (R1).
-
From PC3 ensure you can ping Switch-1 at 10.10.10.4
-
Begin your pings again from PC3 to Switch-1 but this time using the “-t” switch so that the pings will continue until you interrupt them with the “Control-C” command
Ping 10.10.10.4 -t
-
While PC3 is pinging Switch-1, what do you think would happen if, in router R1, you shutdown interface Gig0/1? Try it?
- What affect did this action have on your pings from PC3 to Switch-1?
- Re-enable Gig0/1 in router R1.
- Stop your pings on PC3
-
Configure HSRP on routers R1 and R2 using the following parameters:
- HSRP should be activated on the following interfaces:
- The HSRP Group number should be “8”
- The HSRP virtual IP address should be the last available host address in the prefix allocated for these two interfaces.
-
Using the IOS “show standby” command, identify which router (R1 or R2) became the HSRP Active router.
-
Login to the router that is currently operating as HSRP Standby and force this router to become the HSRP Active router. You may not disable any links or reload any routers to accomplish this task.
-
Configure PC3 with the static IPv4 address and mask of 10.10.40.4/28 and a default gateway of the HSRP Virtual IP address you configured in the previous step.
-
Start a continuous ping again from PC3 to Switch-1 (10.10.10.4).
-
Login to your HSRP Active Router that was configured in Step-8.
- Shutdown the interface on your HSRP Active router that connects downstream to Switch-2 while simultaneously monitoring the continuous pings from PC3.
- Were any of your pings lost when you shutdown that router’s interface?
- If any of them WERE lost, did the pings resume again at any point? How long did it take?
-
With the continuous pings still going from PC3 to Switch-1, re-enable the router’s interface that you shutdown in the previous step.
-
Once you re-enabled the router’s interface were your pings interrupted at all?
Solutions
Lab solutions are stored as viewable (and loadable) named configuration files stored in Flash memory on each device. To view the Lab Solution, login to any IOS device in your topology (Routers or Switches) and issue the following command:
    Router>enable
    Router#more flash:Lab-4-Solution
    !
    version 15.9
    service timestamps debug datetime msec
    service timestamps log datetime msec
    no service password-encryption
    !
    hostname R1
    !
    boot-start-marker
    [SNIP]
To Load** the solution configuration onto your device follow the procedure below. Please NOTE that **this procedure will completely erase your current configuration file and overwrite it with the solution configuration file:
    Router-1#configure replace flash:Lab-4-Solution
    This will apply all necessary additions and deletions
    to replace the current running configuration with the
    contents of the specified configuration file, which is
    assumed to be a complete configuration, not a partial
    configuration. Enter Y if you are sure you want to proceed. ? [no]: yes

    *Jul 29 19:10:01.921: Rollback:Acquired Configuration lock.
     WARNING: Command has been added to the configuration using a type 0 password. However, type 0 passwords will soon be deprecated. Migrate to a supported password type

    *Jul 29 19:10:04.061: %AAAA-4-CLI_DEPRECATED: WARNING: Command has been added to the configuration using a type 0 password. However, type 0 passwords will soon be deprecated. Migrate to a supported password type

    *Jul 29 19:10:05.067: %LINEPROTO-5-UPDOWN: Line protocol on Interface Loopback0, changed state to up
    Total number of passes: 1
    Rollback Done

    R1#